Photoshop Selective Color Tutorial | Beginner's Tutorial
Here I will teach you how to use the Selective Color tool in Adobe Photoshop. For more videos please visit www.TheArtofRetouching.com
Photoshop Tutorial – Selective Color Adjustment Layer
elective Color is the go-to tool for simple color correction. Little need for masking, and no confusing RGB sliders. You just need someone to give you a little direction, and you will find how easy this tool can be.
As with the other Adjustment Tools, you can find it with the Adjustments Palettee, which is found within Window – Adjustments. The second way is at the bottom of the Layers Palette, with the Black and White Circle icon for New Adjustment Layers. Lastly, it’s also in Layer – New Adjustment Layer – Selective Color.
Adjustments and Destructive Changes (Bad)
Once again, what’s not recommended is to go to Image – Adjustments – Selective Color, because any changes you make here are made on your original background image layer, making all changes permanent. We wouldn’t want that when we’re all about non-destructive editing.
Once you’ve chosen a method from the first three options, it will now open up the Properties palette for the Selective Color tool.
Using the Selective Color Properties Palette
On the Properties Palette, you will see a dropdown where you can choose the color you want to make changes to: Reds, Yellows, Greens, Cyans, Blues, Magentas, Whites, Neutrals, Blacks.
If you choose Red, you will affect areas of the image that are red, Yellows for yellow areas, and so on.
Let’s say you have Reds selected. Notice that there are sliders for Cyan, Magenta, Yellow, and Black. When you adjust these sliders, you adjust the Hue of colors in your image, based on the color range previously selected.
For instance, if you selected Reds, and you hiked up the Magenta slider to 100%, what happens is that the Reds from all the flesh tones (and other red areas) get boosted up to give the image a pinkish hue. But because we picked Reds, it will not affect the Yellow, Blue or Green colors.
Now that you know how each color affects your image, you can play around with the adjustments until you get your desired effect. This powerful tool allows you to isolate specific colors without making any complicated Masks. Just remember that the colors work the same way that paints do: combine magenta and yellow to get orange, mix cyan and yellow to get green, or cyan and magenta for purple. Remember back to when you were seven years old. It works the same way.
Working with Tonal Range
If you think of your image as a grayscale image, you can use the Selective Color tool in Black, White, and Neutral Gray’s. In case you have Whites selected and you boost up the Magenta slider, it will only affect the Highlight areas in your image.
With Neutrals selected, the sliders will pretty much affect everything in your image. This is especially useful with Masking techniques, because it gives you more control over the general tones, and and the Masking is what controls the colors selected. This is more advanced, but that’s how it works.
Видео Photoshop Selective Color Tutorial | Beginner's Tutorial канала The Art of Retouching Studio
Показать
Комментарии отсутствуют
Информация о видео
3 октября 2014 г. 6:16:50
00:06:22
Другие видео канала
 Smart Objects and Smart Filters - Photoshop Tutorial
 What is the Bit Depth of an Image? | Image Bit Depth Explained | 8-Bit vs. 16-Bit
 Adjustment Layers - Photoshop Tutorial
 Info Palette | Photoshop Beginner's Tutorial
 Magic Wand - Quick Selection Tool | Photoshop Tutorial
 Color Range for Masking - Photoshop Tutorial
 Smart Objects and Smart Filters for Photoshop
 How to Succeed as a Freelancer – Part 1 | Self Employment for Beginners
 Photoshop Tutorial - Palettes Preview
 Adobe Camera Raw's Output Options - Photoshop Tutorial
 How to Succeed as a Freelancer Part 2 | Self Employment for Beginners
 How to Succeed as a Freelancer Part 3 | Self Employment for Beginners
 Photoshop Tutorial | DIfference among JPG & RAW Files
 Photoshop Tutorial -- What Are JPGs?
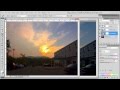 Digital Fundamentals - RAW vs. JPEG
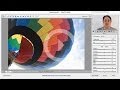 Photoshop Raw Tutorial | RAW File Format
 Navigator Palette, Hand & Zoom Tools | Photoshop Beginner's Tutorial
 Behind the Retouching | John Ross - Celestial
 Adobe Camera Raw Adjustments - Photoshop Tutorial
 Pictocolor iCorrect EditLab 6 Review
 Digital Fundamentals - Tonal Range, Levels and Curves