Adobe Camera Raw Adjustments - Photoshop Tutorial
www.TheArtofRetouching.com - This Photoshop tutorial teaches you how to isolate certain areas of a photo using Local Adjustments in Camera Raw. Does one cheek of your model look a little too flushed? Is a particular part of the leg covered in unnecessary shadows? You can make your changes specifically to that section alone, without affecting the other areas of your image.
Basics of local adjustments
Let's say you are editing a photo where you've properly adjusted the exposure, shadows, vibrance and whatnot. You might think the picture looks okay, but it seems something is still a little off. In a subject model, there are times when the elbows seem a little too yellowish, or the eyes become a bit too shadowed. It can be difficult to adjust these simply by using the sliders, so here's where the local adjustments come in.
Essentially, our goal is to isolate only the elbow or the eye in order for us to make changes to it without damaging the rest of the picture. In the tool palette at the top part of Camera Raw, you will see the "Adjustment Brush" icon. Once you click that icon, you'll notice that your palette has changed into something similar to before, with the exception of the Blacks and Whites being removed and the values being preset. These values are preset from your previous adjustments, just in case you are working on something similar to your previous task.
If you want to start from scratch, you can always reset all the values to zero, but note that you'll get an error message once you click on your photo. Don't be alarmed; you just need to at least have a value for any one of those adjustment sliders so that you can continue.
Now that you're in control of your adjustment brush, a quick tip to enlarge or reduce your brush is to press the left bracket key on your keyboard to make your brush smaller, and the right bracket key to make it bigger. You can also adjust the feathering of your brush by holding down the Shift key along with the corresponding brackets.
Applying local adjustments
Let's go back to your model's eye that you want to adjust. Choose a random slider and add a value just so you can use your brush. Make your brush smaller and paint over that eye that you want to edit. What you've done is that you've effectively placed a mask over the eye which means that you can make your adjustments here without affecting the other parts of your image. Looking at your palette, you can see that you can Add to your existing mask or Erase it. Simply click on that pin that appeared after applying your mask and click "Add" or "Erase" in case you made a mistake with your mask. You can always see the actual mask that you've created by ticking the "Show Mask" box in your palette.
After you've applied the mask to your liking, you can now reset the value of that random slider you used to zero, and then start making your actual adjustments. Do you want to add exposure? Remove shadows? Find what works for you until you're satisfied with your results.
We've got a little trick of the trade here for you. With eyes, you'll notice that people always have this rim around the iris, and a way to make the eyes pop is to define those rims a little bit more. What you need to do after you've brightened up the eyes with your mask is to increase the feathering of your brush and erase a little bit of your mask around the rim. This will really give the eye a more defined rim.
And if you really want to have those lookers pack a punch, you can add a little shadow above and below the eye to give them more depth instead of looking like a flat image. Increase the feathering of your brush and reduce the flow. The flow is just the density of your brush, and when you run your brush over to frame the eye a little bit, you can see the big change it makes to those eyes. They're now more piercing, more alive.
Then, to move on to a new area, simply click "New" on your palette and apply another mask. Perhaps more highlights in the hair?
Of course, you can do all these in more detail with the masking inside of Photoshop itself, but the idea here is that Camera Raw does have that ability.
Now that you have a good grasp of local adjustments, you can retouch your raw images outright. You can easily isolate a specific area of your image without bothering the rest of your picture. Simply pick up the adjustment brush and let the masking of Camera Raw's local adjustments save the day. Do you see why Camera Raw is such a fan favorite?
Видео Adobe Camera Raw Adjustments - Photoshop Tutorial канала The Art of Retouching Studio
Показать
Комментарии отсутствуют
Информация о видео
18 апреля 2014 г. 21:59:56
00:16:39
Другие видео канала
 Smart Objects and Smart Filters - Photoshop Tutorial
 Adjustment Layers - Photoshop Tutorial
 Info Palette | Photoshop Beginner's Tutorial
 Magic Wand - Quick Selection Tool | Photoshop Tutorial
 Color Range for Masking - Photoshop Tutorial
 Smart Objects and Smart Filters for Photoshop
 How to Succeed as a Freelancer – Part 1 | Self Employment for Beginners
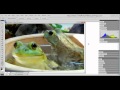 Photoshop Tutorial - Palettes Preview
 Adobe Camera Raw's Output Options - Photoshop Tutorial
 How to Succeed as a Freelancer Part 2 | Self Employment for Beginners
 How to Succeed as a Freelancer Part 3 | Self Employment for Beginners
 Photoshop Tutorial | DIfference among JPG & RAW Files
 Photoshop Tutorial -- What Are JPGs?
 Digital Fundamentals - RAW vs. JPEG
 Photoshop Raw Tutorial | RAW File Format
 Navigator Palette, Hand & Zoom Tools | Photoshop Beginner's Tutorial
 Behind the Retouching | John Ross - Celestial
 Pictocolor iCorrect EditLab 6 Review
 Digital Fundamentals - Tonal Range, Levels and Curves
 Professional Masking | Photoshop Intermediate Tutorial