Photoshop Camera Raw Tutorial | Output Options
www.TheArtofRetouching.com - Because of all the fancy tools that Camera Raw comes packed with, it's easy to overlook certain settings that are actually very important. This tutorial will briefly go over the significance of knowing how Camera Raw exports images to Photoshop. Determining your output options will make the work that you do, whether it's for printing or for magazines or simply for web display, much more convenient.
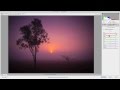
Below your image in Camera Raw, you will see a line of blue text that tells you specific details about your picture. Clicking on this blue text opens up the "Workflow Options" dialog box, where you can set up your color profile, bit depth, image size, etc.
Color Profile
The first little dropdown menu is the Color Profile (or Color Space). There are a lot of different options here, but the most important ones to take note of are sRGB, Adobe RGB, and ProPhoto.
What makes the three of these different from each other? We can go into detail about each profile, but what's important to know right now is how you can use these to your benefit depending on your work.
If your work is limited to digital outputs like the web or other digital devices, then sRGB is the universal color profile for that purpose.
Adobe RGB is most commonly used by those who are in the editorial line of work. This is because Adobe RGB handles more colors than sRGB. Adobe RGB Colors are often duller and more muted as well, making them easier to transition to CMYK when it comes to printing magazines and such.
However, if you have a more controlled environment with your output options, say, from your computer to your printer, then choosing ProPhoto might be the way to go. This profile handles the most colors. If you want to have your ProPhoto image printed out, it might not transition too well into a printed output by someone who is only familiar with Adobe RGB.
The point is to make sure you consider all aspects of the work you do, and choose the right profile that'll fit your line of business.
Bit Depth and Image Sizing
The default setting for bit-depth is 8-bit, only because there used to be a lot of filters that only support 8-bit images. Keep in mind though that it's always best to use 16-bit as the default bit-depth for your images. As discussed previously, it'll provide the smoothest gradient of colors for your picture, and will get rid of those nasty banding effects that may get with an 8-bit image. Nobody wants to see sloppy work, right?
For Image Sizing, unfortunately, the "Resize To Fit" behaves quite differently on a Mac and on a PC. When left unticked, the image size defaults based on your camera settings, which for example may be 16 megapixels. When you click on this tickbox, you will have the option to change your size to whatever megapixels you wish. Why would you even want to do that, you ask?
Again, depending on the work that you do, you need to know what size you need. For a magazine, the standard size is usually 11 by 17 inches, and with 16 megapixels, that just isn't enough. If you change it up to about 18 megapixels, then you will get roughly about 11×17". But if you need to use your images simply for computer display, then perhaps something around 3 megapixels will be enough to keep your file sizes on the smaller side, especially if large images take too long to render on your computer.
Other Workflow Options
Resolution, as previously discussed, is best left to 300 pixels/inch for the best output. Sharpening is better left unticked. The same is true with your sharpening adjustment sliders, because sharpening inside Camera Raw will not only sharpen your image edges (contrast), but also sharpen noise as well. If you really need to have that kind of effect, there are more powerful and effective tools you can use once you get into Photoshop itself.
Lastly, there is a tickbox inside the Workflow Options dialog box that says "Open in Photoshop as Smart Objects". Should you check this tickbox? Yes, absolutely yes. Normally, at the bottom right corner of your Camera Raw interface, you will see a button that says "Open Image". This opens up your photo into Photoshop as a background layer. But when you tick "Open in Photoshop as Smart Objects", this button changes into "Open Object", which then allows you to open your image in Photoshop, make changes, go back into Camera Raw, make some more changes, and head back into Photoshop again. That's the ultimate non-destructive workflow right there. Neat trick!
Видео Photoshop Camera Raw Tutorial | Output Options канала The Art of Retouching Studio
Показать
Комментарии отсутствуют
Информация о видео
2 мая 2014 г. 7:46:41
00:09:35
Другие видео канала
 Photoshop Tutorials for Beginners - Camera Raw Workflow Tips & Tricks
 Drawing Supplies I Use in My Videos
 8 or 16 bit for retouching.
 Targeted Adjustment Tool in Adobe Camera Raw
 How to convert RGB to CMYK
 Behind The Retouching | John Ross Architecture
 New Quick Export and Export As Feature Enhancements in Photoshop CC
 Camera Raw Histogram: How To Accurately Edit & Process Images
 Photoshop: Resizing and resampling images | lynda.com tutorial
 Color Spaces - sRGB, Adobe RGB, ProPhoto RGB and CMYK - Photoshop Tutorial
 Never Convert RGB to CMYK Again in Photoshop
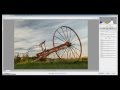 Setting up your Camera Raw Defaults in Adobe Camera Raw
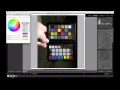 Custom Camera Profile for Extreme Lighting - Adobe DNG Profile Editor Tutorial
 Converting RGB to CMYK | Photoshop, Illustrator, and Publisher
 Camera RAW basics in Adobe Photoshop
 Processing Multiple Images in Adobe Camera Raw
 Photoshop tutorial: Converting from RGB to CMYK via Multichannel | lynda.com
 Photoshop Tutorial | Camera Raw Adjustments
 How to Save Images in Photoshop | Beginner Tutorial
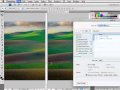 Photoshop with Matt: sRGB vs. Adobe RGB