Smart Objects and Smart Filters - Photoshop Tutorial
www.TheArtofRetouching.com - For any retoucher, it's important to develop a non-destructive workflow. Smart Objects and Smart Filters will give you the ability to go back and forth between your actions without permanently damaging your photo.
For example, after many hours of work, I had 7 images needed to be blown up approximately 170%. The client failed to mention that part. Instead of having to blow up pixel data, or start over again; I was able to simply go back to Camera Raw, and output the images blown up (which were way sharper than Photoshop's pixel data). Simply dragging over the existing Adjustment Layers, Masks, and Smart Filters; I was able to give the sharpest image possible, without much trouble.
Open Object from Camera Raw
There are two ways to create a Smart Object. From Camera Raw, simply hold down the SHIFT key and click the "Open Image" button, which now changes into the "Open Object" button. Clicking on this new button opens up your raw file into Photoshop, where you'll see in your image layer with an icon that tells you your image is now a Smart Object.
Another way is below your image in Camera Raw. You will see a line of blue text that tells you specific details about your picture. Clicking on this blue text opens up the "Workflow Options" dialog box. Check the tickbox that says "Open in Photoshop as Smart Objects". Once you click OK, what happens? The "Open Image" button changes into the "Open Object" button by default. Pretty cool? Let's keep going.
Smart Objects
Inside Photoshop, you now have a Smart Object as a layer. You can also see your image name here, instead of just "Background". What happens here is that your photo is actually inside that layer; that's why when you double-click on the layer, it's going to open up the original raw image again in Camera Raw. What does this mean for you? It essentially allows you to open your image in Photoshop, make changes, go back into Camera Raw, make some more changes, and head back into Photoshop again. If that's not the ultimate non-destructive workflow, we don't know what is.
Smart Filters
Attached to a Smart Object can be a Smart Filter. For instance, try going to Filter -- Render -- Lens Flare, just to try one out and apply it onto the image. After you've applied your filter, you can see that a lens flare does indeed pop up in your image. Over at the layers palette, you'll notice that under your Smart Object, there is a Smart Filter, and underneath that is your Lens Flare.
What's the point, you ask? Amazing workability. Because when you double-click on that Lens Flare effect, you can once again go back to your Lens Flare dialog box and adjust your effect. You can change the brightness of the flare or even move it around somewhere else. It just gives you the ability to go back and forth between the effects you've applied, if you later decide that you've changed your mind. Instead of damaging your image permanently with every effect you apply, this tool gives you the power of repeatedly reversing your actions until you finally find what works.
Notice that eye icon in your layers? You can click on that as well, in order to turn the visibility of your layer on and off. In your Smart Filter, there are also some arrow icons which when clicked, will show you the Blending Options dialog box. This allows you to adjust the opacity of your filter to whatever you think looks best. It also allows you to change the bleding of the filter to something other than "Normal". "Luminocity" perhaps?
So basically, you can keep applying and adding more and more filters, and each one will appear as a separate icon that you can always double-click and come back to whenever you feel like it.
Order Matters
What happens when you have three or four filters all stacked up onto each other? Photoshop applies your filters from the bottom going up. Let's imagine that you have, for example, Add Noise at the bottom, then Unsharp Mask at the top. Photoshop's tendency is not to sharpen the image, but the noise. This is because Add Noise was applied first before the Sharpening. This is why the order of the filters matters a lot. By dragging the order of the filters around, you will get a noticably different result.
A problem like this on a pixel-based layer would most definitely mean that you would need to throw away your layer and start over with a new one because of the permanent damage you've done. But with Smart Filters, all you need to do is drag down the "Unsharp Mask" filter at the bottom, so that the Add Noise filter is at the top. What Photoshop will do now is to sharpen the image first, then apply the noise. And it's as simple as that!
Видео Smart Objects and Smart Filters - Photoshop Tutorial канала The Art of Retouching Studio
Показать
Комментарии отсутствуют
Информация о видео
5 мая 2014 г. 8:55:07
00:09:09
Другие видео канала
 What is the Bit Depth of an Image? | Image Bit Depth Explained | 8-Bit vs. 16-Bit
 Adjustment Layers - Photoshop Tutorial
 Info Palette | Photoshop Beginner's Tutorial
 Magic Wand - Quick Selection Tool | Photoshop Tutorial
 Color Range for Masking - Photoshop Tutorial
 Smart Objects and Smart Filters for Photoshop
 How to Succeed as a Freelancer – Part 1 | Self Employment for Beginners
 Photoshop Tutorial - Palettes Preview
 Adobe Camera Raw's Output Options - Photoshop Tutorial
 How to Succeed as a Freelancer Part 2 | Self Employment for Beginners
 How to Succeed as a Freelancer Part 3 | Self Employment for Beginners
 Photoshop Tutorial | DIfference among JPG & RAW Files
 Photoshop Tutorial -- What Are JPGs?
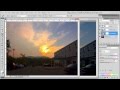 Digital Fundamentals - RAW vs. JPEG
 Photoshop Raw Tutorial | RAW File Format
 Navigator Palette, Hand & Zoom Tools | Photoshop Beginner's Tutorial
 Behind the Retouching | John Ross - Celestial
 Adobe Camera Raw Adjustments - Photoshop Tutorial
 Pictocolor iCorrect EditLab 6 Review
 Digital Fundamentals - Tonal Range, Levels and Curves