Vibrance Adjustment Layer | Photoshop Beginner's Tutorial
Here I will teach you the basic and detailed functionality of vibrance adjustment layer in adobe photoshop. For more videos please visit www.TheArtofRetouching.com
Photoshop Tutorial – Vibrance Adjustment Layer
Let’s say you have an image that’s looking pretty pale. When you want to adjust the saturation of an image, I normally don’t recommend using the Saturation Adjustment. Instead, what we’ll be using is the Vibrance Adjustment, because it has Saturation included, and gives you more control over your adjustments. Over at the Adjustments Palette, you can select the Vibrance icon. You can also find it at the bottom of your Layers Palette, as well as in Layer – New Adjustment Layer – Vibrance.
Adjustments and Destructive Changes (Bad)
A final (Bad) way is to go to Image – Adjustments – Vibrance, but we don’t recommend this method because using this enables you to make changes that are irreversible because the adjustments are made on top of your actual background image, as opposed to having a separate layer for the Vibrance adjustment. Since we always want to work non-destructively, this is not a good idea.
When you open up the Vibrance Properties window using any of the first three methods, you will see that you can adjust the Vibrance and the Saturation in an image. These sliders can increase or decrease the saturation in your picture.
When you play around with the different sliders, you can see that adjusting it to the right increases the saturation and makes an image go nuclear, while sliding it to the left makes it go all pale. We normally like to keep the adjustments to a minimum to make everything look natural.
Vibrance vs. Saturation
Officailly, Vibrance affects the weakest colors in an image, while Saturation affects all colors equally. But under controlled adjustments, you will see that Vibrance affects the cool colors first before affecting the warm ones, while Saturation moves the warms, before the cools.
For instance, when you hike up the Vibrance, it emphasizes the cools like blue or purple, while Saturation, when hiked up, enhances warms like red and yellow. The trick is to find the right balance between adjusting the cools and the warms.
You can check your before-and-after by toggling the visibility of your Vibrance layer on the Layers Palette’s eye icon. Go ahead and experiment on it—it’s an incredibly powerful tool that can really make your images pop.
Making color changes in Adobe Photoshop can be very daunting for a beginner, because some of the color tools are confusing to use. But that’s what I’m here for. We’re going to simplify everything so that color changes can come easily to you.
Видео Vibrance Adjustment Layer | Photoshop Beginner's Tutorial канала The Art of Retouching Studio
Показать
Комментарии отсутствуют
Информация о видео
8 сентября 2014 г. 5:00:01
00:04:15
Другие видео канала
 Smart Objects and Smart Filters - Photoshop Tutorial
 What is the Bit Depth of an Image? | Image Bit Depth Explained | 8-Bit vs. 16-Bit
 Adjustment Layers - Photoshop Tutorial
 Info Palette | Photoshop Beginner's Tutorial
 Magic Wand - Quick Selection Tool | Photoshop Tutorial
 Color Range for Masking - Photoshop Tutorial
 Smart Objects and Smart Filters for Photoshop
 How to Succeed as a Freelancer – Part 1 | Self Employment for Beginners
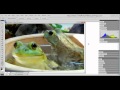 Photoshop Tutorial - Palettes Preview
 Adobe Camera Raw's Output Options - Photoshop Tutorial
 How to Succeed as a Freelancer Part 2 | Self Employment for Beginners
 How to Succeed as a Freelancer Part 3 | Self Employment for Beginners
 Photoshop Tutorial | DIfference among JPG & RAW Files
 Photoshop Tutorial -- What Are JPGs?
 Digital Fundamentals - RAW vs. JPEG
 Photoshop Raw Tutorial | RAW File Format
 Navigator Palette, Hand & Zoom Tools | Photoshop Beginner's Tutorial
 Behind the Retouching | John Ross - Celestial
 Adobe Camera Raw Adjustments - Photoshop Tutorial
 Pictocolor iCorrect EditLab 6 Review
 Digital Fundamentals - Tonal Range, Levels and Curves