Photoshop Lasso Tool | Beginner's Tutorial
Here you can find the basic and detailed functionality of photoshop lasso tool in adobe photoshop. For more videos please visit www.TheArtofRetouching.com
The purpose of making a selection, is so that you can make changes within a limited, and controlled area.There are a variety of tools you should consider when making selections in your image. There are several that will allow you make direct selections by drawing them, and a few that let you make your selections based on color.
Making Selections
The Lasso will make freeform selections, Polygonal lasso will make straight lines with anchor points, and the Magnetic Lasso will automatically look for contrasts and edges. The easiest to use is the Magnetic Lasso, so let’s begin there.
Lasso Tool
The Lasso Tool is one of the most basic for making a selection.
With the Lasso Tool alone, you can click and drag around an area and whatever shape your mouse creates will be the selection that Photoshop will make.
Polygonal Lasso Tool
For cases where you you would like to have a little more control, you can use the Polygonal Lasso Tool. When you click on one part of your image, it creates an anchor point. When you let go of your mouse, the line simply follows your mouse cursor around, waiting for you to make another anchor point with a mouse click.
When you click a second time, it creates an anchor point; a third time, another anchor point, and so on. The idea here is to make mouse clicks whenever you feel you need to. If there is a straight edge, you can make longer lines with anchor points that are far apart. When you have smaller edges or curves, you can make multiple anchor points by clicking more often as you go around the small curves.
Magnetic Lasso
The Magnetic Lasso will be the simplest tool for now that you can use to make basic selections. With the tool selected, simply hold down the mouse key and drag it around the area of an image you want to select. What the tool does is it makes computations based on tonal changes and contrast so that it trails behind your cursor and tries to make smart selections along with you, depending on the accuracy of your mouse.
Feathering
Once you’re happy with your selection, you have a choice with regard to your selection edge. Over at the Options Bar at the top, you can see the Feather box, which determines the softness of your edges.
You can input the number of pixels you want for your feathering. Just keep in mind that we normally want to have a certain amount of softness to any edge rather than having a completely hard and defined edge, so try to see what works for you.
Selection as an Adjustment Layer
Now that you have your desired area selected, you can apply it to a separate layer. By clicking on any of the Adjustment Layers in the Adjustment Palette, let’s say Levels, it automatically opens up your selection as a new layer with the Levels Properties window open.
Here, you can adjust the tone (or color) of the selection by simply moving the sliders around. We discussed Levels in a previous chapter of this tutorial.
One thing to note about making extreme changes to your selection is that when you zoom in (using the Ctrl + Spacebar function for the Zoom Tool), you will see the inaccuracies in the selection. You will notice a haloing effect around your unrefined selection.
Now that we’ve covered the basics of the Lasso tools, you should be able to make some simple selections for yourself. When combined with Adjustment Layers, the possibilities for your image corrections open up tremendously.
Видео Photoshop Lasso Tool | Beginner's Tutorial канала The Art of Retouching Studio
Показать
Комментарии отсутствуют
Информация о видео
29 октября 2014 г. 3:55:28
00:10:18
Другие видео канала
 Smart Objects and Smart Filters - Photoshop Tutorial
 What is the Bit Depth of an Image? | Image Bit Depth Explained | 8-Bit vs. 16-Bit
 Adjustment Layers - Photoshop Tutorial
 Info Palette | Photoshop Beginner's Tutorial
 Magic Wand - Quick Selection Tool | Photoshop Tutorial
 Color Range for Masking - Photoshop Tutorial
 Smart Objects and Smart Filters for Photoshop
 How to Succeed as a Freelancer – Part 1 | Self Employment for Beginners
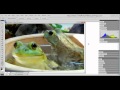 Photoshop Tutorial - Palettes Preview
 Adobe Camera Raw's Output Options - Photoshop Tutorial
 How to Succeed as a Freelancer Part 2 | Self Employment for Beginners
 How to Succeed as a Freelancer Part 3 | Self Employment for Beginners
 Photoshop Tutorial | DIfference among JPG & RAW Files
 Photoshop Tutorial -- What Are JPGs?
 Digital Fundamentals - RAW vs. JPEG
 Photoshop Raw Tutorial | RAW File Format
 Navigator Palette, Hand & Zoom Tools | Photoshop Beginner's Tutorial
 Behind the Retouching | John Ross - Celestial
 Adobe Camera Raw Adjustments - Photoshop Tutorial
 Pictocolor iCorrect EditLab 6 Review
 Digital Fundamentals - Tonal Range, Levels and Curves