- Популярные видео
- Авто
- Видео-блоги
- ДТП, аварии
- Для маленьких
- Еда, напитки
- Животные
- Закон и право
- Знаменитости
- Игры
- Искусство
- Комедии
- Красота, мода
- Кулинария, рецепты
- Люди
- Мото
- Музыка
- Мультфильмы
- Наука, технологии
- Новости
- Образование
- Политика
- Праздники
- Приколы
- Природа
- Происшествия
- Путешествия
- Развлечения
- Ржач
- Семья
- Сериалы
- Спорт
- Стиль жизни
- ТВ передачи
- Танцы
- Технологии
- Товары
- Ужасы
- Фильмы
- Шоу-бизнес
- Юмор
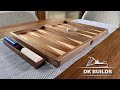
Building a Unique Walnut Engagement Ring Box
In this video, I show how to make a solid walnut hexagonal box to hold wedding rings that I designed myself. The top of the box is on a swivel to rotate open, and is held in place when closed with a small magnet. The axle for the rotation is a simple 2 inch nail. This box will be used to carry the bands at my wedding ceremony in a few months. The rings shown in the thumbnail are my fiancee's engagement ring, and a random other ring... we haven't bought our wedding bands yet.
I started with rough walnut that I purchased at the local hardwood supplier. I chose pieces with lots of exposed sapwood because my fiancee likes the contrast between the darker core wood and lighter sapwood colors.
The creation of this box involved a combination of powertools and hand tools. For example, I used a chisel to carve out the hexagonal interior shape, and then used a flush-trim bit in my router to hog out the rest of the material.
One mistake I made in this build was not using a sacrificial piece of wood beneath the work piece when drilling out the interior wood. When the bit broke through the bottom surface, some chip-out occurred. Luckily this is covered up by the foam ring mount inside of the box, and is not visible from the outside.
Overall, I'm very happy with how this turned out. More importantly, my fiancee is happy too!
Thanks for watching. Feel free to leave a comment with your thoughts, and don't forget to subscribe if you like content like this!
** Want to buy the tools and accessories I use in my videos? Here is my Amazon affiliate store where you can get them for yourself! https://www.amazon.com/shop/dkbuilds
Check out my facebook page here: https://www.facebook.com/dkbuilds/
Or my instagram page here: https://www.instagram.com/dkbuilds
#dkbuilds #woodworking #carpentry
Видео Building a Unique Walnut Engagement Ring Box канала dk builds
dkbuilds woodworking DIY easy woodworking project make build woodshop making wedding ring ring box walnut dk builds engagement ring box engagement ring do it yourself diy engagement ring box building an engagement ring box how to build an engagement ring box building a ring box building a wedding ring box unique engagement ring box unique wedding ring box
Комментарии отсутствуют
Информация о видео
26 мая 2018 г. 4:10:16
00:04:48
Другие видео канала