Glowing Mushroom Photo Blending with Lightroom & Photoshop | QE #220
In this quickedit video I‘m creating another glowing mushroom photomanipulation using Adobe #Lightroom Classic and Adobe #Photoshop CC 2019 for the #Editing.
If you'd like to support me, Patreon: https://www.patreon.com/phlog
Instagram: http://www.instagram.com/thephlog
Facebook: http://www.facebook.com/phlog
For this photo I shot several images: The base image (without glow) 4 times with different focus points for focus stacking later in Photoshop (I have to admit I did mess this up a little bit as the mushroom isn’t sharp from front to back) and multiple photos to make the mushroom appear to be glowing by holding a flashlight close to it’s top. My goal was to create an image with rather muted colours and overall make the picture a lot darker to make the glow appear to be brighter. Most of the editing was done in Adobe Lightroom Classic, while I used Adobe Photoshop for focus stacking, blending and some minor editing.
1. Basic raw adjustments
Before I start: I edited one of my base images and then synchronised the settings with all the other photos.
First, I changed the camera profile to Adobe Standard, this will reduce the contrast by making darker areas slightly brighter. Then, as I wanted to have a dark, gloomy image the next step was to drop the exposure to make everything darker. Also, I decreased the highlights but increased the shadows and whites slightly.
2. Local Adjustments
I started working on the right side of the photo. Here isn’t much going on but to further make the background smoother I dragged a graduated filter over the right side and decreased the texture, clarity and exposure which will help bring more attention to the mushroom.
Next, I added a radial filter for the mushroom itself. Since I wanted it to be extra sharp and detailed, I increased the texture and clarity a lot. Another radial filter was added over the mushroom, but this time the outside will be affected by it. I wanted to add a little bit of fake vignetting, so I dropped the exposure, as well as the texture and clarity.
3. Colour Grading
The original shot had a lot of strong green tones, which I personally don’t like to have in the final photo. So first I dropped the green hue, giving those tones a warmer colour and also dropped the yellow hue slightly. Now the photo was still a bit to saturated, so I dropped the green and yellow saturation carefully. I used the split toning to apply a cold colour tone to the shadows. Finally, I headed to the calibration tab where I played around with the red, green and blue primary settings.
4. Photoshop
After synchronising all the photos in Lightroom I opened them in Photoshop. First, I aligned all the images so the mushroom on every layer overlaps perfectly (Edit Auto-Align Layer). After that I did the focus stacking on the base images (Edit Auto-Blend layers).
Then it was time to add the glow effect to the base images. With the base image at the bottom of the layers panel I applied a layer mask to the glowing mushroom layers above and inverted the layer mask (CTRL + I) so it’s filled with black. Now I grabbed the brush tool, set the foreground colour to white and carefully painted over the mushroom on the layer masks to reveal the glow effect.
Видео Glowing Mushroom Photo Blending with Lightroom & Photoshop | QE #220 канала Christian Möhrle - The Phlog Photography
Показать
Комментарии отсутствуют
Информация о видео
7 января 2020 г. 22:17:20
00:08:28
Другие видео канала
 Creating a warm Sunrise image with Adobe Photoshop | QE #179
 Colorful Photos with SPLIT TONING Lightroom & Photoshop | QE #188
 Creating Dramatic Weather Photos with Adobe Lightroom Classic | QE #195
 Create MAGIC LIGHT with Photoshop
 How I Adjust Light for Better Photos in Lightroom
 Removing HAZE & getting back DETAILS with Photoshop | QE #341
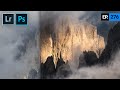 Enhancing Golden Hour Light in Lightroom & Photoshop | QE #276
 Golden Hour Post Processing with Photoshop (with Raw File)
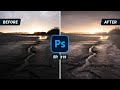 Dramatic GOLDEN HOUR Light with Photoshop | QE #319
 Photographing in a Hidden Waterfall Cave
 7 SIMPLE Tricks for better CONTRAST in Lightroom
 Lovely Blue Hour COLOR GRADING with Lightroom Classic
 How to create a Dreamy Drone Panorama in Photoshop
 Use Local Adjustments to create dramatic Landscape Photos in Photoshop | QE #298
 50 Photoshop TIPS, TRICKS & SHORTCUTS for Landscape Photographers
 Easy Lightroom COLOR GRADING from Start to Finish
 Vibrant Sunset Color Grading with Photoshop
 How to Create the Vintage Look - Photoshop Tutorial
 Create Abstract Digital Art like Alex Hyner - Photoshop Tutorial
 How to create ORANGE SUNSET TONES - Photoshop Tutorial
 Lightroom Basic Adjustments Explained | Lightroom Masterclass EP. 01