John Deere 400 First Start after Engine Rebuild
🔽Check out my Merch Store🔽
https://workshop-rebuild.creator-spring.com/
Finally, I can mount the engine to the mainframe on the John Deere 400! Not only the engine but all the components I need to get this engine started up. In this video, I focus on the engine install, instrumental panel install and everything around the dash.
The wiring has already been cleaned up, so I will not have any issues at all. There are a couple of safety switches that need to be activated before I start the Kohler K532 engine, but everything seems to line up just fine after restoring the instrumental panel. Once I have a little bit more time, I will tidy up the wiring so they do not rub on any levers.
Adding more parts to the mainframe is always getting easier, as I only have a few more parts left. All the major components have already been mounted and most of the hard stuff is on as well.
Now I'll give this Kohler K532 a good engine run-in time. This will consist of the engine idling for 15-20mins. This will allow the engine to warm up and I will be able to adjust the fuel to air ratio.
A couple minutes later I will increase the engine RPMs and listen closely to the engine sound for about 15-20minutes.
If everything seems fine I will adjust the throttle to 3/4 and leave it at that setting for another 15-20minutes.
Once I have run the engine for at least 1 hour I will be confident that everything is the way it should be and I can start to assembly more parts onto this JD400 garden tractor.
If this video was helpful, please give it a "thumbs up", comment if you have any questions, and consider subscribing.
________________________________________________________________________
Watch My Previous Rebuilds:
𝐉𝐨𝐡𝐧 𝐃𝐞𝐞𝐫𝐞 𝟑𝟎𝟎:https://bit.ly/3BbuWDz
𝐉𝐨𝐡𝐧 𝐃𝐞𝐞𝐫𝐞 𝟑𝟏𝟕:https://bit.ly/3wHy2x5
𝗕𝗼𝗹𝗲𝗻𝘀 𝗛𝗧𝟮𝟬 𝗣𝗿𝗼𝗷𝗲𝗰𝘁: http://bit.ly/2NOLvlp
𝗔𝗹𝗹𝗶𝘀 𝗖𝗵𝗮𝗹𝗺𝗲𝗿𝘀 𝐂/𝐁 𝗧𝗿𝗮𝗰𝘁𝗼𝗿: http://bit.ly/3bvXLzd
𝗧𝗵𝗼𝗺𝗮𝘀 𝗛𝗟𝟭𝟳𝟯 𝗦𝗸𝗶𝗱 𝗦𝘁𝗲𝗲𝗿: http://bit.ly/3pDTBKM
𝗝𝗼𝗵𝗻 𝗗𝗲𝗲𝗿𝗲 𝟔𝟖/𝟕𝟎 𝗣𝗿𝗼𝗷𝗲𝗰𝘁: http://bit.ly/3bKGra3
𝐁𝐨𝐛𝐜𝐚𝐭 𝟕𝟓𝟑 𝐏𝐫𝐨𝐣𝐞𝐜𝐭: http://bit.ly/37EDeaD
Instagram: https://www.instagram.com/workshoprebuild/
Tiktok: https://www.tiktok.com/@workshoprebuild?lang=en
E-Mail: Workshoprebuild@gmail.com
🎵: https://soundcloud.com/workshop-rebuild/sets/music-for-the-youtube-channel
Timestamps:
00:00 Intro
01:01 Parts Overview
03:53 John Deere 400 Engine Install
05:44 Instrumental Panel Install
07:08 Installed Wiring
09:53 John Deere 400 Throttle Cable & Choke Cable
11:39 Initial Engine Startup
Видео John Deere 400 First Start after Engine Rebuild канала Workshop Rebuild
Показать
Комментарии отсутствуют
Информация о видео
Другие видео канала
 1975 Bolens HT20 Rear End Issues (Hydraulic Motor & Differential)
 Motorcycle Jack For Restoration #shorts
 Building a simple & sturdy Workshop Bench from Lumber
 Time for some paint - John Deere 68 & R70 Rebuild
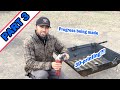 3D Printing Parts for the Thomas Skidsteer Part 3
 JOHN DEERE 317 MOWING TALL GRASS
 BMW R60/5 Drive Dog Removal and Install - Rear Drive Mechanism
 REMOVING STUBBORN BEARING RACES WITH A WELDER
 John Deere 400 Paintjob
 Workshop Rebuild Talkshow - John Deere 68 & R70 Rebuild
 Top End Assembly BMW Airhead Engine Rebuild - Part 5
 BMW Airhead Main Bearing Install (R60/5)
 John Deere 35A Tiller & PTO Conversion Kit Teardown
 Timing Chain Install BMW Airhead Rebuild - Part 2
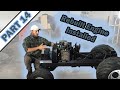 Just a couple more parts and I'm done! Bolens HT20 Part 14
 John Deere 317 Frame Prep and Paint
 Renault R5 Classic Car Barnfind!
 CLEAN A KOHLER ENGINE BLOCK
 Painting the Panels, Rims and Wheel Weights: Bolens HT20 Part 7
 John Deere 400 Hydraulic Motor Disassembly | Sundstrand Series 15 Model 90 Inline Pump