How I lit a dramatic night time car scene | Cinematic lighting tutorial
►► Watch my FREE WEBINAR here: My Top 10 Tips for making your passion project on a budget https://www.diymoviemaking.com/pl/2147593183
►► Check out my courses and learn how to make your best film on a budget at https://www.diymoviemaking.com/
🔥 Instagram: @diy_moviemaking
🔥 Facebook: @diymoviemaking
Steve Ramsden here with DIY Moviemaking and this week I’m going to show you how to easily and cheaply light a dramatic and cinematic night time scene set in a parked car - just like you’ve seen with Ryan Gosling in Drive and Daniel Craig in Skyfall. So if you want to try something similar on a budget, then stick around!
Lighting kit used:
- Aputure C300D II light: https://www.aputure.com/products/ls-c300d-ii/
- Light Dome II: https://www.aputure.com/products/light-dome-ii/
- Neewer light panels: https://www.amazon.co.uk/gp/product/B07WV9LTFG/
- Light stands: https://www.amazon.co.uk/gp/product/B074NY47J6/
- CTB and Deep Amber gel: https://www.leefilters.com/
- Red Coloured gel: https://www.amazon.co.uk/DECARETA-Correction-Overlays-Transparency-29-7x21cm/dp/B08NJLK8FJ/
In my film we have a scene with two actors, who secretly meet in the car and discuss something shady, so it seemed like a good excuse to create a fun moody lighting design. First for our key light, meaning our main light on the actors, I wanted to try and create a soft orangey glow to look like a sodium street light, and you can see this used quite a lot in films set in urban environments. For this I used my Aputure C300D Mark II light with the Light Dome II attachment, and clamped several orange gels inside it to create the correct colour. If you can find some CTO gel (meaning Color Temperature Orange), this will be a good start, but you will probably need quite a few sheets of it to create a deeper orange. In the end I combined some CTO with a few sheets of another gel called Deep Amber, and when held up to the light source it really kicked in lots of warm orange and looked pretty good. We set up the Aputure light on a C-stand with a sandbag, and placed it off to the left side of the camera, and you’ll see later on there was a good reason for putting it there.
Now you might be saying “I don’t have a fancy Aputure light, what can I use that is more basic or cheap?” and if you are just starting out with lighting, you can do a lot worse than buying a set of three LED light panels like this kit which I got from Neewer. I’ve found if you have an LED panel with some barn doors on it, if you want to create something similar to the light dome, you can make a pretty good cheap soft box by just adding something as some diffusion over the front. Just put your coloured orange gels inside first, and you should get a pretty similar look to what I did.
The main other light to think about is a back light, and I will often make the back light a different colour temperature to my key light to create some colour contrast. This way you have a warm light on the face, and a cooler back light around the hair or the edge of the face. For this scene I just used one of my light panels set on the coolest colour temperature which is the daylight setting or 5600, and I angled it in from the back and on the opposite side to the warm soft light. You could also raise this cool backlight up higher and pretend it is moonlight, though in our urban scene it was just meant to be another light on a nearby building.
Next, as a bit of fun we added a third light with a cheap red gel over it to look like the car’s tail lights, and added a nice extra colour into the frame.
So using this lighting design we didn’t have to move much to shoot the whole scene. We started off by filming our master shot from the front of the car. For the side shots, the background was a little dim and not very interesting, so we set up our third LED panel light and shone it at the storage containers in the distance behind. We wanted Matthew’s character to be a little more mysterious than Phil’s character in this scene, so we deliberately kept him more in the shadows and shone less of our key light on him, and it almost becomes a backlight.
Then to fill in some of these shadows and to add a little catch light into the eyes, I re-angled that cool LED panel at the back of the car a little, brought it closer and dimmed it down a bit. This just added some soft illumination onto the other side of Matthew’s face. and another easy way to do this is to just shine a torch or a phone onto a piece of polystyrene and bounce this light back into your actor’s face. This gave a really nice, dark, mysterious feel to Matthew’s shot.
And so that’s how we lit our car scene to hopefully look like a Hollywood movie. So you can always use this lighting plan as a starting point when trying your next short film project. And if you want to learn more about low budget filmmaking you can of course check out my full courses at DIYmoviemaking.com
Видео How I lit a dramatic night time car scene | Cinematic lighting tutorial канала Steve Ramsden
Показать
Комментарии отсутствуют
Информация о видео
Другие видео канала
 Digger 1983 PC gameplay - TEXTBOOK Level 3!
 Behind the scenes on Wolf of Wool Street | How we made a puppet movie!
 Made In Downton! (Downton Abbey meets Made In Chelsea)
 Traveling Abroad (short improv comedy sketch)
 Potential Threat 4: Asian Dawn - First Trailer
 How we made our thriller Part 2 | Pre-Production | Making of PAY BACK starring Craig Conway
 Watch my film ROAD KILL starring Guy Henry - premiering online today!
 On Location in Papua New Guinea
 Digger 1983 PC gameplay - lucky Level 2
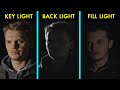 3 point lighting explained in 1 minute | DIY Moviemaking
 How to film a KNIFE THROW effect! (After Effects Tutorial)
 Mission Impossible MASK EFFECT Tutorial! | Adobe After Effects
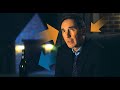 How to light a DRAMATIC INTERIOR NIGHT SCENE | Cinematic lighting tutorial
 How to CLONE yourself with a moving camera! | Video editing VFX tutorial
 My FAST workflow for Premiere Pro CC editing: tutorial
 How we made our thriller Part 1 | The Story and Cast | Making of PAY BACK starring Craig Conway
 How to use MINIATURE MODELS as your movie sets (like Titanic) - After Effects Tutorial
 How to create DIGITAL MATTE PAINTINGS in your films | Photoshop & After Effects tutorial
 SMASH THROUGH WINDOW one-take effect! | After Effects
 300k... thank you 🙏