How to use MINIATURE MODELS as your movie sets (like Titanic) - After Effects Tutorial
►► Watch my FREE WEBINAR here: My Top 10 Tips for making your passion project on a budget https://www.diymoviemaking.com/pl/2147593183
►► Check out my courses and learn how to make your best film on a budget at https://www.diymoviemaking.com/
🔥 Instagram: @diy_moviemaking
🔥 Facebook: @diymoviemaking
Steve Ramsden here and this week I tried a Hollywood trick of using a miniature model as the background for a scene, instead of building a full-scale set!
So you might have seen this effect used in some of the biggest films ever made, but you probably never even realised you were seeing it. A good example is “Titanic” where they saved hundreds of thousands of dollars by not building huge portions of the ship that they weren’t going to use very much. They did this for at last two sets: the First Class lounge and the giant engine room. For these scenes they filmed their actors against green screen with a motion-control camera and filmed miniatures as the backgrounds with a scaled-down camera move to match. These passes are then combined and you don’t even question the final result. A same process was used by Peter Jackson using 'bigatures' (big miniatures!) in Lord of the Rings.
These days a lot of films choose to extend their sets and scenery with CGI, but if you’re making a film on a low budget and you enjoy that real-world feeling of miniatures, then this can be a great effect to try.
If you want to see more fun DIY Moviemaking experiments like this, then hit that subscribe button!
So for this test I got the background model shot while we were at a location to do some filming for a client. There was an old model there of a fusion power plant which was big enough to provide some great detail, and the best part was, I didn’t have to build it! It was however in a glass case which couldn’t be moved, and this presented a real challenge to light and film it without reflections. It also included two model figures at the bottom which couldn’t be removed, but my plan was to film another element such as a foreground character who could cover these up.
Back in the studio we planned to film me as a foreground character in front of a green screen and composite it together with the miniature model as the background. We filmed a slow push-in on the slider towards me to try and replicate the move done with the model. Now in Hollywood they would have done both shots with motion control and some clever sums to work out the corresponding camera move at two different scales, but for this DIY version my plan was just to cheat a little bit and begin with the image scaled down smaller so it would look like a longer move. For this shot I just looked up at the green screen as if I was looking at something pretty amazing in a location.
The first thing I did was to load the two takes into After Effects and remove the green screen from the studio shot using Keylight and cut off the edges of the frame using the pen tool. This then left just the figure on its own which could be lined up with the model shot using the position and scale controls. Another thing that helped was to add a fake tilt-up movement in the shot. For this I parented both layers to a Null object and then key-framed its position so the shot appears to tilt up. And then I hid this move by adding some cinematic black bars to the top and the bottom, which allows you more room to reposition the image in the frame.
Next I wanted to remove the top part of the model shot which reveals the ceiling of the room it was filmed in, so I masked out these areas with the pen tool and keyframed them over time. I chose a starry night sky to be a dramatic background behind this giant machine, and so placed this behind the model layer and also attached it to the same null object so that it moved with the other layers.
Now in films that use miniatures a good trick to make them look less lifeless is to add some small moving background characters in behind the main action (you can see this in Lord of the Rings), so I did the next best thing for a low-budget experiment, and found some willing extras on stock footage websites, which I could remove from their backgrounds and scale down to add into the scene. As the perspective of the model shot was quite tricky to match due to the wide lens, I kept them all in the extreme background and tracked the motion of the scene using the Tracker panel to attach these elements to, and then they stuck nicely on top of the model layer. Basically these are all designed to add enough movement into the frame so that your eyes don’t question the miniature which is of course not moving.
Get unlimited Stock Footage from Artgrid and get 2 extra months with our link: ► https://bit.ly/33Qtw40
Get unlimited music for your videos on Artlist and get 2 extra months with our link: ► https://bit.ly/3fJ68HH
Sign up to ProductionCrate for free or paid membership to access their amazing library of assets: ►
https://productioncrate.grsm.io/steveramsden2434
Видео How to use MINIATURE MODELS as your movie sets (like Titanic) - After Effects Tutorial канала Steve Ramsden
Показать
Комментарии отсутствуют
Информация о видео
Другие видео канала
 How I made a short film in one night | Making of ROAD KILL starring Guy Henry
 Mission Impossible mask effect! 😎 #shorts #missionimpossible #missionimpossible7
 Mission Impossible MASK EFFECT Tutorial! | Adobe After Effects
 Satellite zoom out to SPACE effect - After Effects Tutorial
 I added myself to movies 😂#shorts #vfx #bts
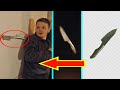 How to film a KNIFE THROW effect! (After Effects Tutorial)
 Throwing a KNIFE into a wall (using After Effects!)
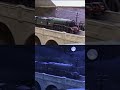 Digital set extension for a miniature #shorts #vfx #bts
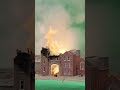 Factory explosion effect! 🔥 #shorts #vfx #bts
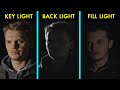 3 point lighting explained in 1 minute | DIY Moviemaking
 Doctor Strange portal effect! 🔥 #shorts #vfx #bts
 300k... thank you 🙏
 Mission Impossible Mask Effect! 🥸 #shorts #vfx #bts
 Indiana Jones invisible bridge effect! 🤠 #shorts #vfx #bts
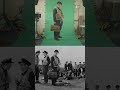 I added myself to old movies #shorts #vfx #bts
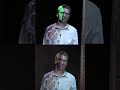 Missing face effect! #shorts #vfx #bts
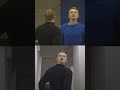 Backwards head effect! 😱 #shorts #vfx #bts
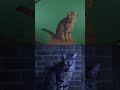 Halloween animal transformation! 🎃 #shorts #halloween #vfx
 Doctor Who Regeneration! 😲 #shorts #doctorwho #filmmaking
 How to fake a LONG TAKE with hidden cuts! | 4 editing tricks
 Guy Henry interview on film acting, Star Wars Tarkin, Harry Potter, Holby City | DIY Moviemaking