Mission Impossible MASK EFFECT Tutorial! | Adobe After Effects
#missionimpossible #missionimpossible7 #mask
► Get unlimited stock footage from Artgrid and get 2 extra months with my link: https://bit.ly/33Qtw40
► Get unlimited music for your videos on Artlist and get 2 extra months with my link: https://bit.ly/3fJ68HH
►► Watch my FREE WEBINAR here: My Top 10 Tips for making your passion project on a budget https://www.diymoviemaking.com/pl/2147593183
►► Check out my courses and learn how to make your best film on a budget at https://www.diymoviemaking.com/
🔥 Instagram: @diy_moviemaking
🔥 Facebook: @diymoviemaking
Steve Ramsden here with DIY Moviemaking and this week we are having another go at recreating the famous Mission Impossible mask effect! To celebrate a new Mission Impossible film coming out, we’ve had another try at the famous mask effect. This is the moment that appears in most of the films where one character is suddenly revealed to be another, by pulling off a truly impossibly-detailed mask which is of course played by another actor! The fun you can have as a filmmaker is how to join these two actors’ performances together seamlessly, and I’m going to show you how to create this type of shot on a budget.
Just like I teach in my course DIY Moviemaking, you don’t always need a lot of money to get some really creative shots. I’m always looking for new ways to do a lot with a little to really add some production value to my film projects and if you want to see lots more fun DIY Moviemaking tips and tricks, then of course hit that subscribe button.
So looking at the Mission Impossible films, there is always a person 1 (who is supposedly the mask) and a person 2 who is wearing the mask. But there seem to be two main ways this effect is done. Sometimes it is probably just the face of Person 1 tracked onto Person 2 who is already there, and other times it is the whole body which changes while you are busy looking at the face, and a few visible morphs in the clothing usually give this away.
Now we’ve tried this effect twice before - attempting both methods - first a basic test where Person 1’s face is simply added on top of Person 2 and then disappears as the mask comes off, and then secondly a full swap between heads and bodies of Person 1 and 2. But this time we’ve tried to improve it even further and have done a few things differently.
As before with this effect, you need two people, ideally the same height and eye colour. Both should wear the same costume and we have found that something dark with a high neckline like a turtleneck jumper is a good choice because anything without much details and which hides the neck makes the whole thing easier.
You also need consistent lighting, as any changes between takes will give away your joins. The only main prop you need is a rubber mask, which is what we used, and we actually cut part of the neck off it in order to allow it to be removed with one hand more easily.
This is also the first time we have added a wig to the mask to make it a better match with Person 1 - it’s only for a few frames, but seeing some hair when the mask comes off really helps to sell the effect, and you see that they do this in the films.
Now in the past we’ve always tried this effect with a green or blue screen, and although this makes it easier to use the heads and bodies independently without locking you into a background, it has never produced great edges especially around the hair. So this time we tried it with no green screen, and planned to use rotoscoping to cut out the figures and add the clean background behind. We’ve also always tried this effect in the past with a static camera, and just for an extra challenge, this time we tried it with a moving camera.
So with our equipment set up, we began by filming Person 1 doing a move as if pulling off the mask. The person needs to bring their hand up to the opposite earlobe and then pretend to pull a mask off. This covers as much of the neck as possible and will make hiding the joins easier. And during this shot we let the camera slide down the rail, creating a nice push-in on the character.
We also had a mark on the floor to make sure we would be both in standing the same place, and a mark on the wall as an eyeline so we would both be looking in the same direction.
Next we swapped places and clothes, and person 2 - that was me - put on the rubber mask.
We then repeated the same camera move and action, this time with me as Person 2 pulling off the real rubber mask. We basically guessed the speed and when to do it, so there where quite a few variables here, but we did several takes until we got one we thought would work.
Then I did a quick check with the two best takes on a timeline with a fade between them, and was happy that we couldn’t really get it any better.
And then we were done and it was time to blend it all together using Adobe After Effects...
Видео Mission Impossible MASK EFFECT Tutorial! | Adobe After Effects канала Steve Ramsden
Показать
Комментарии отсутствуют
Информация о видео
Другие видео канала
 How I made a short film in one night | Making of ROAD KILL starring Guy Henry
 Mission Impossible mask effect! 😎 #shorts #missionimpossible #missionimpossible7
 Satellite zoom out to SPACE effect - After Effects Tutorial
 I added myself to movies 😂#shorts #vfx #bts
 How to film a KNIFE THROW effect! (After Effects Tutorial)
 Throwing a KNIFE into a wall (using After Effects!)
 Digital set extension for a miniature #shorts #vfx #bts
 Factory explosion effect! 🔥 #shorts #vfx #bts
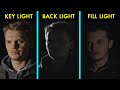 3 point lighting explained in 1 minute | DIY Moviemaking
 Doctor Strange portal effect! 🔥 #shorts #vfx #bts
 300k... thank you 🙏
 Mission Impossible Mask Effect! 🥸 #shorts #vfx #bts
 Indiana Jones invisible bridge effect! 🤠 #shorts #vfx #bts
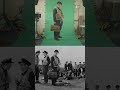 I added myself to old movies #shorts #vfx #bts
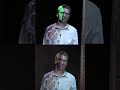 Missing face effect! #shorts #vfx #bts
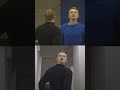 Backwards head effect! 😱 #shorts #vfx #bts
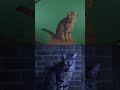 Halloween animal transformation! 🎃 #shorts #halloween #vfx
 Doctor Who Regeneration! 😲 #shorts #doctorwho #filmmaking
 How to fake a LONG TAKE with hidden cuts! | 4 editing tricks
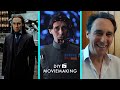 Guy Henry interview on film acting, Star Wars Tarkin, Harry Potter, Holby City | DIY Moviemaking