Adding a Remote to DC Electric Winches - Step-By-Step
This video will cover all of the steps to add a handheld remote to a DC-powered StrongArm electric winch that didn't initially come with one.
0:00 Intro
0:26 Installing the control box
1:07 Modifying your wiring harness
1:39 Connecting everything together
1:54 Outro
The 6371 remote kit can be purchased here:
https://www.dutton-lainson.com/proddetail.php?prod=24054
Check out our channel to watch additional videos about DL and our products: http://www.youtube.com/user/DuttonLainson
Subscribe to our channel to get all of our videos in your feed: http://www.youtube.com/subscription_center?add_user=DuttonLainson
Watch more instructional videos like this one in our Step-By-Step Playlist: http://www.youtube.com/playlist?list=PLskGYSV8ME6PLJyFP9NX0fuMHSX-6hoZv
Thanks for watching!
*Music by Dan-O at DanoSongs.com.
Here is the transcript of this video:
"This video will cover all of the steps to add a handheld remote to a DC-powered StrongArm electric winch that didn't initially come with one, which requires everything included in the 6371 remote switch kit.
Start by pulling the plug of your existing wiring harness out of the side of your winch's cover and replacing it with the black plug from the 6371 kit. Be sure you push the plug in as far as it can go and that the red wire labeled "TOP" is installed on top.
Position the gray control box near the front of the winch on the opposite side (angling it down so water, dirt, or debris doesn't get stuck inside of it) then use the 6371 kit's four self-locking screws to mount the control box in this position. The box should be securely attached, but don't overtighten these screws.
Make sure your original wiring harness is disconnected from your battery, then cut both of its wires near the switch and strip off a half an inch from the end of each of them. Identify the positive stripped wire (the wire connected to the circuit breaker), then insert it into the butt splice terminal on the positive side of the 6371 kit's wire connector. Tightly crimp the wire, then repeat all of these steps for the negative stripped wire.
Combine this with the red connector coming from the control box and plug the remote into the black connector coming from the control box. Reconnect your winch to power and then it is ready to be operated with the newly installed remote.
Thanks for watching this video! We hope it was helpful to you!
Head over to our YouTube channel for many more Step-By-Step videos about StrongArm electric winches."
Видео Adding a Remote to DC Electric Winches - Step-By-Step канала Dutton-Lainson Company
Показать
Комментарии отсутствуют
Информация о видео
Другие видео канала
 New Winch Line From D-L
 Replacing the Drive Shaft on Worm Gear Winches - Step-By-Step
 Adding a Remote to AC Electric Winches - Step-By-Step
 TUFFPLATE® Finish - DL Difference
 Can I Operate My Electric Winch If I Lose Power? - FAQs
 Replacing Strap on DLxFC Pulling Winches - Step-By-Step
 Replacing the Cover on DLxFC Pulling Winches - Step-By-Step
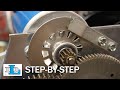 Replacing the Brake Springs and Brake Disc on StrongArm® Electric Winches - Step-By-Step
 DurapatchUV™ - DL Difference
 DurapatchUV™ on Stock Tanks - DL Difference
 Replacing the Bridge on StrongArm AC Electric Winches - Step-By-Step
 Can I Lift a Load With My Pulling Winch? - FAQs
 Does It Matter How the Cable or Strap is Oriented On My Winch? - FAQs
 Does It Matter Which Direction the Cable or Strap Comes Off My Winch? - FAQs
 Why Isn't My Brake Winch Lowering the Load? - FAQs
 Why Do B-Series Winches Cost More Than DLB-Series Winches? - FAQs
 Replacing Strap on TW9000 and TW9015 Electric Winches - Step-By-Step
 Replacing Strap on TW4000 and TW4015 Electric Winches - Step-By-Step
 What's the Difference Between Goldenrod Fence Stretcher-Splicer Models? - FAQs
 Goldenrod® Fence Stretcher-Splicers - DL Difference