Replacing the Drive Shaft on Worm Gear Winches - Step-By-Step
If you want to replace the drive shaft on your worm gear winch or switch to a different shaft style, use this video as your guide!
0:00 Intro
0:45 Removing the old drive shaft
1:38 Installing the new drive shaft
2:08 Outro
Repair parts for D-L worm gear winches are available for purchase here:
https://www.dutton-lainson.com/products.php?cat=45
Check out our channel to watch additional videos about DL and our products: http://www.youtube.com/user/DuttonLainson
Subscribe to our channel to get all of our videos in your feed: http://www.youtube.com/subscription_center?add_user=DuttonLainson
Watch more instructional videos like this one in our Step-By-Step Playlist: http://www.youtube.com/playlist?list=PLskGYSV8ME6PLJyFP9NX0fuMHSX-6hoZv
Thanks for watching!
*Music by Dan-O at DanoSongs.com.
Here is the transcript of this video:
"There are three drive shaft options available on Dutton-Lainson worm gear winches- the standard drive shaft that is operated with the standard 7" handle, the loop drive engaged by a shepherd's hook, and the hex drive that can be used with a special 7" handle or an electric drill.
If you have one style of drive shaft but want or need to switch to another, this video will guide you through the quick change-out process.
Start by disconnecting your winch from any load, then remove its handle with a 3/4" wrench if you have a standard drive shaft or slip off the hex handle if you currently have that style. Use two 7/16" wrenches to remove the nut, bolt, and spacer.
To give yourself room to pound out the pin holding the drive shaft in place, turn the drive shaft until the backside of the pin is lined up with the narrow space between the reel and side of the base, then completely remove the pin with a hammer and either a 3/16" punch or, more ideally, a 3/16" roll pin punch.
Carefully pull out the drive shaft without knocking over any of the worm gear parts, then slide your new drive shaft into place. Position it so its hole is lined up with the hole in the worm gear, then use both your hammer and punch to pound in the pin until it is nearly flush on both ends with the worm gear.
Re-install the spacer, bolt, and nut with your 7/16" wrenches, followed by your winch's handle if applicable.
Thank you for watching!
Refer to our YouTube channel for more videos about D-L winches, and let us know if there is a topic you'd like us to cover in the future."
Видео Replacing the Drive Shaft on Worm Gear Winches - Step-By-Step канала Dutton-Lainson Company
Показать
Комментарии отсутствуют
Информация о видео
Другие видео канала
 New Winch Line From D-L
 Adding a Remote to AC Electric Winches - Step-By-Step
 Adding a Remote to DC Electric Winches - Step-By-Step
 TUFFPLATE® Finish - DL Difference
 Can I Operate My Electric Winch If I Lose Power? - FAQs
 Replacing Strap on DLxFC Pulling Winches - Step-By-Step
 Replacing the Cover on DLxFC Pulling Winches - Step-By-Step
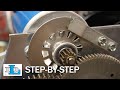 Replacing the Brake Springs and Brake Disc on StrongArm® Electric Winches - Step-By-Step
 DurapatchUV™ - DL Difference
 DurapatchUV™ on Stock Tanks - DL Difference
 Replacing the Bridge on StrongArm AC Electric Winches - Step-By-Step
 Can I Lift a Load With My Pulling Winch? - FAQs
 Does It Matter How the Cable or Strap is Oriented On My Winch? - FAQs
 Does It Matter Which Direction the Cable or Strap Comes Off My Winch? - FAQs
 Why Isn't My Brake Winch Lowering the Load? - FAQs
 Why Do B-Series Winches Cost More Than DLB-Series Winches? - FAQs
 Replacing Strap on TW9000 and TW9015 Electric Winches - Step-By-Step
 Replacing Strap on TW4000 and TW4015 Electric Winches - Step-By-Step
 What's the Difference Between Goldenrod Fence Stretcher-Splicer Models? - FAQs
 Goldenrod® Fence Stretcher-Splicers - DL Difference