How to Make Lovely Taiwanese Pineapple Cakes!
FULL RECIPE: https://bembumkitchen.home.blog/2020/05/24/lovely-taiwanese-pineapple-cakes/
Instagram: https://www.instagram.com/bembum.kitchen/?hl=en
Facebook: https://www.facebook.com/bembuminthekitchen
#bembumkitchen #cutepineappletarts #taiwanesepineapplecakes
Hi Guys, today we are making these "Lovely Taiwanese Pineapple Cakes". They are typically larger and made in square or rectangle shape.
Traditional Taiwanese pineapple cakes filling itself is made of Winter Melon and Maltose Syrup so that the filling is extra sweet, heavy and sticky, which is not healthy.
For this reason, I would like to show you how to make the healthier style of Taiwanese Pineapple Cakes which is hold up pretty well, so adorable and taste much fresher.
Hope you Guys enjoy the recipe! Love you all!!
LOVELY TAIWANESE PINEAPPLE CAKES
Yield: 10 pieces
Active time: 1 hour
Total time: 2 1/2 hours
INGREDIENTS
Pineapple Filling:
500 grams Pineapple (Chopped)
120 grams Granulated Sugar
20 grams Unsalted Butter
30 grams Glutinous Rice Flour
Basic Dough:
100 grams Salted Butter (Cold)
12 grams Icing Sugar
22 grams Egg Yolks
152 grams All-Purpose Flour
24 grams Milk Powder
Colouring Dough:
25 grams Salted Butter (Cold)
7 grams Condensed Milk
3 grams Egg Yolks
38 grams All-Purpose Flour
Food Colouring (Red, Soft Pink, Black, White)
INSTRUCTIONS
Pineapple Filling
1. Cut off the pineapple skin, took off the core and coarsely cut them into chunks (if you use canned pineapple, make sure to adjust the sugar level. They will take longer to cook coz the heavy water content in the canned pineapple).
2. Transfer the chunks into a non-stick pan, add in the sugar (since the sweetness of each pineapple is different, feel free to adjust the amount of the sugar accordingly).
Cook over medium high heat. Stirring constantly until most of the moisture has evaporated. Don’t forget to adjust the heat level based on the water content that was left in the pan.
*I suggest using a non-stick pan as it is sticky after when it becomes concentrated.
3. When the pineapple is about to dry, looks translucent and a bit brownish, lower the heat, add in the butter.
Stir continously until the butter melted and incorporated in the pineapple (the butter makes the pineapple fillings smoother and easier to handle during wrapping).
4. For the binder, sprinkle in some of the glutinous rice flour. Add it gradually, to make sure that the flour are distribute evenly. Mix until well combined.
5. Take it off from the heat, spread the fillings thinly on a large plate to cool completely.
Basic Dough
1. In a large bowl, cream the butter and icing sugar until light and smooth.
2. Add in the egg yolks, mix well
3. Pour in All-Purpose Flour and milk powder, mix until all the ingredients just combined and create a dough ball (do not overmix to avoid the formation of gluten, which will make the pastry less flaky).
4. Cover them with a plastic wrap to prevent the dough dry, set aside.
Colouring Dough
1. Combine the butter, condensed milk and egg yolks, mix well.
2. Pour in the all-purpose flour, mix until it’s form a smooth dough.
3. Colour it as needed (remember to always cover the dough with a plastic wrap to keep their moisture).
Wrapping, Decorating and Baking
1. Divide pineapple filling into portions of 20 grams each, and basic dough 25 grams each.
2. Roll each portion of pineapple filling into a ball.
3. Flatten a portion of basic dough (you can do this in your palm or with a small rolling pin). Place a portion of filling into the centre of the flattened dough. Gently wrap the dough around the filling, pinching away and setting aside excess dough at the top and where the edges meet. Roll the filled dough between your palms to form a smooth oval ball.
4. Using some basic dough and white colouring dough for the ears.
Apply some white colouring dough for the face.
Black dough for the nose, mouth and eyes.
Soft pink for the cheeks and tounge.
Using love shape plunger cutter to create the heart shape.
And finally, use some basic dough to create her hands and legs.
*Make sure the details sticks really well otherwise it will tilted or fall down while baking.
5. Place them on a baking tray with a greaseproof paper. Bake in the preheat 160°C oven for 20 minutes. Remove from the oven, allow to cool slightly on the pan for about 20-25 minutes, and then transfer them onto a cooling rack to cool completely.
NOTES
1. The dough will expand a bit when baked in the oven.
2. You can use any food colouring for the “Colouring Dough” (powder, gel, liquid).
3. Store the cakes at room temperature in an airtight container, the crust will become more tender.
4. Pineapple cakes turning mouldy even when stored in an airtight containers is due to the presence of too much moisture. Store pineapple cakes which are cooled to room temperature in an airtight container away from the sunlight for 3-4 days. Keep them refrigerated for up to 1 months.
Видео How to Make Lovely Taiwanese Pineapple Cakes! канала BEMBUM KITCHEN
Показать
Комментарии отсутствуют
Информация о видео
Другие видео канала
 How to Make Peppermint Hot Chocolate Drink Fruit Cake!
 How to Make Purin Birthday Steamed Brownie!
 Fluffy Moist Vanilla Sponge Cake. Perfect for Birthday Cake!
 How to Make Sumikko Gurashi Bread Shop Manager BREAD STICK!
 How to Make Old Fashioned Sweet Bread | 6 Shaping Method | NO Butter!
 How to Make Quick & Easy Chocolate Babka!
 How to Make Double Dark Chocolate Cupcakes!
 How to Make 15 Minutes Quick Foolproof Pizza Dough!
 How to Make 2 MINUTES Fluffy Microwave Chocolate Mug Cake!
 How to Make Mini Lemon Blueberry Cake!
 How to Make Fluffy Pancakes | With Homemade Maple Syrup!
 VLOG Chewy Korean Mugwort Cookies Recipe 쑥 쿠키 | The Brambly Hedge Collection!
 How to Make Low-Sugar Open Face Apple Pie | Sucanat!
 How to Make Professional Bakery Pan Grease!
 How to Make Chewy Mochi Donuts (No Deflate After Frying)!
 How to Make Lion Dance Steamed Buns! 舞獅包子
 How to Make The Best Chocolate Chip Cookies!
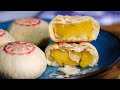 How to Make Super Flaky Durian Pastry Mooncake with GHEE | 苏式月饼 Suzhou Style!
 How to Make Classic Neapolitan Cupcakes | Fluffy & Less Sweet!
 How to Make Tangerine Buns! 橘子包子(Chinese New Year Bao)
 How To Make Chocolate Potica (Traditional Slovenian Nut Roll)!