Mercedes-Benz Actros - Mechanical valve clearance adjustment | W930, W932, W933, W934
Truck engines are not equipped with hydraulic valve clearance compensation.
The valve clearance therefore has to be checked and, if necessary, adjusted at regular maintenance intervals.
The procedure for mechanical valve clearance adjustment is shown here using engine model series 500, engine 541.9, as an example.
This is also called 'Method 2'.
The vehicle must remain idle for 30 minutes before work is started.
This ensures that the engine temperature is uniform.
Note: This time period still applies even if the vehicle is driven just a few meters into the workshop.
Tilt the cab forwards.
Remove the soundproofing cover.
Remove the six cylinder head covers.
This allows easier access to the valves of the cylinders later.
Loosen the two bolts on cylinder 1 with a ratchet wrench.
Tighten the bolts to 20 Nm when reinstalling.
Remove the covers on cylinders 2 and 3.
Continue with cylinders 4, 5 and 6.
The fast depressurization valve is a new feature.
Remove this valve because the oil residues underneath have to be removed.
Remove the screw on the cover.
Tighten the screw to 6 Nm when reinstalling.
Unscrew the constant throttle line.
Remove the mounting bolt on the fast depressurization valve.
Tighten the bolt to 45 Nm when reinstalling.
Remove the fast depressurization valve.
Do not clean until installing.
Continue at the intake and exhaust valves on the cylinders.
These have to be checked and adjusted in two crankshaft positions.
For the first crankshaft position, crank the engine using a turning device.
Remove the lower soundproofing before installing the turning device.
In addition, remove the two bolts on the cover of the inspection hole.
Screw the turning device to the inspection hole in the timing case.
It is held in place by two bolts.
Set the engine to the TDC crankshaft position.
Crank the engine with the turning device far enough that the TDC marking appears in the inspection hole.
Check whether cylinder 1 or 5 is at the TDC of the piston i.e. at ignition TDC.
The rocker arms are seated tight.
Cylinder 1 is thus at valve overlap TDC.
Accordingly, cylinder 5 is at ignition TDC.
Here, the rocker arms are free.
Adjust the valve clearance of the cylinders using the work instructions and feeler gauge.
Start with cylinder 5.
When this is at ignition TDC, as shown here, the valve clearance at the exhaust and intake valve can be checked simultaneously.
Coat the feeler gauge with oil.
This prevents any contact friction.
Check the valve clearance on the intake valve with a 0.4 mm thick feeler gauge.
Check the valve clearance on the exhaust valve with a 0.6 mm thick feeler gauge.
The feeler gauge can be pulled through too easily on both of these valves.
Both valves must therefore be readjusted.
Loosen the jam nuts.
Here, adjustment of the exhaust valve is performed first.
Adjust the clearance with the adjustment screw.
It must not be too easy or too difficult to pull the blade of the feeler gauge through.
Counterhold the adjustment screw and tighten the jam nut with a 17 mm open-end wrench.
Tighten the jam nut to 50 Nm.
Check the clearance again.
It is OK here.
Adjust the clearance on the intake valve in the same way.
Now, this clearance is also within the specified test tolerance of +/- 0.05 mm.
Note: Also tighten this jam nut to 50 Nm.
After valve clearance adjustment on the 5th cylinder, check the remaining valves in the same crankshaft position.
When the 5th cylinder is at ignition TDC, the following valves can be checked and adjusted if necessary.
On cylinder 4, the intake valve.
On cylinder 6, the exhaust valve.
On the right engine side, on cylinder 2 the intake valve.
On cylinder 3, the exhaust valve.
Cylinder 1 is still at valve overlap TDC.
The valve clearance can thus only be checked here when the engine is cranked once again.
Cylinder 1 is now at ignition TDC.
The following adjustments can now be made.
On cylinder 1, the intake and exhaust valve can now be checked and adjusted if necessary.
On the remaining cylinders, check each of the valves which were not adjusted previously.
Note for subsequent installation:
Before reattaching the fast depressurization valve, clean the valve and surroundings.
Use a suitable cleaning agent for this.
Also clean the sealing surfaces of the cylinder head covers.
=======================================================
More Information:
AH 05.30-N-1000-01B
Turning device
W 904 589 04 63 00
Видео Mercedes-Benz Actros - Mechanical valve clearance adjustment | W930, W932, W933, W934 канала MBOwnersClub
Показать
Комментарии отсутствуют
Информация о видео
Другие видео канала
 LB V8 engine 442 valve tappet adjustment
 Mercedes-Benz Axor - Mechanical valve clearance adjustment
 Mercedes-Benz Actros - How to replace the O-ring of the bell hub | W930, W932, W933, W934
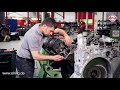 Zylinderlaufbuchsenring OM500 Lkw | Installation Cylinder liner seal ring OM500 (truck)
 Mercedes-Benz Actros - How to bleed the steering system in Actros MP II
 MERCEDES OM501 V6 1,7 млн км - капитальный ремонт мотора / СБОРКА / Mercedes Actros. Ремонт моторов
 LKW Mercedes Benz Actros OM501LA Euro 5 (MP2/MP3) Motor Aufbau
 Mercedes-Benz Actros engine production at the Mannheim Plant
 how to adjust valve clearance of actross OM-501 11/3 V type engine
 Двигатель OM501LA - пробег 1 млн - первый капитальный ремонт Mercedes Actros. Часть 1 - Разборка
 Mercedes actros का पम्प कैसे रिपेयर करे 2 मिनट मै? mercedes actros pump problem? Actros pump repair
 Mercedes-Benz Actros - Drive flange sealing HL7 | W930, W932, W933, W934
 Mercedes-Benz Actros - How to replace the pneumatic switching valve (external) on the pump module
 Mercedes-Benz actros 2040. changing engine oil. Oil filter. And Fuel filter.
 MERCEDES OM501 V6 Капитальный ремонт мотора / Полная сборка ДВС Mercedes Actros + первый запуск
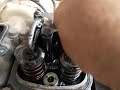 how to adjust valve clearance mercedez benz LB v8 twin turbo.
 WABCO Solution for 3rd Gen Daimler AMT: Overhauling the Gear Shift Module (3 position cylinder)
 Mercedes-Benz Axor - How to adjust plunger of the clutch actuator | W930, W932, W933, W934
 Mercedes-Benz Actros - Rpm sensors on PowerShift 2 transmission | W930, W932, W934
 OM501 V6 MERCEDES 1.7 МЛН ПРОБЕГ - ПЕРВЫЙ КАПИТАЛЬНЫЙ РЕМОНТ ДВИГАТЕЛЯ МЕРСЕДЕС АКТРОС / РАЗБОРКА