Mercedes-Benz Actros - Drive flange sealing HL7 | W930, W932, W933, W934
Oil leak at through-drive axle NAT7 on an Actros construction vehicle.
Remove propeller shaft at drive flange and prop it up at the edge of the pit.
Release the 12-point nut.
Do not use a screwdriver.
Metallic particles could fall into the groove of the drive shaft.
These would then get in between the nut and drive shaft during disassembly.
This would damage the thread.
Wear safety glasses when removing the nut because the retaining tab can spring out ...
... and use a chisel that is not too flat.
Apply the chisel under the area of the retainer.
The retaining tab is now knocked off completely.
Release the 12-point nut using an impact wrench.
Once this is removed, loosen the drive flange with a few blows from a steel hammer.
The drive flange must be replaced with a new one later.
Check the possible causes of the leak.
Detach the locking plate from the threaded ring.
Check whether the threaded ring can be turned by hand.
That is not the case here.
Make a mark on the threaded ring.
Apply the claw wrench.
With a torque of 500 Nm, check whether the threaded ring moves.
Use the claw wrench to detach the threaded ring.
First use the torque wrench as a lever, then it becomes easier.
Remove the coarse dirt in the thread using a wire brush.
Once the coarse dirt is removed, degrease the surface.
Use the repair kit for the replacement.
It contains a threaded ring, sealant and a new drive flange.
Degrease the thread on the threaded ring.
Note: Protect the radial sealing ring already installed from cleaning agents!
Dewax the coupling flange.
Raise the rearmost axle on one side.
Apply sealant to the first third of the threaded surface.
Smooth it out with a piece of cardboard.
Apply the sealant continuously around the threaded ring.
Smooth it out with the cardboard.
Important: The sealant bonds very quickly in the absence of air.
Screw in the ring by hand.
Fix it in place with the claw wrench.
Tighten the ring to a torque of 215 Nm.
Turn the wheel slightly so that the bearing settles.
Apply the torque wrench again.
Repeat the procedure until the threaded ring no longer moves before the crack.
To give the bearing some play, release the threaded ring by 45 degrees.
Mark the edge of a tooth and the threaded ring.
Each tooth and each groove represent an angle of 10 degrees.
Apply a second marking here.
Turn until the markings line up.
The locking plate can be installed on four different ways.
Install it in the appropriate way and tighten the bolt to a torque of 35 Nm.
What has happened if the locking plate does not lie flat?
The washers of the input shaft are not in the specified position.
In this case, detach the threaded ring with housing cover ...
.. and make sure that the washers are in the correct position.
A removed model is shown here as an example.
Lower vehicle.
Fit the drive flange back on and screw in the collar nut.
Fix the collar nut in place with an impact wrench.
Important: Tighten the nut to a torque of 1000 Nm.
Knock the retaining tab into the groove with a chisel.
The nut is then secured.
Install the propeller shaft.
After a hardening time of 24 hours for the sealant, the vehicle can be used again.
=========================================================
More Information:
Claw wrench
W 748 589 01 07 00
Repair kit
A 942 350 15 45
===========================================================
instagram:
https://www.instagram.com/mbownersclub/
twitter:
https://twitter.com/MB_Owners
Видео Mercedes-Benz Actros - Drive flange sealing HL7 | W930, W932, W933, W934 канала MBOwnersClub
Показать
Комментарии отсутствуют
Информация о видео
Другие видео канала
 Mercedes-Benz Actros - Mechanical valve clearance adjustment | W930, W932, W933, W934
 Mercedes-benz actros hub oil seal leak
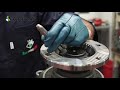 Euroricambi HL6 30 6 2015
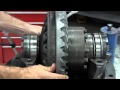 Side bearing adjustment video
 MERCEDES ACTROS ANO NANGYARI EPS TRANSMISSION# GEAR SHIFTING MODULE FOULT 5,6,7,8 MISSING ANG KAMBYO
 Paano mag palit ng clutch lining ng Man truck
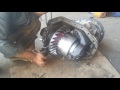 Axor truck Rear Axle
 Mercedes-Benz Actros - How to replace the gear sensor module | W930, W932, W933, W934
 Hino Truck Differential Gear Repair||How to Rebuild Truck Differential Gear||
 Mercedes-Benz Actros - Replace the front cassette type sealing ring | W930, W932, W933, W934 (OM541)
 Mercedes-Benz Actros - How to replace the pneumatic switching valve (external) on the pump module
 Mercedes-Benz Actros - How to replace the O-ring of the bell hub | W930, W932, W933, W934
 Oil seal replacement//Diesel tanker
 LKW Motor Reparatur Mercedes Benz Actros OM471LA in Stop Motion
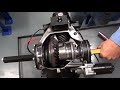 BMW M-Diff Locker Explained
 Mercedes-Benz Axor - How to adjust plunger of the clutch actuator | W930, W932, W933, W934
 Automatic vs Manual Transmission
 Truck Repairs: Steer Axle Wheel Seal
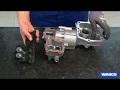 WABCO Solution for 3rd Gen Daimler AMT: Overhauling the Gear Shift Module (3 position cylinder)