Broken Japanese Sander Restoration
So due to the worldwide crisis we are facing at the moment all of my bigger projects are on hold as i cant get any parts but i do have enough materials in stock to restore this cool old sander i have, its made by Nitto Kohki and im not sure of its age but it looks pretty old. It doesn't work just now but by the end of the episode it will ;)
So lets crack on!
First thing i do as always is to give the item a good check over to asses the condition then if all is good i proceed to taking it all apart. Taking this sander apart was a piece of cake and only took very basic tools which is nice for a change. Once apart it was clear to see why the sander wasn't working. Due to age the internal air hose had dried out and broken into several pieces , Nice easy fix :) I then proceeded to sandblast all the parts that were painted and treated all the rusty fixings in a bath of deox c. While the rust was being dissolved i prepped and primed the parts i had just cleaned up in the blaster first with a coat of etch primer then a coat of high build 2k primer which was left to cure while i got on with the zinc plating. The plating was done with my usual methods and the parts were giving a nice yellow passivate instead of silver as i feel it goes better with the white body of the sander. Once plated the parts were left to cure and i set about wet flatting the primed parts to leave me with a nice smooth surface to lay the paint down on. For the paint i was tempted to do something wild but then i decided against it and went with the stock colours. these were applied and left to dry while i made up the stencil to replicate the original lettering on the top case. The stencil was applied and surrounding areas masked off and then it was given a coat of black before being unmasked and clear coated to seal in the lettering. I then set about the next job which was buffing and polishing the rest of the parts needed to put the sander back together this was done with a polishing mop in my pillar drill. Then it was simply a case of re-assembly.
I hope you enjoy it and ill see you all in the next video.
------------------------------------------------------------------------------------------------------------------
A new addition to my videos from now on will be a water mark and my channel name popping up in random places throughout the video as im getting rather tired of people re-uploading my content as their own i hope you guys understand.
If you like what you see and have any ideas for the channel or would even like to donate something to restore to the channel please get in touch. :)
And as usual if you liked the video please like share and subscribe and help the channel grow.
PATREON -If you would like to help support the channel you can find my patreon account here- http://patreon.com/RRCRestoration
INSTAGRAM- https://www.instagram.com/rrcrestoration
More videos can be found here- https://www.youtube.com/channel/UCKWkhqAHjW4x2oRK_yzpxlA/videos?view_as=subscriber
#Restoration #Old #Tools
Really Random Channel
Broken Japanese Sander Restoration
Видео Broken Japanese Sander Restoration канала RRC Restoration
Показать
Комментарии отсутствуют
Информация о видео
Другие видео канала

 Vintage Vise Restoration ( Much nicer than my last attempt! )
 Why didn't I know this before!!!
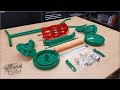 Fatal Flaw!.... And Its 70 Years Old!!!- Mower Restoration
 Makita BO4510 Sander Restoration
 Subaru WRX Brake Caliper Perfect Restoration
 Engine Bay Painting ( Subaru Impreza WRX )
 DeWalt drill cleanup (light restoration)
 Worn Out Pillar Drill Restoration - JUMBO Episode
 Severely Neglected Wheel Restoration
 Subaru Impreza WRX Engine Rebuild - Impreza Pure sound
 Antique Rusty Axe Restoration
 24" Pipe Wrench Restoration ( Stilsons , Tool Restoration )
 Electrical sander restoration - Power Tool
![1920s Rare Battery Charger [Restoration]](https://i.ytimg.com/vi/60RTSNMrcOE/default.jpg) 1920s Rare Battery Charger [Restoration]
1920s Rare Battery Charger [Restoration] Replacing a Sinking Foundation - Cabin Restoration Japan
![Power Hacksaw [Restoration]](https://i.ytimg.com/vi/v7429aWOTF8/default.jpg) Power Hacksaw [Restoration]
Power Hacksaw [Restoration] Motorcycle Fuel Tank Restoration ( Honda TL125 70's)
 26 Year Old Rusty Suspension And Arches Made New Again - WRX Restoration
 Big Japanese Chef Knife Restoration