Old rusty curling iron - Restoration
Link to home nickel plating: https://www.youtube.com/watch?v=Efgxakhziko
In today's video we will show you the renovation of an old curling iron with an alcohol heater.
The curling iron was given to me by my long-time known Mr. Eduard Riedl, who owns a beautiful museum, the Mlejn Museum, a museum of grinders, grinders and other interesting exhibits. This way I would like to thank him.
If you have any information about this curling iron, you can share it with others on my Facebook page:
https://www.facebook.com/groups/951735661652138/
If you have any questions about the process, use machines or other things, ask me in the comments. I try to answer everyone and as soon as possible.
I'm sorry for my bad English, it's not my language.
I'm uploading videos about recovering mechanical things. I'm uploading videos about restoring old wooden things.
If you like this recovery, share and don't forget to give a like and subscribe so you won't miss my other videos :)
Thanks for your advice on how to improve this channel!
youtube channel https://www.youtube.com/user/veradona1
To support our channel: My Patreon Page: https://www.patreon.com/VeradonaRestoration
My PayPal: veradona@email.cz
action index:
00:01 I just got a package with a beautiful old curling iron.
00:56 we start by applying WD-40 to loosen rusted screws and threaded connections
01:17 after a while we begin to dismantle the burner itself
03:49 the original alcohol container is very cracked, so I decided to replace it with another one
04:27 It was necessary to adapt the new container by supplying the original fitting. For soldering it is necessary to clean the container and with the help of solder paste containing silver. Silver draws tin. When to add tin we know that matt gray paste turns into silver.
07:20 Inside the burner is the rest of the wick, which was wrapped on a coiled wire, but it was rotting. Overall, the problem was to get the rest of the wick from the tube, which was mixed with rusty dust from the carbon wire.
07:53 The burner is ready and I started to dismantle the curling iron itself. For easier cleaning and polishing of the curling iron it was necessary to grind the rivets.
09:05 I cleaned all parts first with a wire disc.
09:51 after cleaning the burner there was a soldering crack.
10:45 The body of the burner had to be ground in places where the pulverized disk did not get.
11:07 To make it easier to clean the brass, I chose a "brass cleaner" which is a mixture of several acids.
11:52 And finally, it came to polishing cloth wheel and grinding paste of all parts.
12:19 After polishing, the paste residues are removed with alcohol or petrol.
12:58 I partially riveted the curling iron
13:40 I nicked the sealed metal parts with a hot nickel bath. (reference to nickel plating procedure above)
13:46 Nickeling was beautiful :)
14:05 It was still necessary to make new hand rings and I used a brass tube from an old faucet :)
15:45 Grinded hands had to be recoated.
16:24 I riveted the remaining parts on the curling iron.
17:40 I sprayed the inaccessible places of the drip tray with a black spray suitable for higher temperatures.
17:56 The gun brush is ideal for cleaning inside the burner.
18:17 And all that remains is to make a twisted wire with a wick.
20:01 So, the wick is in place and can begin to assemble.
22:08 Fill the container with alcohol.
22:31 Put some alcohol in the drip tray to heat the burner.
23:15 Burnt from the bowl of alcohol and warmed the burner beautifully :)
23:19 Test
24:25 But I have a beautiful lamb :)
24:53 Comparison before and after renovation.
Thank you for 26:19 minutes of your time :)
Видео Old rusty curling iron - Restoration канала Veradona Restoration
Показать
Комментарии отсутствуют
Информация о видео
Другие видео канала
 Pencil Sharpener Restoration
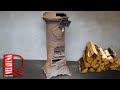 You know these stoves - Restoration
 Small Gasoline blowtorch - Restoration
 Old rusty parquet polisher Restoration
 Chain Hoist Restoration, block n tackle
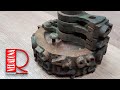 Numbering machine - Restoration
 Door closer - Restoration
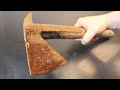 Restoration of a rusty Brades fire axe - ASMR
 Post war Hasag lamp 1945 - Restoration
 Rusty bone grinder - Restoration
 Rusty old Excelsior nut grinder - Restoration
 Manual nettle cutter - restoration , Ruční řezačka na kopřivy
 Do you know what it is? - Restoration
 Rusted of antique iron Restoration
 Old rusty apple peeler - Restoration
 Salami slicer - Restoration, kráječ salámů
 Do you know this press? - Restoration
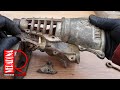 Tutti Frutti juicer - Restoration
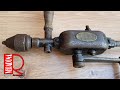 Old hand drill Zbrojovka - Restoration