Rusty bone grinder - Restoration
Hello friends,
In today's video I would like to show you the renovation of a rusty bone grinder by the German company Heureka, which was awarded the medal in Leipzig in 1910.
I found the mill in a metal scrap where it was ready to melt.
If you have some information about restoration photos, you can share them with others on my Facebook page:
https://www.facebook.com/groups/951735661652138/
If you have any questions about the process, use machines or other things, ask me in the comments. I try to answer everyone and as soon as possible.
I'm sorry for my bad English, it's not my language.
I'm uploading videos about recovering mechanical things. I'm uploading videos about restoring old wooden things.
If you like this recovery, share and subscribe :)
Thanks for your advice on how to improve this channel!
youtube channel https://www.youtube.com/user/veradona1
Action Index:
00:01 Presentation of the finding state
00:50 Coarse rust cleaning with a steel brush
01:23 Application of bolt and nut releaser
02:00 Attempt to loosen rusted screws
03:03 The stud had to be drilled
04:47 After unsuccessful attempts to loosen the screws, I decided to heat the screws with flame.
06:30 Since even the warm-up did not help to remove the shaft, I used a press off-hook. Lis jumped and how it turned out :(
06:40 I cleaned the metal parts with the ring disc.
06:25 For quality welding of the broken part it was necessary to sharpen the parts for V weld.
09:33 CO2 welding followed.
09:50 It was necessary to sand the welds after welding.
10:12 Grinded seams were sealed with two-component polyester putty.
11:40 It was necessary to deliver the missing handle (I still have supplies :))
But I had to adjust it because the oval was a square and I needed a triangle.
13:33 After cooking the handle, I put it in the fire to release the tension in the welds.
13:50 I cleaned the handle while the handle was warming up.
14:09 All metal parts were painted with a tannin rust remover.
15:09 I applied graphite to the non-staining areas to have a nice metallic color. Then it is necessary to apply colorless varnish otherwise graphite would stain.
16:17 Gluing places that will not stain.
16:43 Primer
16:52 Top acrylic paint RAL 7001
17:20 Shaft adjustment.
18:01 Handle Compilation.
18:38 It was necessary to make a lever.
20:20 Production of a new pin.
20:50 I chose an acrylic spray, chrome-plated, to highlight the letters.
21:22 Food grease was applied to lubricate the sliding surfaces.
21:50 And the assembly of the bone grinder began.
23:45 Comparison before and after renovation.
23:53 Test followed, but first we had to make bones :)
25:25 Reward for faithful helper :)
26:28 Tes was successful. We can give the bones this ground to the hens :)
Here you can support our channel. Thank you Veronika and Radek :)
My Patreon Page: https://www.patreon.com/VeradonaRestoration
My PayPal: veradona@email.cz
Видео Rusty bone grinder - Restoration канала Veradona Restoration
Показать
Комментарии отсутствуют
Информация о видео
Другие видео канала
![Hand Cranked Grinder Restoration - Antique Bench Grinder [4K]](https://i.ytimg.com/vi/jbuSfqsiP7I/default.jpg) Hand Cranked Grinder Restoration - Antique Bench Grinder [4K]
Hand Cranked Grinder Restoration - Antique Bench Grinder [4K] Old Travel Cooker - Restoration
 Full Restoration 1978 Piaggio Vespa Scooter with SideCar - Full TimeLapse
 1986 Honda Super Cub C90 Full Restoration | Restored to New Condition
 Rusty Bread Slicer - Restoration
 Broken Deadlocked Vise - Perfect Restoration (I did it again)
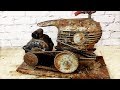 1929 Air Compressor Restoration - Restored to New Condition - I Didn't Think It Would Run
 Restoration old rusty gasoline ChainSaw | Restoring 2-Stroke Petrol Chain Saw
 Restoration of a rare vintage ww2 military watch - nickel and chrome plating - Sanford AS1123
 Antique Grape Press Restoration
 Broken Swivel Vise Restoration
 Restauración de herramientas antiguas eléctricas en español / esmeril (grinder restoration)
![1920s Maytag Washing Machine Engine [Restoration]](https://i.ytimg.com/vi/t_egp4Hqc8Q/default.jpg) 1920s Maytag Washing Machine Engine [Restoration]
1920s Maytag Washing Machine Engine [Restoration] Restoration 2 Stroke Engine ROBIN EC 10 | Restore Engine Robin Antique
![1940s Metal Lathe [Restoration]](https://i.ytimg.com/vi/9s2iZ7HrQX8/default.jpg) 1940s Metal Lathe [Restoration]
1940s Metal Lathe [Restoration]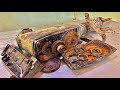 Restoration Hammer Drill USA Old | Restore Drill Electric Large Capacity Max
 Restoration old sewing machine in deep mud | Restore old sewing tools | Valentine gift for wife
 DiResta Winchester 1873 - A VERY RARE RESTORATION
 Rusted of antique tobacco grinder Restoration
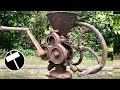 1902 Grain Crusher Restoration