Damaged And Rusty Gumball Machine Restoration [With a lot of candy]
In this restoration I make a trip back in time to my childhood, because I restore an old gumball machine. Many years ago, similar gum dispensers hung on the walls of houses and you could get candy from them, I was there many times :) When I saw this, I'll call it, antique gumball machine on Ebay, I had to buy it and make a restoration video.
▬ What did I do ?! ▬▬▬▬▬▬▬▬
Of course, the first step is to disassemble the old gum dispenser, which I did in 2 stages. First the dispenser itself then the coin mechanism. I remove most of the old paint with paint stripper. Using slag as a blasting medium, I blast off the rest and also so roughen the surface for the new paint. After that I spray primer on the parts, roughen the dried primer with sandpaper and paint everything in red colour. The flap for the gum outlet is aluminium, which I dent out and sand with sandpaper for a great new look. The parts from the coin mechanism are only washed, the front panel is sprayed in silver colour. The heart of the gumball machine is the storage container of the gumballs, this has a huge hole in the side. I remove the old glued plate, cut it to fit and glue it flush again. I cover the inside with cling film, so that plaster mold later is easier to be removed. (tip: do not use spray glue, as I did in the video :)). On a plate I place a pipe and the old storage container, which I fix and seal with acrylic. Then I pour plaster into the mold, let it dry, mend out some spots and sand the mold. Now my thermoforming frame, from the last video, comes into play. Unfortunately, it worked out only at the third attempt, because I simply still lack the experience in settings of the parameters (correct temperature, material thickness, ...). Now all components are ready for the reassembly, and finally just fill it with gumballs and feel transported back to the childhood :)
Delicious, these chewing gums...
▬ Good to know ▬▬▬▬▬▬▬▬
I used the following tools: screwdriver, tweezers, soft-face mallet, water, soap, brush (Turtle), paintbrush, paint stripper, blast cabinet, slag blast media, primer, red paint, silver paint, hot air gun, spray adhesive, putty knife, plastic wrap, aluminum tape, clamps, KG pipe, acrylic, cordless screwdriver, whisk, plaster, saw, vacuum cleaner, thermoforming frame, pliers, candy :)
▬ Chapter ▬▬▬▬▬▬▬▬
0:00 Have a look at the gumball machine
0:24 Disassembling
3:48 Stripping and blasting
4:51 Fill and sand unevenness with fine filler
5:28 Apply primer and roughen with sandpaper
6:12 Spray on red paint
6:49 Washing the parts of the coin mechanism, dent removal and sanding of the flap
7:30 Preparations for plaster mold
9:54 Casting and processing the plaster mold
12:12 Deep drawing of the new gum dispenser
13:37 View all parts
13:46 Assembling all components
16:12 Filling chewing gum dispenser and function test
▬ Did you like it? ▬▬▬▬▬▬▬▬
Did you like the video? Then like, subscribe and please share it!
Many Thanks!
Видео Damaged And Rusty Gumball Machine Restoration [With a lot of candy] канала Forgotten Shine Restoration
Показать
Комментарии отсутствуют
Информация о видео
23 апреля 2021 г. 22:45:00
00:17:34
Другие видео канала
![Christmas Tree Stand Restoration [Germany - 1900 with rotating mechanism and music boxes]](https://i.ytimg.com/vi/kdT_W5Z_Ag8/default.jpg) Christmas Tree Stand Restoration [Germany - 1900 with rotating mechanism and music boxes]
Christmas Tree Stand Restoration [Germany - 1900 with rotating mechanism and music boxes]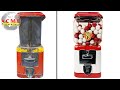 Restoration of a Very Crusty Gum Ball Machine
![German 'St. Hubertus Glas' binoculars restoration [very damaged leather grip]](https://i.ytimg.com/vi/XtUxCITpXus/default.jpg) German 'St. Hubertus Glas' binoculars restoration [very damaged leather grip]
German 'St. Hubertus Glas' binoculars restoration [very damaged leather grip]![1940s Metal Lathe [Restoration]](https://i.ytimg.com/vi/9s2iZ7HrQX8/default.jpg) 1940s Metal Lathe [Restoration]
1940s Metal Lathe [Restoration]![Pipe Vise Restoration [Painted Twice]](https://i.ytimg.com/vi/nYDWJYciFzI/default.jpg) Pipe Vise Restoration [Painted Twice]
Pipe Vise Restoration [Painted Twice] Key Cutting Machine Restoration | Key Duplicator Restore
![Rusty Electric Stove Restoration [Camping Hotplate]](https://i.ytimg.com/vi/fPHFZNe19M0/default.jpg) Rusty Electric Stove Restoration [Camping Hotplate]
Rusty Electric Stove Restoration [Camping Hotplate] GUM BALL MACHINE RESTORATION
![Vacuum Forming Machine - DIY Restoration Preparation [How To Make]](https://i.ytimg.com/vi/X8nUn1qw1xw/default.jpg) Vacuum Forming Machine - DIY Restoration Preparation [How To Make]
Vacuum Forming Machine - DIY Restoration Preparation [How To Make]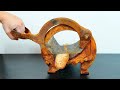 Rusty Bread Cutter Restoration
 Rusty old Excelsior nut grinder - Restoration
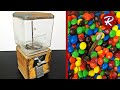 Northwestern Model 60 Vending Machine Restoration
![1900s Wallpaper Trimmer [Restoration]](https://i.ytimg.com/vi/EcRFywUxQrI/default.jpg) 1900s Wallpaper Trimmer [Restoration]
1900s Wallpaper Trimmer [Restoration] Rusty Sheep Shears - Rescue & Restoration
![Christmas bauble [Steampunk Christmas Tree Ball]](https://i.ytimg.com/vi/TAWQDjp6l70/default.jpg) Christmas bauble [Steampunk Christmas Tree Ball]
Christmas bauble [Steampunk Christmas Tree Ball]![Brass Oil Can Restoration [Polished Brass]](https://i.ytimg.com/vi/MAL0cZxcMio/default.jpg) Brass Oil Can Restoration [Polished Brass]
Brass Oil Can Restoration [Polished Brass]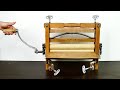 Broken Hand Wringer Restoration
 Vintage Toy Vending Machine Restoration
 Antique Hand Cranked Grinder - Restoration
![Two-Man Chainsaw - Carburetor & Muffler [Restoration]](https://i.ytimg.com/vi/ZjkIl6R3EEk/default.jpg) Two-Man Chainsaw - Carburetor & Muffler [Restoration]
Two-Man Chainsaw - Carburetor & Muffler [Restoration]