Vintage Paraffin Blow Torch Restoration
Please read the full description for any information about the video.
If you would like to send me something to restore, tools to use or anything to support Restore It, please send to:
Restore It Mail Box
PO Box 50
CHATTERIS
PE16 9AZ
Subscribe for Weekly content!
Tools used in this video:
Tools & equpitment used:
Quartz Lacquer - https://goo.gl/8PTVKM
Base Coat Paint - https://goo.gl/mWhufG
Rust Remover - https://goo.gl/13gopW
Moldex Full Face Mask - https://goo.gl/NNYGrv
FGL 5 Spray gun - https://goo.gl/Acg5rd
A.N.I. R150-T Mini Spray gun - https://goo.gl/cHTJS2
Colad Washable Overalls - https://goo.gl/3Css9E
Colad Mixing Cups - https://goo.gl/8DYmE8
Colad TurboMix Sticks - https://goo.gl/cYZfks
Colad Synthetic Paint Strainers - https://goo.gl/H79ZgL
Steel wire bits - http://geni.us/keyaD
Rotary Tool - http://geni.us/HGed
Concentrate Degreaser - http://geni.us/yUn9
Mannesmann Socket Set - http://geni.us/HCDZ
I bought this old blow torch for £3. As you can see it's in a fairly bad condition. I thought this would make a perfect Restore It project as I haven't worked with brass before. I start by dismantling the torch completely. I then clean and degrease every part. Once dry I remove what's left of the gasket material around one of the holes. I then dissolve some salt in vinegar and add flour to create a paste I can cover the brass parts with. This will react with the brass and give it a reddish copper finish that looks a lot brighter than before. I then remove the sticker and start to clean/polish the brass parts with a brass wire brush in a drill press. This brings the brass to an almost reflective finish. I now move onto the previously black parts. All of which need basting and preparation for painting. Once ready, I apply heat resistant black and lacquer paint to the parts surrounding the nozzle and pipes. I then etch, primer, colour and lacquer the handle and support piece with normal paint. After I have finished the painted parts, I move back to the brass parts. I use metal polish and a leather buffing wheel to really make the brass pop. It actually came up a lot nicer than I thought it would. Whilst doing all of this, I had a sticker printed that looked very similar to the original design. I took a photograph from the internet, removed the imperfections, added the banner at the bottom and brightened up the colour. Which was then added to the torch. A new gasket was made from chemical and heat resistant gasket material and added just before reassembling the entire torch and completing the restoration.
Disclaimer: I am no professional. I am completely self-taught and would appreciate any feedback, advice or constructive criticism.
I don't add music to these videos so that you can choose to listen to what you like if you would like to.
Become a patron to win the rocker cover featured in this video!
Patreon - https://www.patreon.com/RestoreIt
PayPal Donations - restoreitchannel@gmail.com - If you would like to help towards more tools and projects.
Follow us on Social media to keep up to date with videos and giveaways.
Twitter - https://twitter.com/Restore__It
Facebook - https://www.facebook.com/RestoreItChannel
Instagram - @RestoreItChannel
Patreon - https://www.patreon.com/RestoreIt
Discord - I now also have a discord server if you want to chill with like-minded people and maybe learn something new. - https://discord.gg/vNmCBk9
Видео Vintage Paraffin Blow Torch Restoration канала Restore It
Показать
Комментарии отсутствуют
Информация о видео
Другие видео канала
 Vintage Blow Torch Full Restoration
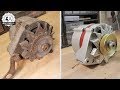 BMW E30 Alternator Restoration
 how to operate a vintage brass paraffin/kerosene blow torch
 Restoration Abandoned Drill Press
 Kamasa 2 Ton Hydraulic Jack Restoration
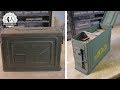 1942 US .30 Cal Carbine M1 Ammo Box Restoration
![Antique Jewelry Lathe [Restoration]](https://i.ytimg.com/vi/3PRjw2rohxU/default.jpg) Antique Jewelry Lathe [Restoration]
Antique Jewelry Lathe [Restoration]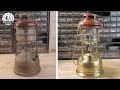 Broken Tilley Storm Lamp Restoration
 Rusty bone grinder - Restoration
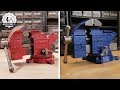 Engineer's Swivel Vice Restoration
![Rare Antique Blower [Restoration]](https://i.ytimg.com/vi/v8TKJsKAhLI/default.jpg) Rare Antique Blower [Restoration]
Rare Antique Blower [Restoration] 1930s GASOLINE BLOW TORCH RESTORATION - With Testing!
 ITS ALIVE!!! Vintage Brass Blowtorch Full Restoration
 Restoration - A beautiful workshop VISE
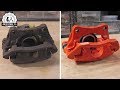 Rusty BMW E30 325i Brake Caliper Restoration
 Old Airbrush Compressor Restoration
 BMW E30 Limited Slip Differential Restoration
 1940's Two Speed Enclosed Breast Drill Restoration
 Rusty Old Coffee Grinder - Perfect Restoration
 Hand Pump Restoration