Kamasa 2 Ton Hydraulic Jack Restoration
Please read the full description for any information about the video.
Restore It Mail Box
PO Box 50
CHATTERIS
PE16 9AZ
Subscribe for Weekly content!
Tools & equpitment used:
Quartz Lacquer - https://goo.gl/8PTVKM
Base Coat Paint - https://goo.gl/mWhufG
Rust Remover - https://goo.gl/13gopW
Moldex Full Face Mask - https://goo.gl/NNYGrv
FGL 5 Spray gun - https://goo.gl/Acg5rd
A.N.I. R150-T Mini Spray gun - https://goo.gl/cHTJS2
Colad Washable Overalls - https://goo.gl/3Css9E
Colad Mixing Cups - https://goo.gl/8DYmE8
Colad TurboMix Sticks - https://goo.gl/cYZfks
Colad Synthetic Paint Strainers - https://goo.gl/H79ZgL
Steel wire bits - http://geni.us/keyaD
Rotary Tool - http://geni.us/HGed
Concentrate Degreaser - http://geni.us/yUn9
Mannesmann Socket Set - http://geni.us/HCDZ
The restoration began with dismantling the jack. This involved removal of all of the axles, clips and major functional pieces. I then degreased everything before removing all of the red paint with paint stripper. During the paint stripping process, I also remove an old warning sticker with a chisel. I then moved onto dismantling the smaller bits like the piston and bracket from the socket piece. Once most of the paint, dirt, and grease were off, I blasted pretty much everything with 120 grit aluminum oxide and etch primed shortly after to protect the metal from rusting now and in the future. Once that was dry, I high-build primed all of the main metal parts. Once they were dry I sanded down them with 400g and then 800g wet and dry sandpaper. This prepared them for the coats of blue and black that followed. Once the primed parts were prepared for paint, I painted all of the red parts blue and the black pieces black again. I then lacquered the blue parts to protect the water-based paint and also make the pieces shine. Whilst all of that was drying I set about electroplating the axles, nuts, and bolts that needed it.
So, I'm still learning and my setup is amateur at best, but the idea is to coat the freshly blasted/cleaned metal piece with zinc and then dye them with either gold or silver/blue passivate. It's called Electrogalvanization. Electricity from the battery travels to the two anodes you see in the far right bucket, across the saline/zinc solution and onto the pieces that need plating. These parts are attached to a conductive wire, which is connected to the ruler, which is connected to the negative side of the battery. This causes zinc to leave the anode and attach to the part. I can control the current and therefore the speed and quality of the plating using a rheostat.
A starter kit can be found here from the UK - http://www.gaterosplating.co.uk/zinc-plating-kit
Once all of the pieces were plated and passivated I moved onto the front wheels. These were stuck in their carriers with a squashed axle that I couldn't remove, so I kept them in there. Firstly I removed all of the rust and chipped paint from the wheels. I then placed the wheels in some vice holes and painted them with a brush. Whilst they were drying I polished all of the bare metal pieces on a bench drill with a steel wire wheel. During my time out of the workshop, I was trying to find a photo of the sticker that was on the jack, as the one I had was completely ruined. I was having a really hard time doing so. So much so, I had to create one using a photo of the one originality on the jack in Photoshop. It came out a little pale but looks great on the finished piece. Once everything had dried, including the passivate which cannot be touched for 48 hours. It was then a case of reassembling everything. During this process, I added new circlips, ball bearings, and grease. Once everything was back together. (I accidentally put the leveling arms on the wrong axles attached to the saddle, I have fixed this now) All that was required was new hydraulic fluid. This didn't arrive in time and this video had been delayed already so I'll just add it when it arrives. The reason I did not change the seals on the hydraulic pump, is because the jack worked perfectly with no sagging before the resto. The jack is also no longer used and was done solely for the video.
- Disclaimer: I am no professional. I am completely self-taught and would appreciate any feedback, advice or constructive criticism.
Become a patron to win the Items featured in these videos!
Patreon - https://www.patreon.com/RestoreIt
PayPal Donations - restoreitchannel@gmail.com - If you would like to help towards more tools and projects.
Follow us on Social media to keep up to date with videos and giveaways.
Twitter - https://twitter.com/Restore__It
Facebook - https://www.facebook.com/RestoreItChannel
Instagram - @RestoreItChannel
Patreon - https://www.patreon.com/RestoreIt
Discord - I now also have a discord server if you want to chill with like-minded people and maybe learn something new. - https://discord.gg/vNmCB
Видео Kamasa 2 Ton Hydraulic Jack Restoration канала Restore It
Показать
Комментарии отсутствуют
Информация о видео
Другие видео канала
 HYDRAULIC FLOOR JACK REBUILD
 Old Airbrush Compressor Restoration
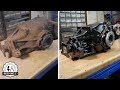 BMW E30 Limited Slip Differential Restoration
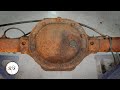 Rear Axle Restoration and Rebuild (Chrysler 8.25)
 Restauração Compressor Wayne de 1950
 Restoration Old Air Compressor Machine | Nothing is impossible - Restore Capacity Small Air Tool
 Mantenimiento GATO HIDRAULICO Cambiar ACEITE Y PURGAR Gato BOTELLA CARRETILLA (Reparar 💯 Ahorra 💲) ✅
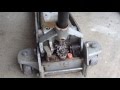 How to repair a floor jack that leaks fluid
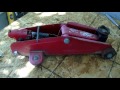 Como hacer una reparacion a un gato increible el gasto
 Most Destroyed Hydraulic Jack EVER ! Amazing RESTORATION
 BMW E30 Alternator Restoration
 Super Rusty Spare Wheel Restoration
 Restoration Hydraulic Jack | Restaurare cric hidraulic
 Which is the Strongest Car Jack? Hydraulic Press Test!
 BMW E30 Front Struts Restoration | BMW E30 325i Sport Restoration S1 E1
 Hydraulic CAR JACK modification
 Reparacion de gato hidraulico tipo botella
 عندك عفريته ضعيفه او تهرب زيت ؟؟ هنا فك اجزاءها واعادتها كالجديده
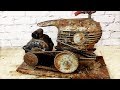 1929 Air Compressor Restoration - Restored to New Condition - I Didn't Think It Would Run
 Gato hidraulico con fuga