Macrame Vine with 3 Leaf Variations - DIY Intermediate Macrame Tutorial!
Macrame Vine with 3 Leaf Variations - DIY Intermediate Macrame Tutorial! Please see below for materials and written instructions.
Shop my book, Mixed Fiber Macrame, and Fiber Art Supplies (string, rope roving, ribbons, velvet and more) on my website or in my Etsy Shop:
Website: https://www.lotsofknots.ca
Etsy Shop: https://www.etsy.com/ca/shop/LotsofKnotsCanada
Support me directly: https://ko-fi.com/lotsofknotscanada
Materials:
- 3mm Single Strand String (Natural)
Hey guys! I have an intermediate pattern for you today which will teach you how to make a macrame vine with 3 different leaf variations. Let’s get started.
Set up - Cut one piece of rope that is 5 ft in length and two pieces of rope that are 13 ft in length. Attach the 5 ft piece on the left side of your work and then the two other pieces by folding each piece in half and attaching to your dowel using Lark’s Head knots.
Using the two cords on the left as your filler cords tie 4 double half hitch knots (DHHKs) working down and to the right. These two cords will be used as filler cords through out this pattern to create the vine.
Leaf Variation 1
Using the inside right cord as your filler cord tie 3 DHHKs working up and to the left. Using the same filler cord tie 3 DHHKs working down and to the right.
Using the inside left cord as your filler cord tie 2 DHHKs working up and to the left. Using the same filler cord tie 2 DHHKs working down and to the right.
Using the two cords on the right as your filler cords tie 4 DHHKs working down and to the left.
Make another leaf on the right side of your work using the same method we used to create the first leaf.
Leaf Variation 2
Using the inside right cord as your filler cord tie 3 DHHKs working up and to the left. Using the same filler cord tie 3 DHHKs working down and to the right.
Using the outside left cord as your filler cord tie 2 DHHKs working down and to the right.
Using the outside left cord as your filler cord tie 1 DHHK working down and to the right.
Using the two cords on the right as your filler cords tie 4 DHHKs working down and to the left.
Just as we did above, make another leaf on the right side of your work using the same method we used to create the leaf on the left.
Leaf Variation 3
Using the inside right cord as your filler cord tie 3 DHHKs working up and to the left. Using the same filler cord tie 2 DHHKs working down and to the right.
Using the same filler cord tie 2 DHHKs working up and to the left, then 2 DHHKs working down and to the right.
Using the same filler cord tie 2 DHHKs working up and to the left and then 3 DHHKs working down and to the right.
Using the two cords on the right as your filler cords tie 4 DHHKs working down and to the left.
Just as we did above, make another leaf on the right side of your work using the same method we used to create the leaf on the left.
I started to run out of cord here as I had originally only planned for two leaf variations. I adjusted for this in the measurements I suggested at the beginning of this tutorial so you should be just fine!
Thanks for watching!
Видео Macrame Vine with 3 Leaf Variations - DIY Intermediate Macrame Tutorial! канала Lots of Knots Canada
Показать
Комментарии отсутствуют
Информация о видео
Другие видео канала
 Macrame Floral | Wavy Leaves Pattern For Any Macrame Design
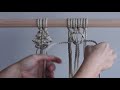 DIY Macrame Tutorial - More Square Knot Patterns!
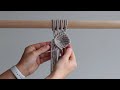 DIY Macrame Tutorial - Vine/Leaf Pattern Using Double Half Hitch Knots!
 DIY Macrame Tutorial - Intermediate Pattern Using Double Half Hitch Knots!
 3 FLORAL MACRAME LEAF PATTERNS FOR MICRO & MACRO MACRAMÉ
 3 LEAF CHAIN PATTERNS FOR YOUR MACRAME PROJECTS
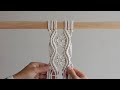 DIY Beginner Macrame Tutorial: Diamond Pattern with a Twist!
 "Easy To Follow" - How To Tie An Eye Splice In 3 Strand Rope
 How to make Petals Macrame Wall Hanging / modern macrame patterns/ simple macrame easy for beginners
 DIY Macrame Plant Hanger with Floral Pattern
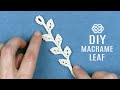 LEAF PATTERN TUTORIAL FOR YOUR MACRAME PROJECTS 🌿
 DIY Macrame Tutorial - Berry Knot Pattern!
 3 Intermediate Macrame Knots & Sennits Patterns
 50 Macrame Knots & Sennits To Improve Your Macrame Designs
 Tutorial Macrame Knots / Sea Decor /
 6 nuevos NUDOS en MACRAMÉ (paso a paso) | 6 New Macrame Knots
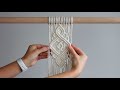 DIY Macrame Tutorial - Intermediate Pattern #2 Using Double Half Hitch Knots!
 Macrame Plant hanger using wave pattern / 마크라메 플랜트 행거 만들기
 DIY: MACRAME VINE KEYCHAIN | MACRAME TUTORIAL | LEAF PATTERN (STEP BY STEP)