DIY Macrame Tutorial - Intermediate Pattern Using Double Half Hitch Knots!
Intermediate Macrame Pattern! Please see below for materials and written instructions.
Materials:
- 3mm Single Strand Twisted Cotton String in Natural (Beige)
2mm-6mm Natural and Coloured Cotton String and 3 Ply Rope are available for purchase in my Etsy Shop: https://www.etsy.com/ca/shop/LotsofKnotsCa
Hey guys! Today I will show you how to make an intricate pattern using double half hitch knots (DHHK). As such, this is an intermediate pattern for those comfortable tying DHHKs. This pattern uses 3mm Single Strand Twisted Cotton String in Natural (Beige) and is approximately 7 inches long. Let’s get started.
Set up - Cut 8 pieces of string, each piece is 2 meters long. Fold each piece in half and attach to your dowel using Lark’s Head knots.
Tie a double half hitch knot with the two middle cords. Working down and to the right tie 3 more DHHKs. Move back to the centre of your work. Working down and to the left tie 3 more DHHKs.
Move back to the middle and tie a DHHK with the two middle cords. Working down and to the right tie 2 more DHHKs. Move back to the middle and working down and to the left tie 2 more DHHKs.
Using the 6th cord from the left as your filler cord tie 2 DHHKs working down and to the right.
Using the 6th cord from the right as your filler cord tie 2 DHHKs working down and to the left.
Using the middle left cord as your filler cord tie one more DHHK to connect the 2 sides.
Using the 5th cord from the left as your filler cord tie 3 DHHKs working down and to the right.
Using the 5th cord from the right as your filler cord tie 2 DHHKs working down and to the left.
Using the inner filler cord on the left tie one DHHK. Using the outer filler cord on the left tie one DHHK.
Using the 5th cord from the left as your filler cord tie 2 DHHKs working to the left.
Using the next cord on the right as your filler cord tie 2 DHHKs working to the left.
Using the same filler cord tie 2 DHHKs working to the right.
Using the outer filler cord on the left tie 2 DHHKs working to the right.
Repeat that process on the right side of your work.
Next we will start to create the top of the main diamond that will sit in the centre of your work.
Using the 7th cord from right as your filler cord tie 2 DHHKs working down and to the right.
Using the next cord on the left as your filler cord tie 2 DHHKs working down and to the right.
Repeat that same process on the left side of your work.
We will create 2 more semi-circle sections on the sides of our work.
Using the 3rd cord from the right as your filler cord tie 2 DHHKs working down and to the right.
Using the next cord on the left as your filler cord tie 2 DHHKs working down and to the right.
Using the same filler cord tie 2 DHHKs working to the left.
Using the outer filler cord on the right tie 2 DHHKs working to the left.
Using the 5th cord from the right as your filler cord tie 2 DHHKs working down and to the right.
Using the next cord on the left as your filler cord tie 2 DHHKs working down and to the right.
Repeat that same process on the left side of your work.
Tie a square knot in the middle of your work.
We have now completed the first half of the design. The second half of the design is a mirror image of the first half.
Using the 4th cord from the left as your filler cord tie 2 DHHKs working down and to the right.
Using the next cord on the left as your filler cord tie 2 DHHKs working down and to the right.
Using the 3rd cord from the left as your filler cord tie 2 DHHKs working down and to the left.
Using the next cord on the right as your filler cord tie 2 DHHKs working down and to the left.
Using the same filler cord tie 2 DHHKs working to the right.
Using the outer filler cord on the left tie 2 DHHKs working to the right.
Repeat that process on the right side of your work.
Using the 6th cord from the left as your filler cord tie 2 DHHKs working down and to the right.
Using the next cord on the left as your filler cord tie 2 DHHKs working down and to the right.
Using the 5th cord from the left as your filler cord tie 2 DHHKs working down and to the left.
Using the next cord on the right as your filler cord tie 2 DHHKs working down and to the left.
Using the same filler cord tie 2 DHHKs working to the right.
Using the next cord on the left as your filler cord tie 2 DHHKs working to the right.
Repeat that process on the right side of your work.
Before I tie my semi-circle on the right I am going to connect the 2 sides of the diamond in the middle.
Using the middle left cord as your filler cord tie 2 DHHKs working to the right.
Using the next cord on the left as your filler cord tie 2 DHHKs working to the right.
Finish it off with one more diamond at the bottom.
Thanks so much for watching!
Видео DIY Macrame Tutorial - Intermediate Pattern Using Double Half Hitch Knots! канала Lots of Knots Canada
Показать
Комментарии отсутствуют
Информация о видео
Другие видео канала
 6 PATTERNS AND KNOTS FOR YOUR MACRAME PROJECTS
 DIY como hacer HOJAS o PLUMAS en MACRAME | DIY Macrame Feathers/Leaf
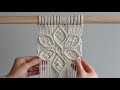 DIY Macrame Tutorial: Large 6 Petal Flower Using Double Half Hitch and Square Knots!
 3 MACRAME PATTERNS FOR PLANT HANGERS | DIY BOHO HOME DECOR
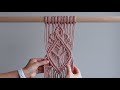 DIY Macrame Tutorial - Intermediate Pattern #3 Using Double Half Hitch Knots!
 DIY PORTAMACETAS de MACRAME paso a paso (PRINCIPIANTES) | DIY Macrame Plant Hanger for Beginners
 8 NUDOS BÁSICOS en MACRAMÉ (paso a paso) | 8 Basic Macrame Knots
 Tutorial Macrame Triangular Dream Catcher | Macrame Wall Hanging |
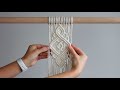 DIY Macrame Tutorial - Intermediate Pattern #2 Using Double Half Hitch Knots!
 HOW TO: Double Half Hitch Knot
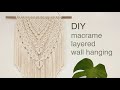 DIY TUTORIAL macrame layered wall hanging diamond pattern | 마크라메 레이어드 월 행잉 다이아몬드 패턴
 DIY Macrame Tutorial - Berry Knot Pattern
 DIY Macrame Dreamcatcher | Modern Macrame Step by Step Tutorial |
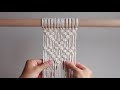 MACRAME SHAPES SERIES - Triangle Pattern #2 Using Square Knots!
 DIY 3 ideas de PORTAMACETAS en macrame SIN ARO | DIY 3 Macrame Plant Hanger ideas Without a Ring
 Macrame curtain #3 / How to make a Macrame curtain / step by step / easy even if you are a beginner
 10 Macrame Wall Decor DIY Ideas For Home Decoration
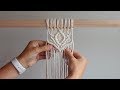 DIY Macrame Tutorial - Lotus Flower
 Learn to Macrame, The Half Hitch Knot