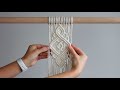
DIY Macrame Tutorial - Intermediate Pattern #3 Using Double Half Hitch Knots!
DIY Macrame Tutorial - Intermediate Pattern #3! Please see below for materials and written instructions.
Materials:
- 5mm Single Strand String (Dusty Pink)
10% OFF ALL MACRAME SUPPLIES NOW (String, rope, rings and beads)
Premium and raw cotton available in mini and bulk spools (various colours and sizes). Shop Now: https://www.etsy.com/ca/shop/LotsofKnotsCanada
Hey guys! I have another intermediate pattern for you that uses double half hitch knots.
Intermediate Pattern 1: https://youtu.be/oW9nAeX7H5g
Intermediate Pattern 2: https://youtu.be/QSE7SgtD43w
I used 3mm string for the other two patterns but for this pattern I am using 5mm string. If you are wanting to create one of my other intermediate patterns using 5mm string add a little extra to the set up for this pattern as this pattern is a little less dense than my other 2 intermediate patterns. Let’s get started.
Set Up - Cut 10 pieces of cord, each piece is 2 meters in length. Fold each piece in half and attach to your dowel using Lark’s Head knots. Once finished you will have 20-60cm of cord hanging below your piece. The pattern measures roughly 10 inches in length by 6 inches in width.
Use the inner left cord as your filler cord and the inner right cord as your working cord and tie a double half hitch knot (DHHK) working to the right. Using the same filler cord tie 3 more DHHKs working down and to the right.
Using the inner left cord as your filler cord tie 3 DHHKs working down and to the left.
Use the inner left cord as your filler cord and the inner right cord as your working cord and tie a double half hitch knot (DHHK) working to the right. Using the same filler cord tie 2 more DHHKs working to the right.
Using the inner left cord as your filler cord tie 2 DHHKs working down and to the left.
Using the same filler cord on the left tie 2 DHHKs working down and to the right.
Using the next filler cord on the left tie 2 DHHKs working down and to the right.
Repeat on the right side of your work.
Using the inner left filler cord tie 2 DHHKs to connect the two sides. Using the next filler cord on the left tie 2 DHHKs working down and to the right.
Using the 7th cord from the left as your filler cord tie 3 DHHKs working down and to the left. Using the same filler cord tie 3 DHHKs working down and to the right.
Using the 9th cord from the left as your filler cord tie 2 DHHKs working down and to the left to start to create the large diamond.
Using the 4th cord from the left as your filler cord tie one DHHK working down and to the left.
Using the same filler cord tie 3 DHHKs working down and to the right.
Using the filler cord to the right of that section tie one DHHK working down and to the left.
Using the inner left cord as your filler cord tie 3 DHHKs working down and to the left.
Repeat that section on the right side of your work.
Using the 6th cord from the left as your filler cord tie 5 DHHKs working down and to the left. Using the 7th cord from the left as your filler cord tie 5 DHHKs working down and to the left.
Repeat that process on the right side of your work.
Using the 9th cord from the left as your filler cord tie 1 DHHK working down and to the right. Repeat on the right side of your work. Using the inside left cord as your filler cord tie a DHHK working to the right.
Using the 8th cord from the left as your filler cord tie 2 DHHKs working down and to the right. Repeat on the right side of your work. Using the inside left cord as your filler cord tie a DHHK working to the right.
Using the 5th cord from the left tie 5 DHHKs working down and to the right. Repeat on the right side of your work. Using the inside left cord as your filler cord tie a DHHK working to the right.
We will now complete the bottom half of the diamond.
Using the 2nd cord from the left tie 8 DHHKs working down and to the right. Using the left most cord as your filler cord tie 8 DHHKs working down and to the right.
Repeat that process on the right side of your work.
Using the inside right cord as your filler cord tie 2 DHHKs to connect the two sides. Repeat that process with the next filler cord on the left.
Thanks so much for watching!
Видео DIY Macrame Tutorial - Intermediate Pattern #3 Using Double Half Hitch Knots! канала Lots of Knots Canada
Показать
Комментарии отсутствуют
Информация о видео
Другие видео канала
 DIY Macrame Tutorial - Intermediate Pattern #2 Using Double Half Hitch Knots!
 DIY como hacer una HOJA en MACRAME (paso a paso) | DIY Macrame Leaf Tutorial
 DIY | macrame wall hanging | 마크라메 월 행잉
 Tutorial Macrame Wall Hanging with beads | DIY |
 DIY MANDALA en MACRAME (paso a paso) PRINCIPIANTES | DIY Macrame Mandala Wall Hanging for Beginners
![[kyeol macrame] 결마크라메 DIY 레이어드 월행잉 만들기 / 보헤미안월행잉 / macrame layered wallhanging / tutorial](https://i.ytimg.com/vi/qg_wrn9cAAI/default.jpg) [kyeol macrame] 결마크라메 DIY 레이어드 월행잉 만들기 / 보헤미안월행잉 / macrame layered wallhanging / tutorial
[kyeol macrame] 결마크라메 DIY 레이어드 월행잉 만들기 / 보헤미안월행잉 / macrame layered wallhanging / tutorial 3 FLORAL MACRAME LEAF PATTERNS FOR MICRO & MACRO MACRAMÉ
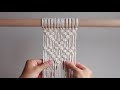 MACRAME SHAPES SERIES - Triangle Pattern #2 Using Square Knots!
 DIY Macramé Cat Hammock #1, Macrame Cat Bed Tutorial for beginner by TNARTNCRAFTS
 DIY Macrame Tutorial - Incorporating Colour Into Your Work Using Double Half Hitch Knots!
 20 Pattern Elements for your macrame projects (PART 1) / How to weave it
 DIY Macrame Tutorial - Intermediate Pattern Using Double Half Hitch Knots!
 Tutorial Macrame Wall Hanging exclusive by MACRAMESSAGE | Easy DIY |
 5 nuevos NUDOS en MACRAMÉ (paso a paso) | 5 New Knots in Macrame
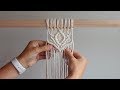 DIY Macrame Tutorial - Lotus Flower
 DIY Macrame Tutorial - Berry Knot Pattern
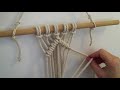 diagonal double half hitch macrame knot
 10 Easy MACRAME KNOTS and PATTERNS | Tutorial
 10 EASY MACRAME PATTERNS