DIY Beginner Macrame Tutorial: Diamond Pattern with a Twist!
DIY Macrame Tutorial: Diamond Pattern with a Twist! - Please see below for materials and written instructions.
Material:
-4mm Single Strand Twisted String (Colour: Natural)
Shop Fiber Art Supples (string, rope, roving and more) here: https://www.etsy.com/ca/shop/LotsofKnotsCanada
Hey guys! Chantel here again - just want to say thank you all for you support. I’ve received a lot of messages over the past few weeks, each of you showing me the work you’ve created with the help of my tutorials which I just love to see so thank you!
I have a fun double half hitch knot (DHHK)/square knot (SK) pattern for you today. What I want to highlight is how this is a common diamond pattern that I have alternated a bit to create a completely different look. As we go through I’ll show you how I did this. Let’s get started.
Set up - Cut 6 pieces of 4mm string, each piece is 2m in length. Fold each piece in half and attach 3 on the left and 3 on the right using Lark’s head knots with about 1.5 inches of space in between them groups. I’ve left a bit more space here but I adjust later on in this tutorial.
Using the 5th cord from the left as your filler cord tie 4 diagonal DHHKs working to the left. Using the 6th cords from the left as your filler cord tie 4 diagonal DHHKs working to the left. Repeat on the right side of your work.
I’ll adjust this slightly by moving the groups a bit closer together.
By leaving space in between the sides of this diamond pattern and not tying the first DHHK which connects the sides of the diamond you can see how I have now created a completely different look. I’ve added a photo on the right side of the screen for reference so you can see what I mean.
Tie a SK with the four middle cords. Tie two alternating SKs underneath the first SK. Tie one alternating SK underneath the second row.
Using the second cord from the left as your filler cord tie 4 DHHKs. Using the cord on the left as your filler cord tie 4 DHHKs. Repeat on the right side of your work.
Repeat this pattern until you’ve created a design of your desired length. I’ll show you what this design looks like after repeating this pattern again.
Thanks for watching!
Видео DIY Beginner Macrame Tutorial: Diamond Pattern with a Twist! канала Lots of Knots Canada
Показать
Комментарии отсутствуют
Информация о видео
Другие видео канала
 Macrame Wall Hanging New Tutorial | Easy DIY for Macrame Beginners
 6 nuevos NUDOS en MACRAMÉ (paso a paso) | 6 New Macrame Knots
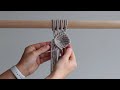 DIY Macrame Tutorial - Vine/Leaf Pattern Using Double Half Hitch Knots!
 DIY Macrame Tutorial: Small Diamond Pattern Using Double Half Hitch Knots!
 DIY Macrame Tutorial - Eye Pattern
 DIY como hacer HOJAS o PLUMAS en MACRAME | DIY Macrame Feathers/Leaf
 DIY Macrame Intermediate Tutorial: Reverse DHHK Coloured Diamond Pattern!
 HOW TO: Macrame Basics | Larks Head, Square Knot, Spiral Stitch, Double Half Hitch
 DIY | macrame layered wall hanging | 마크라메 레이어드 월 행잉
 DIY ANGEL en MACRAME (paso a paso) | DIY Macrame Angel Tutorial
 10 Easy MACRAME KNOTS and PATTERNS | Tutorial
 DIY Macrame Tutorial Using Double Half Hitch Knots & Berry Knots! Semi-Circle Pattern
 6 nuevos NUDOS en MACRAMÉ (paso a paso) | 6 New Macrame Knots
 DIY Tutorial l How to make a Moon Dreamcatcher ? | Macrame Decor
 DIY | macrame leaves wall hanging | 마크라메 나뭇잎 월 행잉
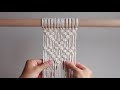 MACRAME SHAPES SERIES - Triangle Pattern #2 Using Square Knots!
 ✂️Top 5 Tips to get Started With Macrame
 Tutorial Macrame Boho Wall Hanging on a stick of cinnamon
 3 MACRAME PATTERNS FOR PLANT HANGERS | DIY BOHO HOME DECOR
 DIY Macrame Tutorial - Intermediate Pattern Using Double Half Hitch Knots!