- Популярные видео
- Авто
- Видео-блоги
- ДТП, аварии
- Для маленьких
- Еда, напитки
- Животные
- Закон и право
- Знаменитости
- Игры
- Искусство
- Комедии
- Красота, мода
- Кулинария, рецепты
- Люди
- Мото
- Музыка
- Мультфильмы
- Наука, технологии
- Новости
- Образование
- Политика
- Праздники
- Приколы
- Природа
- Происшествия
- Путешествия
- Развлечения
- Ржач
- Семья
- Сериалы
- Спорт
- Стиль жизни
- ТВ передачи
- Танцы
- Технологии
- Товары
- Ужасы
- Фильмы
- Шоу-бизнес
- Юмор
Flame Treating & Mixing Epoxy | Kevlar Skid Plate Install Made Easy (Part 5)
This is where things start coming together.
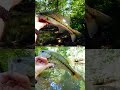
In Part 5 of this step-by-step Kevlar skid plate series, we wrap up the flame treatment process and move into mixing the resin and hardener—the beginning of the actual installation.
In this video:
Continuing the flame treatment (“blushing”) process
When this step is necessary (and when it might not be)
How to do it safely without overheating your boat
What to look for: subtle warmth, not melting
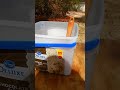
Mixing resin and hardener using pre-measured skid plate kits
Not all boat materials require flame treatment—some lighter materials (like Royalex-style hulls) may not need it. But for many plastic boats, this step helps improve bonding.
The good news? Most skid plate kits make the epoxy process simple, with pre-measured components and easy mixing right in the provided containers.
🎣 Up next: applying epoxy to the Kevlar felt and setting the skid plate in place.
Subscribe to keep up with the best black bass content out there.
Don't miss the previous episodes!
Part 1 - https://youtube.com/shorts/-B0KEGLdqk8
Part 2 - https://youtube.com/shorts/3k2JPR1UmwU
Part 3 - https://youtube.com/shorts/dEep49r-LGQ
Part 4 - https://youtube.com/shorts/QJUD1vNTWOg
#CanoeDIY #kayakdiy #skidplate #kevlar #boatmaintenance #fishinggear #riverfishing #kayakfishing #canoefishing #DIYOutdoors #fishinglife #outdoorskills #bassfishing #blackbass
Видео Flame Treating & Mixing Epoxy | Kevlar Skid Plate Install Made Easy (Part 5) канала Black Bass Talk
In Part 5 of this step-by-step Kevlar skid plate series, we wrap up the flame treatment process and move into mixing the resin and hardener—the beginning of the actual installation.
In this video:
Continuing the flame treatment (“blushing”) process
When this step is necessary (and when it might not be)
How to do it safely without overheating your boat
What to look for: subtle warmth, not melting
Mixing resin and hardener using pre-measured skid plate kits
Not all boat materials require flame treatment—some lighter materials (like Royalex-style hulls) may not need it. But for many plastic boats, this step helps improve bonding.
The good news? Most skid plate kits make the epoxy process simple, with pre-measured components and easy mixing right in the provided containers.
🎣 Up next: applying epoxy to the Kevlar felt and setting the skid plate in place.
Subscribe to keep up with the best black bass content out there.
Don't miss the previous episodes!
Part 1 - https://youtube.com/shorts/-B0KEGLdqk8
Part 2 - https://youtube.com/shorts/3k2JPR1UmwU
Part 3 - https://youtube.com/shorts/dEep49r-LGQ
Part 4 - https://youtube.com/shorts/QJUD1vNTWOg
#CanoeDIY #kayakdiy #skidplate #kevlar #boatmaintenance #fishinggear #riverfishing #kayakfishing #canoefishing #DIYOutdoors #fishinglife #outdoorskills #bassfishing #blackbass
Видео Flame Treating & Mixing Epoxy | Kevlar Skid Plate Install Made Easy (Part 5) канала Black Bass Talk
kevlar skid plate epoxy mixing epoxy kayak canoe epoxy mixing flame treating kayak flame treating canoe plastic adhesion epoxy skid plate installation part 5 DIY canoe repair DIY kayak repair kayak hull protection canoe hull protection epoxy resin hardener kayak fishing kayak setup canoe fishing gear river fishing gear shallow water fishing protect kayak hull kayak maintenance canoe maintenance how to install skid plate
Комментарии отсутствуют
Информация о видео
6 мая 2026 г. 20:00:00
00:02:42
Другие видео канала