Digispark ATtiny85 with Arduino 2.0: How to program?
🔥🔥After installing the Digistump AVR package, windows/mac will ask to install the "Digistump LLC" drivers. Click next to install it.🔥🔥
Click on the link below. Then copy the URL and paste it into "additional boards URL" section:
https://raw.githubusercontent.com/digistump/arduino-boards-index/master/package_digistump_index.json
Hey, this is the tutorial on how to use the Digispark Attiny85 development board with Arduino 2.0.
Digispark Attiny85 board has 8KB of flash memory, SRAM, and EEPROM of 512 bytes each, 6 digital pins, and 4 analog pins. Due to the onboard 5V regulator, it supports voltage between 7 to 35 volts. There is also a built-in LED connected to digital pin 1.
It has 6 digital pins(P0 to P5), 4 analog pins(P2 to P5) that can be used for analog input, and 3 PWM pins(P0, PI, and P4).
––––––––––––––––––––––––––––––
Track: Long Journey — Zackross [Audio Library Release]
Music provided by Audio Library Plus
Watch:
• Long Journey — Za...
Free Download / Stream: https://alplus.io/long-journey
––––––––––––––––––––––––––––––
Видео Digispark ATtiny85 with Arduino 2.0: How to program? канала THE ELECTRONIC GUY
Показать
Комментарии отсутствуют
Информация о видео
Другие видео канала
 DIY Step Counter using ESP32!
 Level Measuring Device using #esp32
 How to make a Flappy Bird Game using #esp32?
 Crypto Price Ticker using #esp32project
 Check your stocks price with this ESP32 project
 New Arduino UNO R4 WiFi In-depth Review
 Internet Clock Using ESP32 Web Server!
 An Electronic Dice #arduinoproject
 Scan nearby WiFi networks using ESP32!
 A Smart way to Display a Message #esp32project
 Wi-Fi strength checker using ESP32! #esp32
 Boost Your Reflexes with this #ArduinoProject
 I made this Tachometer using IR sensor!
 DIY Stopwatch made in 30 seconds using #arduino
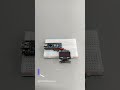 Temperature controlled fan control using #arduino
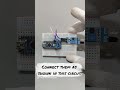 Automatic garage door using Arduino! #arduinoproject
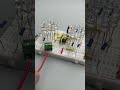 16 LED circuit on a Breadboard!
 Operating a Servo Without an #arduino!
 Simple Ultrasonic Sensor Project #arduino
 DIY Weather Station in 30 seconds using #arduino