- Популярные видео
- Авто
- Видео-блоги
- ДТП, аварии
- Для маленьких
- Еда, напитки
- Животные
- Закон и право
- Знаменитости
- Игры
- Искусство
- Комедии
- Красота, мода
- Кулинария, рецепты
- Люди
- Мото
- Музыка
- Мультфильмы
- Наука, технологии
- Новости
- Образование
- Политика
- Праздники
- Приколы
- Природа
- Происшествия
- Путешествия
- Развлечения
- Ржач
- Семья
- Сериалы
- Спорт
- Стиль жизни
- ТВ передачи
- Танцы
- Технологии
- Товары
- Ужасы
- Фильмы
- Шоу-бизнес
- Юмор
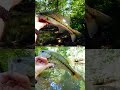
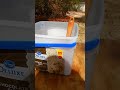
Cleaning Up Epoxy & First Skid Plate Done | Kevlar Install (Part 8)
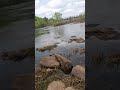
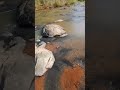
The first skid plate is on—and now it’s time to clean things up.
In Part 8 of this Kevlar skid plate install series, we finish shaping and smoothing the applied felt and deal with excess epoxy on the hull.
In this video:
Managing epoxy drips and excess resin
How much cleanup really matters (and when it doesn’t)
Using a scraper and rag to smooth the surface
What to watch for before the epoxy cures
Why extra resin on the hull isn’t always a bad thing
A lot of tutorials focus heavily on making everything look perfect. But if your boat sees real use—rocks, shoals, and rough landings—function matters more than cosmetics.
By the end of this video, the first Kevlar skid plate is fully in place and ready to cure.
🎣 Up next: a pro tip for ensuring a tight bind between the skid plate the hull.
Subscribe to keep up with the best black bass content out there.
Don't miss the previous episodes!
Part 1 - https://youtube.com/shorts/-B0KEGLdqk8
Part 2 - https://youtube.com/shorts/3k2JPR1UmwU
Part 3 - https://youtube.com/shorts/dEep49r-LGQ
Part 4 - https://youtube.com/shorts/QJUD1vNTWOg
Part 5 - https://youtube.com/shorts/NvTW_Mx2K60
Part 6 - https://youtube.com/shorts/BzDJ9LI4-Mg
Part 7 - https://youtube.com/shorts/BEzqWiySFl8
#CanoeDIY #kayakdiy #skidplate #kevlar #boatmaintenance #fishinggear #riverfishing #kayakfishing #canoefishing #DIYOutdoors #fishinglife #outdoorskills #bassfishing #blackbass
Видео Cleaning Up Epoxy & First Skid Plate Done | Kevlar Install (Part 8) канала Black Bass Talk
kevlar skid plate cleanup epoxy drips kayak canoe epoxy cleanup skid plate installation part 8 kayak hull protection canoe hull protection DIY canoe repair DIY kayak repair epoxy resin kayak fishing kayak setup canoe fishing gear river fishing gear shallow water fishing protect kayak hull kayak maintenance canoe maintenance how to install skid plate kayak skid plate install canoe skid plate install
Комментарии отсутствуют
Информация о видео
8 мая 2026 г. 0:00:00
00:02:18
Другие видео канала