video sguscia fondo
Realizzazione del canale della sguscia del fondo di violino, prima di filettare.
ENGLISH TRANSLATION OF THE WRITTEN NOTES IN THE VIDEO IN ORDER OF APPEARANCE
00:06 - Cutting of the channel
00:10 - Check that the edge has the desired thickness
00:15 - For me 4.1 mm in upper and lower bouts
00:18 - 4.5 mm at corners
00:21 - 4.3 mm in the C bout
00:42 - with special marking tool trace the channel width
00:50 - 11 mm in upper and lower bouts, 7 mm in the C bout
02:18 - I use a gouge n°6 x 13.7mm with a radius of 13 mm for upper and lower bouts
02:25 - Start by cutting a central channel more narrow and shallow
02:36 - Cut only the inner half of the channel reaching the marked line
02:51 - and cut only the outer half of the channel stopping at barely 1 mm from the edge
03:16 - Remove alternately on the two sides perfecting lines
03:31 - and reach the final depth removing even at the center of the channel
03:45 - With a thickness gauge check from time to time the thickness reached, which should be 3.1/3.2 mm in lower and upper bouts, 3.4/3.5 mm in the C bout
03:57 - Refine the channel by removing all the bumps, reaching a uniform thickness
04:04 - Feel by touch the presence of humps and irregularities, eliminating them where needed
04:09 - Proceed with great caution in sections with problematic grain, taking away a little at a time to avoid tear-out
04:33 - Bring the channel directly into the C bout, without entering in the corners, obtaining a profile in the shape of "8", passing inside the line of the blocks
06:58 - Connect the two channels in the upper part at the button, taking care to obtain continuous lines and not to dig excessively this area particularly stressed by the pull of the neck
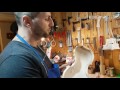
07:35 - For the C bout I use a gouge more curved and narrow, n°7 x 11mm with a radius of 7mm
08:34 - As the last thing cut the channel in the corners, taking care that it ends to zero depth at the exit from the corner, linking it well without digging it too deep
08:40 - For this task I use a small and flatter gouge : n°6 x 10.5mm with a radius of 10mm
08:57 - Connect well with the rest of the channel finishing carefully the edge line
09:30 - At this point, we will proceed with the marking and cutting of the purfling channel, as described in the video "Filettatura Parte Prima" (Purfling Part One)
Видео video sguscia fondo канала Davide Sora
ENGLISH TRANSLATION OF THE WRITTEN NOTES IN THE VIDEO IN ORDER OF APPEARANCE
00:06 - Cutting of the channel
00:10 - Check that the edge has the desired thickness
00:15 - For me 4.1 mm in upper and lower bouts
00:18 - 4.5 mm at corners
00:21 - 4.3 mm in the C bout
00:42 - with special marking tool trace the channel width
00:50 - 11 mm in upper and lower bouts, 7 mm in the C bout
02:18 - I use a gouge n°6 x 13.7mm with a radius of 13 mm for upper and lower bouts
02:25 - Start by cutting a central channel more narrow and shallow
02:36 - Cut only the inner half of the channel reaching the marked line
02:51 - and cut only the outer half of the channel stopping at barely 1 mm from the edge
03:16 - Remove alternately on the two sides perfecting lines
03:31 - and reach the final depth removing even at the center of the channel
03:45 - With a thickness gauge check from time to time the thickness reached, which should be 3.1/3.2 mm in lower and upper bouts, 3.4/3.5 mm in the C bout
03:57 - Refine the channel by removing all the bumps, reaching a uniform thickness
04:04 - Feel by touch the presence of humps and irregularities, eliminating them where needed
04:09 - Proceed with great caution in sections with problematic grain, taking away a little at a time to avoid tear-out
04:33 - Bring the channel directly into the C bout, without entering in the corners, obtaining a profile in the shape of "8", passing inside the line of the blocks
06:58 - Connect the two channels in the upper part at the button, taking care to obtain continuous lines and not to dig excessively this area particularly stressed by the pull of the neck
07:35 - For the C bout I use a gouge more curved and narrow, n°7 x 11mm with a radius of 7mm
08:34 - As the last thing cut the channel in the corners, taking care that it ends to zero depth at the exit from the corner, linking it well without digging it too deep
08:40 - For this task I use a small and flatter gouge : n°6 x 10.5mm with a radius of 10mm
08:57 - Connect well with the rest of the channel finishing carefully the edge line
09:30 - At this point, we will proceed with the marking and cutting of the purfling channel, as described in the video "Filettatura Parte Prima" (Purfling Part One)
Видео video sguscia fondo канала Davide Sora
Показать
Комментарии отсутствуют
Информация о видео
Другие видео канала
 Violino - Filettatura parte prima - Tracciatura e taglio del canale per il filetto
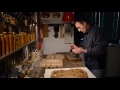 Rib making from start to finish (condensed)
 Costruzione violino nella bottega del Liutaio Gabrieli Rubino
 MAKING VIOLIN - Inessa Galante soprano (Info) + Beverly Murk violin (Info) - Credits at the end
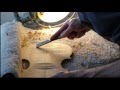 Thomas Billoux Luthier - fabrication d'un violon
 Mirecourt, Dominique Nicosia, making of a violin, Luthier
 Making purfling with Anton Somers
 1) Sgrossatura della tavola Parte prima
 Making a violin from scratch with maker Per Ovesen | Mini-Documentary
 Contorno dei bordi parte terza - Finitura del contorno della tavola
 Tavola di violino - Scavo del canale della sguscia
 Violin edgework : finalizing the edge outline from start to finish
 Carving a violin scroll from start to finish
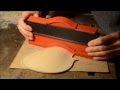 Bombatura della tavola - Appendice
 Taglio delle effe dall'inizio alla fine (Soundholes cutting from start to finish)
 Violino - Filettatura Parte Seconda - Scavo canale del filetto
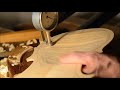 Spessori della tavola parte prima - Sgrossatura a sgorbia
 Spessori di tavola e fondo - appendice
 Violino - Filettatura Parte Sesta - Finitura del filetto e della sguscia