Spessori della tavola parte prima - Sgrossatura a sgorbia
Index of videos : http://davidesora.altervista.org/
ENGLISH TRANSLATION of the written notes in the video, in order of appearance :
00:05 - Top plate thicknesses part one - Gouge roughing
00:18 - Start by tracing the lines to delimit the gluing surface of the blocks and ribs, keeping abundant about 1 mm
01:36 - Using an adjustable thickness gauge set to edge measurement (4.5 mm) draw the limit of the fluting to be used as a reference during roughing. Trace also the F- holes so you can visualize their position, to avoid digging too much in these areas.
02:54 - Using a fairly curved and wide gouge (No.6 x 35 mm) begin to rough out the lower bout, creating a channel on the maximum width line. Set the graduation punch to a measure of 4 mm, so that once all the holes of the punch are removed, an effective thickness of about 3.5 mm remains
05:40 - Use a flat and wide gouge (No.3 x 35 mm) to connect the lower area from the channel up to the gluing surface of the block, bringing it to the same thickness of the channel (3.5 mm)
06:32 - In the same way, also roughen the upper bout, bringing it to a thickness of about 3.5 mm
07:42 - Rough out the central part in the longitudinal direction, paying attention to the direction of the fiber to avoid tearing the wood, creating two channels on both sides of the center joint using the curved gouge. Set the graduation punch to 4.5 mm so that once all the holes of the punch have been removed, an effective thickness of about 4 mm remains
09:42 - Connect the lateral parts using the flattest gouge, paying attention to respect the convexity of these areas to avoid digging too much, especially in the lower eye area of the F-holes
11:14 - Check the frequency of the highest note emitted from the top plate (mode 5, percussion and listening at the center) that at this stage of the working should still be higher than Sol (G 392 Hz)
Видео Spessori della tavola parte prima - Sgrossatura a sgorbia канала Davide Sora
Показать
Комментарии отсутствуют
Информация о видео
Другие видео канала
 Bombatura fondo - Lavorazione a pialletto (versione corta)
 Spessori di tavola e fondo - appendice
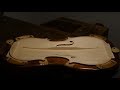 Bassbar from start to finish (condensed)
 Episode 3 Gluing the Fingerboard
 Tavola di violino - Scavo del canale della sguscia
 Spessori del fondo parte quinta - Messa a punto finale a rasiera
 Daniele Tonarelli Master Violinmaker - Cremona Italy
 2 - Adattamento piroli di violino - Alesatura dei fori della cassetta
 Exploring lost violin making practices 4: the top plate
 Spessori del fondo parte prima - Sgrossatura a sgorbia - Creazione dei canali
 Spessori della tavola parte terza - Lavorazione a rasiera
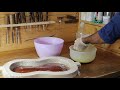 how to repair bass bar in top violin plate
 Spessori della tavola parte seconda - Lavorazione a pialletto
 2) Sgrossatura della tavola parte seconda Impostazione della sesta
 Removal of the form and finishing the inside of the ribs
 Tuning the Violin Plates
 Bombatura del fondo - Lavorazione a rasiera parte quarta : finitura finale della superficie
 4 - Adattamento dei piroli di violino - Fori per le corde
 Making a violin - step 9 - the thickness
 Finitura dell'interno delle fasce parte terza - Finitura delle controfasce