Violino - Filettatura Parte Sesta - Finitura del filetto e della sguscia
Asportazione della parte sporgente del filetto dopo l'incollaggio e l'asciugatura completa della colla, portandolo a filo della sguscia.
Utilizzare solo le sgorbie (le stesse usate per fare la sguscia), la finitura a rasiera verrà fatta contestualmente alla finitura della bombatura.
Il passo successivo è il raccordo del canale della sguscia con il resto della bombatura, da fare ancora con le sgorbie.
Poi si procederà con pialletti e rasiera alla lavorazione finale della bombatura.
Removal of the protruding part of the purfling after gluing and complete drying of the glue, bringing it flush with the fluting.
Use only the gouges (the same ones used to make the fluting), the scraper finish will be done at the same time as the arching is finished.
The next step is the connection of the channel of the fluting with the rest of the arching, to be done with gouges.
Then we will proceed with fingerplanes and scrapers to the final working of the arching.
ENGLISH TRANSLATION of the written notes in the video, in order of appearance :
00:05 - Purfling part six (and last)
00:10 - Finish of the purfling and fluting
00:15 - Use the same gouges used for the fluting channel
00:27 - Start from corners with gouge n°6, radius 10mm, width 10.5mm
01:52 - Take the more curved gouge for the channel of the C
02:00 - Gouge n°7, radius 7mm, width 11mm
02:42 - Use the wider gouge for the upper and lower bouts
02:48 - Gouge n°6, radius 13mm, width 13.7mm
Index of videos : http://davidesora.altervista.org/videos/
Website : http://www.davidesora.it/
Видео Violino - Filettatura Parte Sesta - Finitura del filetto e della sguscia канала Davide Sora
Показать
Комментарии отсутствуют
Информация о видео
Другие видео канала
 Bombatura fondo - Lavorazione a pialletto (versione corta)
 Tavola di violino - Scavo del canale della sguscia
 How to cutting & fitting the violin bridge
 Violino - Filettatura Parte Quinta : incollaggio dei filetti
 Anima di violino - appendice - Controforme per la lavorazione
 Fitting a new bass bar to a Violin front.
 Professione liutaio: Mestiere d'arte
 Violino - Filettatura parte prima - Tracciatura e taglio del canale per il filetto
 Top plate edgework from start to finish
 Imagevideo Hans Pluhar | Violin Maker
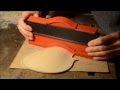 Bombatura della tavola - Appendice
 Restauro di un antico e pregiato violino
 Anima di violino - parte prima - Preparazione dei pezzi
 video sguscia fondo
 Tuning the Violin Plates
 Wesley Baggett French Polishing a new violin.
 Rettifica lucidatura e ricoronatura tasti. Guitar fret leveling.
 Tavola di violino - Tracciatura, taglio e scavo del canale del filetto
 Intervista a Fabio Dalla Costa, maestro liutaio