Violino - Filettatura Parte Quinta : incollaggio dei filetti
Sistema di incollaggio dei filetti del fondo di violino dopo aver fatto le punte a secco. Per la tavola il sistema è uguale, solo che le parti superiore e inferiore non sono in pezzo unico ma in due parti separate giuntate non in corrispondenza della mezzeria ma sfasate di circa un centimetro per rinforzare la giunta della tavola durante le successive lavorazioni.
Le giunte dei filetti verranno poi a trovarsi in corrispondenza dell'incastro del manico e del reggicordiera e non è quindi necessario farle in modo perfetto.
E' possibile fare lo stesso anche sul fondo tenendo le giunte più sfasate rispetto alla mezzeria e facendole in modo perfetto così che non si notino, tagliando verticalmente i filetti a 45° nel punto d'incontro (sistema cremonese classico).
System for gluing the purflings of the violin back after making the dry fit of mitres. For the top plate, the system is the same, only the upper and lower parts are not in one piece but in two separate parts jointed offset by about 10 mm from the centerline to reinforce the joint of the plate during subsequent processing.
The joints of the purflings will then be in correspondence with the neck joint and the lower nut and therefore it is not necessary to make them perfectly.
It is also possible to do the same on the back plate by keeping the joints farther from the center line and making them perfectly so that they are not noticed, vertically cutting the purflings at 45° at the meeting point (classic Cremonese system).
ENGLISH TRANSLATION of the written notes in the video, in order of appearance :
00:05 - Purfling part five
00:09 - Gluing the purfling
00:18 - Start by locking the upper mitre with a drop of glue
00:26 - Gently pull out and lift the C
00:37 - Apply glue in the channel using a pipette dropper
00:47 - Do not let the glue enter in the tip of the channel but stop at about 4 mm from there
00:56 - Insert the lower tip before the glue reach and fill the mitre
01:02 - ...and insert the rest of the C by pressing with fingers
01:09 - Press well using a little hammer with rounded head
01:22 - Hammering gently to seat well the purfling and glue
01:41 - Brush up a bit of glue on the purfling to seal it well
02:01 - Lock the upper tip of the second C
02:12 - Pull out and lift...
02:22 - Apply the glue...
02:37 - Stop before the lower mitre...
02:43 - Insert the tip...
02:48 - and the rest of the C...
03:00 - Press down...
03:20 - Hammer to seat...
03:36 - Brush up a bit of glue
03:44 - Repeat the procedure for the upper bout
03:49 - Lift the purfling without removing the tips (already glued)
04:44 - Hammer from the center to the corners, so to let the glue run into the mitres
05:10 - Press well...
05:30 - Brush up the glue...
05:44 - Proceed also with the lower bout completing the gluing of the purfling
07:27 - Clamp the plate on a flat glass during glue drying to prevent any deformations
Index of videos : http://davidesora.altervista.org/videos/
Website : http://www.davidesora.it/
Видео Violino - Filettatura Parte Quinta : incollaggio dei filetti канала Davide Sora
Показать
Комментарии отсутствуют
Информация о видео
Другие видео канала
 Violino - Filettatura Parte Sesta - Finitura del filetto e della sguscia
 Incollaggio delle giunte
 MAKING VIOLIN - Inessa Galante soprano (Info) + Beverly Murk violin (Info) - Credits at the end
 Spessori del fondo parte quinta - Messa a punto finale a rasiera
 1- Arrotondamento bordi parte prima - Teoria
 Violino - Filettatura Parte Terza - Preparazione, taglio e piega dei filetti
 1) Sgrossatura della tavola Parte prima
 video sguscia fondo
 Violin: Making the Rib Structure
 Inserting a neck into a violin or a viola body with Anton Somers - Part 2
 Violino - Filettatura parte prima - Tracciatura e taglio del canale per il filetto
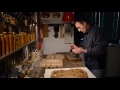 Rib making from start to finish (condensed)
 Violino - Filettatura Parte Quarta : taglio punte filetto
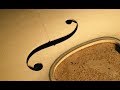 Taglio delle effe dall'inizio alla fine (Soundholes cutting from start to finish)
 Caseina - applicazione in tempo reale - 48 minuti
 21) Testa di violino - sgusciatura del dorso parte seconda - Finitura a sgorbia e rasiera
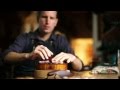 Benning Violins: Finding Bespoke "The Violinmaker" - A film by Michael Bernard
 8 - Finitura di manico e tastiera parte ottava : colorazione e trattamento finale del manico
 Carving a violin scroll from start to finish