Universal Joints - Part 7: Centering and Adjusting Axial Play
Weber State University (WSU) - Automotive Technology Department - Transmission Lab. This is the seventh in a series of videos on universal joints, constant velocity joints, and driveshafts. In this episode, we learn how to properly center universal joints and adjust the axial play.
Timeline:
0:00 start
0:10 Introduction
0:48 Setting up a dial indicator to check the axial endplay
2:20 Measuring the axial endplay on the universal joint bearing cups in the aluminum driveshaft (0.0035") Out of specification of 0.0197"
3:51 Measuring the axial endplay on the universal joint bearing cups in the steel slip yoke (0.0015") Within the specification of 0.0197"
5:36 Axial endplay on driveshaft side after replacing the copper snap-rings with grey snap rings. (No change in the axial endplay of 0.0035".
6:50 Axial endplay on driveshaft side after replacing the grey snap-rings with pink snap rings. (0.0005") Within the specification of 0.0197"
7:20 Summary of specifications
8:46 What would happen with the aftermarket universal joint installed?
10:20 The "I changed the u-joint and now the vehicle vibrates" complaint
10:41 Universal joint centering is maintained with equal thickness snap rings
10:50 Universal joint axial play is adjusted with selectable thickness snap rings
11:22 Differences in factory service information for universal joint service
11:55 Wrap up
This video series helps partially cover the following NATEF Master Tasks:
3.D.1. Diagnose constant-velocity (CV) joint noise and vibration concerns; determine necessary action.
3.D.2. Diagnose universal joint noise and vibration concerns; perform necessary action.
3.D.4. Inspect, service, and replace shafts, yokes, boots, and universal/CV joints.
3.D.5. Check shaft balance and phasing; measure shaft runout; measure and adjust driveline angles.
3.E.4. Measure drive axle flange runout and shaft end play; determine necessary action.
Questions for teachers:
1. How much axial end play was measured on the slip yoke side with the coated black snap rings?
2. How much axial end play was measured on the driveshaft side with the copper-colored snap rings?
3. How much axial end play was measured on the driveshaft side with the grey colored snap rings?
4. How much axial end play was measured on the driveshaft side with the pink colored snap rings?
5. How does one center a universal joint in the ears of the driveshaft or yoke?
6. How does one adjust the axial end play of the universal joint in the ears of the driveshaft or yoke?
7. How much axial end play would the universal joint in the video have if the aftermarket universal joint on the comparison board was installed rather than the Spicer universal joint?
8. What can cause the "I changed the u-joint and now the vehicle vibrates" complaint?
9. How is driveshaft runout affected by universal joint axial endplay?
Subscribe to the weberauto Youtube channel for more great videos. www.youtube.com/weberauto
Visit the following website for information on how to attend our school and obtain an associate's degree or bachelor's degree in Automotive Technology.
http://www.weber.edu/automotive
This video was created and edited by Professor John D. Kelly at WSU. For a full biography, see http://www.weber.edu/automotive/J_Kelly.html
Видео Universal Joints - Part 7: Centering and Adjusting Axial Play канала WeberAuto
Показать
Комментарии отсутствуют
Информация о видео
Другие видео канала
 How To Replace U-Joints (ULTIMATE Guide Using BFH)
 Universal Joints - Part 6: Proper U-Joint Installation
 Megohmmeter - Loss of Isolation Diagnostics
 How to Diagnose and Replace Universal Joints (ULTIMATE Guide)
 Universal Joints - Part 1: Introduction
 Understanding Differences in Automotive Differentials
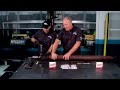 Driveshaft Repair | Spicer Garage
 4L80e EARLY & LATE models learn the difference between the 2...
 20 Tips to Replace U joints Like a Pro from a Professional Mechanic
 AUSV 2520 - On-Off and Pulse-Width Modulated Solenoids
 2001 Ford F150 - Universal Joint (U-Joint) Replacement
 Thrust Bearing Replacement -Maintenance and Assembly 2/2
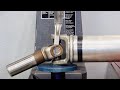 Universal Joints - Part 5: U-Joint Tools and Removal
 Differential Ring and Pinion Gear Setup
 Universal Joints - Part 2: Comparing Joints
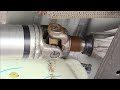 Universal Joints - Part 4: U-joint and Driveline Inspection
 How to replace U joints with no special tools
 DIY Dynamic Balancing !! - This REALLY works !! - Balancing my lathe - Part 1 - Apr 2020
 Service U-joints in minutes using the Tiger Tool 10105 U Joint Puller & 10202 Bearing Cup Installer