3DR Pixhawk Installation Part 1 - Physical Connectons
A brief overview of how to install the Pixhawk on a quadcopter. We go through all the connections and what each port is designed for. More info at our website. www.uavamerica.com
Видео 3DR Pixhawk Installation Part 1 - Physical Connectons канала Socratic 101
Видео 3DR Pixhawk Installation Part 1 - Physical Connectons канала Socratic 101
Показать
Комментарии отсутствуют
Информация о видео
Другие видео канала
 (1/5) PixHawk Video Series - Simple initial setup, config and calibration
 DIY drone (Part Two) | S500 | Pixhawk | FPV Quadcopter |
 Pixhawk 4 - Wiring Update
 SiK and 3DR 433Mhz 915Mhz Radio Telemetry ground Station for Pixhawk
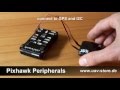 Pixhawk peripherals - overview and connection guide
![Tarot IRONMAN 650 build and review - Mounting Pixhawk autopilot [Part 5]](https://i.ytimg.com/vi/uaKH098clmM/default.jpg) Tarot IRONMAN 650 build and review - Mounting Pixhawk autopilot [Part 5]
Tarot IRONMAN 650 build and review - Mounting Pixhawk autopilot [Part 5] Installing PPM Encoder
 High End 450 Quadcopter - E05 - Pixhawk Connections
 Connecting Raspberry Pi w/ Pixhawk and Communicating via MAVLink Protocol
 How to setup a Pixhawk flight controller
 (2/5) PixHawk Video Series – Power, installation, final checks and first hover
 How to setup a minimOSD for APM or Pixhawk
 Pixhawk Interface with Taranis X9D & X8R using Sbus
 (5/5) PixHawk Video Series – Common Power Options (BEC, Power Modules, ESCs and combos)
 Cleanest Built Pixhawk 2.4.8 Drone | F450 frame
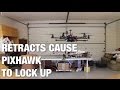 Pixhawk Locks Up with Retracts - Always Use BEC to Power Servos
 DIY drone (Part One) | S500 | Pixhawk | FPV Quadcopter |
 S500 Quadcopter Frame Guided Assembly | Pixhawk 4 + S500 Drone Build Tutorial | Part 2
 PIXHAWK Hobbywing ESC calibration
 Pixhawk 4 Setup and Calibration with QGroundControl | Pixhawk 4 + S500 Drone Build Tutorial | Part 4