How to build a Stainless Steel exhaust system for your hot rod or classic trucks
ack in October of last year I made arrangements with Paul Bosserman, my friend who just happens to own the family run Old Anvil Speed Shop in my old stomping grounds of Orange, California, to do a “couple” things on my then-dormant ’48 Chevy project. (I’d acquired the chopped ’n’ bagged three-window over a year prior. Due to its needing way more than advertised to put it back on the road, I chose to throw a cover over it … ’til now.)
Bosserman was kind enough to agree to install a new Air Lift/FLO Airride management system (to replace the cool but antiquated MIC-style manual valves) initially, but after a conversation at the Grand National Truck Show in September, that list grew to include a BedWood & Parts curly maple wood floor with a Legens Hot Rod Shop hinged center plank—in conjunction with Old Anvil’s still-in-development All Access VIP hinged bed floor frame kit. But that was it—that’s all we agreed upon! That is, until Bosserman and his trusty sidekick, Jake Caballero, started tearing into the truck.
Not a week after dropping the ’48 off, I get a text from Bosserman: “I’m replacing your exhaust … it sucks.” I’m not certain if that was before or after we’d discussed the brakes (now being upgraded with a Wilwood remote-fill master), the steering (now being upgraded with a new Borgeson stainless linkage), and the battery situation (already upgraded with dual XS Power AGMs), but I do clearly recall getting that text!
“When the truck came in it needed some exhaust work done. We came to the decision to replace it completely. First, we started by removing the old worn-out exhaust because it had been repaired a couple of times and would be more work to fix it than to just build a completely new system. A saw was used to cut the old system out. The frame was then cleaned up by removing all the old tabs and hangers. We began the new system with laser-cut header flanges and 18-inch polished Porter mufflers all from Speedway. All of our 2-1/2-inch tubing was from Ace Race Parts, while our exhaust hangers are laser cut and sold at Old Anvil Speed Shop.
“When building an exhaust, I like to try to make maintenance as easy as possible, like clearing the oil filter and starter. First a couple of bends are held up at the collector to get the angle needed to get around the oil filter and the starter, then a couple of straight sections are tacked into place. Next, two 90-degree bends are tacked together and fitted to offset the exhaust over the crossmember. From there, two short straight sections were tacked on to get to the flex couplers. The flex couplers absorb all the vibration of the motor to prevent cracking—we rigid mount our exhaust systems so there is no need for rubber bushings that could wear out over time. Next, we tack on our V-band clamps after the flex coupler. A rigid mount is now placed behind the flex coupler and before the muffler, that way the weight of the muffler is not hanging on the flex coupler. After our V-bands, a straight section or tubing is tacked in place and the stainless mufflers can be tacked in.
“After the mufflers we had to make a decision where the exhaust needs to exit. Going over the rearend like most cars was going to be difficult because of the large fuel cell and the airbags, so we went under the rearend. Two bends were once again tacked together to make an offset to get under the differential. Now the exhaust turns and goes up toward the framerail, from there one more bend is tacked to angle down to the tip. We like to get the shallowest angle possible so the exhaust flows out from under the truck rather than straight toward the ground, so you don’t blow up a lot of dust and dirt. Once everything was finalized, I made a rear mount but did not weld it in yet. I like to fully weld the exhaust out because it tends to distort from welding and will never go back in the same place you had it. Once the exhaust was fully welded out, the front and rear mounts are welded on.”
When all was said and done, not only did I have a beyond aesthetically pleasing to the eye exhaust system (which was one of Bosserman’s main objectives seeing as the forthcoming All Access VIP bed floor kit will be “all revealing,” if you know what I mean), I now have an audibly pleasing to the ear—in a mean, non-sissy, twice-pipe kinda way—full stainless exhaust system! Now onto the rest of that to-do list before Old Anvil finds anything else wrong!
Видео How to build a Stainless Steel exhaust system for your hot rod or classic trucks канала Classic Truck Performance
Показать
Комментарии отсутствуют
Информация о видео
Другие видео канала
 How to Route Parking Cables to Wilwood Internal Parking Brake System using an E-Stopp
 Installing a Golden Star Classic Auto replacement grille on a 47-53 Chevy pickup.
 How to properly measure for a driveshaft when upgrading you transmission or rearend
 Vintage Air EZ Clip How to Install for custom air conditioning systems Classic Truck Performance
 How to Plumb Hard Lines into a Wilwood Brake System - Classic Truck Performance
 How to install or rebuild 1992-2000 Blazer/Tahoe suspension and OBS 1988-1998 Truck suspension
 How to rebuild F-100 4×4’s four-wheel drum brake system. Step by step to remove & replace 4X4 hubs.
 Grand National Roadster Show 2024 from Classic Truck Performance view. Slonaker competition
 Chris Cerce 1983 C10 - Classic Truck Performance
 Replacing Brakes on a 1992-1999 Blazer/Tahoe and 1988-1998 OBS trucks
 The best and easiest on-car tool we have used for double flaring brake lines.
 Keep on Truckin’ at the 2023 Grand National Roadster Show - Classic Truck Performance
 Jason Scudellari's 1967 Ford F100- Classic Truck Performance @weektowickedjason
 Taiwan Makes American Trucks Great Again! Tour of Sheet Metal and Replacement Parts Factories
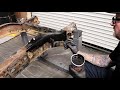 Applying four Important Products to Keep Rust Away from your car or truck project.
 How to properly build a 1967-1972 Ford F-100 or F-250 styleside shortbed using all new sheetmetal.
 Replacing LS engine sensors when you purchase a motor second hand or from a is a good idea.
 How to properly install a Lokar throttle pedal, throttle cable and kick down cable.
 Mustang II spindles with Corvette C7 sealed bearings eliminating the spindle pin from the equation.
 LS3-Powered 1966 Chevy C10 Pickup: The Dream Fulfilled