How to properly build a 1967-1972 Ford F-100 or F-250 styleside shortbed using all new sheetmetal.
With our longbed-to-shortbed conversion on our 1969 Ford F100 a wrap as far as the chassis goes, it’s time to turn our attention to the part that will really bring to life the transformation, the short bed truck sheet metal. In the past there was no easy way to convert the long bed truck sheet metal down to short bed specs. Slicing a full 16-inch section out of the front bedsides and floor, as well as an additional 4-inch section out back, makes for a ton of cutting and welding, not to mention the grinding and sanding involved to get the sheet metal smooth enough for body and paint. A challenge on the double-walled smooth bedsides to be sure, but grinding the two seams nice and smooth on the corrugated steel floor would be something akin to Chinese water torture. For most home builders this puts the conversion out of reach as far as skill set or budget resources allowed. But thanks to the recent introduction of reproduction steel bedsides from Golden Star Classic Auto Parts, converting that long bed Ford down to a short box Fleetside Ford is a simple matter of swapping a few sheet metal components.
Read More: 1967-1972 Ford F100 Short Bed Conversion Part 1
We’ll start the short bed conversion assembly by inspecting each panel. Laying out each piece in its respective location will also aid in assembly. The new Golden Star short box includes the tailgate (PN TG15-671), left and right bedsides (PNs PB15-67L, PB15-67R), left and right wheelhouse panels (PN WH15-67), complete bed floor assembly (PN PB15-676B), and front bed panel (PN PB15-67F). Not shown are the four intermediate floor panels that will be installed fore and aft of each wheelhouse.
Now, before we get too carried away with the simplicity of this portion of the project, it should be mentioned that unlike the GM trucks of the era, the Ford truck beds were assembled by spot welding multiple sheet metal components, as opposed to GM’s simpler, screwed-together assembly. Due to this fact, we opted to replace our entire bed assembly with new sheet metal, all thankfully available from Golden Star Auto. While this may seem like a large pill to swallow at its onset, after considering the probable shape of the few panels that can be reused in addition to the labor involved in drilling out the spot welds and removing said panels, one is likely money ahead by springing for the entire truck bed package.
Assembly begins by placing the complete truck bed floor assembly on our previously shortened frame, squaring it in relation to the chassis and fastening it in place.
In fact, considering the front bed panel and tailgate being the two panels that are the best candidates for reuse, these are also likely to be the most damaged two panels of the bed, making another argument for complete replacement. Of course, every build is different and swapping out your stock tailgate onto that new bed is completely possible, provided it’s in decent shape. But other than those two and the pair of wheelhouse panels, there aren’t any other panels that interchange when going from a long bed to short.
Next, the front bed panel is slid in place. Note the center of the bed floor and the center of the front panel have been located and labeled to aid in alignment.
The fact that the Ford truck beds were welded together makes assembly of the new sheetmetal a slightly more difficult task than the assembly of a GM truck bed. Where the GM components may have had a few holes on each panel to aid in lining up said panels during rough assembly, the Ford tin needs to be carefully assembled, first using a series of clamps, followed by a few carefully placed sheet metal screws or Clecos to hold things together as the assembly progresses. This process also requires the complete assembly of the bed panels before any welding can be performed, due to the necessity to check for final fit of said panels, bed square, and proper assembly process and panel overlap. We’ll be mimicking the factory spot weld process by punching holes in the overlying panels and then welding the two panels together. Similar in nature to the factory spot welds, this process is known as rosette or plug welding. To do this, we’ll need to know the precise location of where each panel overlaps so as to not only punch the hole in the proper location, but where to remove the e-coating (the rust-preventing factory coating Golden Star Auto applies to every panel) so a proper, clean weld can be achieved.
The bedsides are tackled next. The F100’s two stake pockets slide over the corresponding crossmembers in the bed floor while the top front stake pocket fits over the front panel. This slip fit provides a pretty good baseline for final assembly specs.
https://goldenstarauto.com/
Видео How to properly build a 1967-1972 Ford F-100 or F-250 styleside shortbed using all new sheetmetal. канала Classic Truck Performance
Показать
Комментарии отсутствуют
Информация о видео
Другие видео канала
 New F100 Flairside or C10 Stepside truck latch kit for your tailgate so you can ditch the chains.
 How to install or rebuild 1992-2000 Blazer/Tahoe suspension and OBS 1988-1998 Truck suspension
 How to Route Parking Cables to Wilwood Internal Parking Brake System using an E-Stopp
 How to Plumb Hard Lines into a Wilwood Brake System - Classic Truck Performance
 How to install stainless steel brake lines, proportioning valve, and residual valve on a Chevy C10
 Replacing Brakes on a 1992-1999 Blazer/Tahoe and 1988-1998 OBS trucks
 How to replace stock drum brakes on a 1963-1972 C10 or Suburban using all new parts
 Keep on Truckin’ at the 2023 Grand National Roadster Show - Classic Truck Performance
 Replacing LS engine sensors when you purchase a motor second hand or from a is a good idea.
 Installing Classic Performance Products 13" front brake and rear disc kit on a 1960-1987 Chevy C10
 Bolt on Front Suspension and Steering for 1963-1987 C10 with Scott’s Hotrods N Custom IFS System
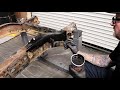 Applying four Important Products to Keep Rust Away from your car or truck project.
 New 1967-1972 Ford F100 and F250 longbed to shortbed frame conversion kit and styleside bed kit
 How to properly measure for a driveshaft when upgrading you transmission or rearend
 LS3-Powered 1966 Chevy C10 Pickup: The Dream Fulfilled
 Installing LS Coils and plug wires that produce truly produce horsepower and are dyno proven
 How to properly install a Lokar throttle pedal, throttle cable and kick down cable.
 Installing an 200-4R automatic overdrive to a 352, 360, 390 and 428 Ford FE engine is a good option
 How to rebuild F-100 4×4’s four-wheel drum brake system. Step by step to remove & replace 4X4 hubs.
 Getting a project F-100 back on the road after sitting in a field for 10 years. 352, 360, 390 or 428