Replacing LS engine sensors when you purchase a motor second hand or from a is a good idea.
When it comes to prepping a junkyard LS engine for a new project truck build, one of the first things we like to do is replace all the necessary OEM sensors with the corresponding items from Duralast Parts. These engines, whether clean as a whistle or filthy as a feral cat, don’t tell their true story regarding what’s going on inside and the miles of torture and torment they may have endured.
While the interior of the engine may not be easily inspected, the consumable components on the exterior are easily accessed while the engine is out of the vehicle, something that becomes more difficult after the engine’s installed. Tight, confined space due to firewall clearance can make accessing the cam position and oil pressure sensors a challenge in some trucks, while the low-mounted crank sensor can be hard to access due to various header designs and so on.
We’ll start at the top of the block where the damaged oil pressure sensor sits. Damaged sensors from careless removal is not uncommon when it comes to “pull-out” LS engines.
Built to meet or exceed OE specifications, Duralast’s LS sensors make for great peace of mind insurance before finalizing an engine swap and provide a bulletproof foundation to provide accurate information to the engine’s ECU, whether it’s an OE unit or, like our setup, an aftermarket EFI system from FiTech. While it may seem redundant to replace seemingly good sensors with new, we’ve found that oftentimes these sensors are damaged when the engine is pulled due to operator error and plain old carelessness. In fact, when we inspected our LS engine, we found an oil pressure sensor that was completely broken off. This is one of those sensors that can be hard to access once in the vehicle due to clearance between the intake and the firewall.
On many LS engines and all iron-block designs, the cam position sensor sits at the top of the block next to the factory oil pressure sensor. We’ll install both sensors while we’re at it.
Typically, an LS swap is being made for peace of mind and reliability, so it seems natural to want to ensure that all the necessary components are new and in primo shape from the start. Like a house built on a solid foundation, new, properly functioning sensors from Duralast ensure we won’t be spinning our wheels and chasing our tails trying to track down the reason for a poorly running engine. CTP
Here are the two sensors installed in their place, the oil pressure sensor on the left (Duralast PN PS391) and the cam position sensor (PN SU1277DG) on the right.
Видео Replacing LS engine sensors when you purchase a motor second hand or from a is a good idea. канала Classic Truck Performance
Показать
Комментарии отсутствуют
Информация о видео
Другие видео канала
 How to Route Parking Cables to Wilwood Internal Parking Brake System using an E-Stopp
 Installing a Golden Star Classic Auto replacement grille on a 47-53 Chevy pickup.
 How to properly measure for a driveshaft when upgrading you transmission or rearend
 Vintage Air EZ Clip How to Install for custom air conditioning systems Classic Truck Performance
 How to build a Stainless Steel exhaust system for your hot rod or classic trucks
 How to Plumb Hard Lines into a Wilwood Brake System - Classic Truck Performance
 How to install or rebuild 1992-2000 Blazer/Tahoe suspension and OBS 1988-1998 Truck suspension
 How to rebuild F-100 4×4’s four-wheel drum brake system. Step by step to remove & replace 4X4 hubs.
 Chris Cerce 1983 C10 - Classic Truck Performance
 Replacing Brakes on a 1992-1999 Blazer/Tahoe and 1988-1998 OBS trucks
 The best and easiest on-car tool we have used for double flaring brake lines.
 Keep on Truckin’ at the 2023 Grand National Roadster Show - Classic Truck Performance
 Jason Scudellari's 1967 Ford F100- Classic Truck Performance @weektowickedjason
 Taiwan Makes American Trucks Great Again! Tour of Sheet Metal and Replacement Parts Factories
 How to properly build a 1967-1972 Ford F-100 or F-250 styleside shortbed using all new sheetmetal.
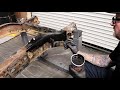 Applying four Important Products to Keep Rust Away from your car or truck project.
 How to properly install a Lokar throttle pedal, throttle cable and kick down cable.
 Mustang II spindles with Corvette C7 sealed bearings eliminating the spindle pin from the equation.
 LS3-Powered 1966 Chevy C10 Pickup: The Dream Fulfilled
 67-72 C10 Bed Wood Install using the new BedWood X kit using the new aluminum flat bed strips