Making a Rail Anvil Stand
This video shows the process of cutting and gluing many layers of plywood together to create a stand for a short length of rail. I use this piece of rail as an anvil for small hammering and forming and I prefer to use the flat surface whenever I can. I needed a way to hold the rail with the flat facing upwards, and I designed the stand to be reversible so I can use the curved topside whenever needed.
A few tools I used in this video...
Tape measure - https://amzn.to/2rumH38
Nail Gun: https://amzn.to/2rD7nBc
Wood Glue: https://amzn.to/2I9k9i5
Forstner bits - https://amzn.to/2G3uLgE
Palm Sander - https://amzn.to/2EfrLCa
Trim router - https://amzn.to/2rtWWRp
Hacksaw: https://amzn.to/2FEJHBB
Milwaukee drill - https://amzn.to/2IaJzf0
Table saw: https://amzn.to/2KXkUwe
Bandsaw: https://amzn.to/2PsMen9
Mig Welder: https://amzn.to/2KhL2AP
Bench Grinder: https://amzn.to/2rtIEA1
Видео Making a Rail Anvil Stand канала PatonHaus
Показать
Комментарии отсутствуют
Информация о видео
Другие видео канала
 I turn a Old Iron Plate into an Anvil - Homemade Iron Anvil
 Yost Vise Restoration & New Handle
 Building a Mobile Anvil Stand - Blacksmithing
 I turn a Railroad Track into an Anvil! Simple & Easy DIY - Homemade Anvil
 Шикарная идея из куска рельса! У китайцев такого не купишь!
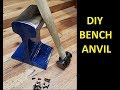 DIY Bench Anvil from Railroad Track
 BIGORNA - Anvil
 СЮРПРИЗ НА СВАЛКЕ! НАКОВАЛЬНЯ | Зачем люди это выбрасывают?
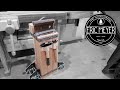 Building a Stand for a Railroad Track Anvil
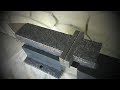 ПРЕВРАЩАЕМ РЕЛЬСУ В МОЩНЫЕ ТИСКИ / Turning the rail into a powerful vice
 Making an Anvil Stand out of a Tree Stump - Part 1
 3 Awesome Ways to Turn A Railroad Track Into An Anvil l DIY l Top Tech
 $1 DIY Anvil
 Railroad track into homemade anvil.- With angle grinder -
 DiResta Mobile Anvil Stand
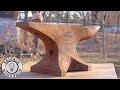 The Abandoned Anvil ~ RESTORATION, REPAIR, & DISCOVERY
 12 SIMPLE INVENTIONS
 СУВЕНИР ИЗ РЕЛЬСА | НАКОВАЛЬНЯ
 Bigorna de trilho de trem com dois lados
 How to Mount an Anvil - Cool Trick