Perfect Panos - A lightweight simple to use solution to solve parallax
This is a sort of part two to a recent video that I posted on how to create panoramic images in Capture One software. As one commenter pointed out though, I didn't discuss finding the optical center of a lens. The original video is here: https://www.youtube.com/watch?v=iscfl37rFSs
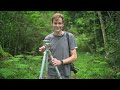
This short video looks at how to overcome the issue of parallax in photographing panoramas with more complex shapes inside them. In particular I use a leveling base on my tripod (built in to the Leofoto CEX range), and a small nodal rail - also from Leofoto - the NR-200. With this simple and light setup I can shoot perfect panoramas that don't struggle with parallex.
Please note that this technique is specifically for single-row panoramas. If you want to shoot multi-row panoramas a gimbal head is needed to get the actual nodal point (x and y axis) of the lens itself. I very rarely shoot multi-row panoramas (unless I have to create a VR or 360 degree image which is a different thing entirely). As such, finding the optical center along one axis through the use of a rail clamp is more than sufficient for single row panoramas.
Timeline:
00:00 Intro
01:30 Equipment - Leveling bases
03:25 The problem of parallax
04:00 Equipment - The nodal rail
05:20 Find the optical center of a lens
07:14 Previsualising using a cellphone
08:17 Is this necessary for panos?
08:58 Equipment - The L-bracket
09:28 The procedure of shooting a pano stitch
10:57 Summary and Conclusion on how to shoot perfect panos
Видео Perfect Panos - A lightweight simple to use solution to solve parallax канала Emil von Maltitz
Показать
Комментарии отсутствуют
Информация о видео
Другие видео канала
 A Look at the Leofoto Gabriel Tripod
 Basic Stitching in Lightroom.
 Photographing Giant's - A Kubu Island Film
 Introducing the Nisi True Colour Vario ND Filter
 Obliterating Dust - How to remove sensor dust and other crud using Capture One Pro
 BioWatch - A celebration of seed
 Basic Blending of Layers in Photoshop.
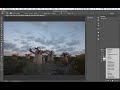 Basic Landscape Workflow One - Madagascar.
 Blending Images for Exposure Blend with Sun.
 Speed Editing Keys with Capture One Pro 23
 Is this THE last seascape tripod you'll own? | Introducing the Leofoto Agulhas Tripod
 Hillcrest Camera Club - Landscape Images and the Stories Behind Them
 Chasing Snow
 Protec Interview - Sthokozile Shangase
 Understanding Curves Video Tutorial.
 Luphathana Waves
 Parc d' Anja and the Lemurs.
 Wandering The Wild Coast - the highlights
 Creating a Panoramic in Lightroom.
 How to focus stack images manually in Photoshop
 Stars & Trees at Andavadoaka.