How To Apply An Island Dressing To The Tip Of Your Toe
✅ Learn More About Blister Bandaids, Adhesive Plasters & Island Dressings: https://www.blister-prevention.com/best-blister-bandaids/
The tip of the toe is the fiddliest area to put bandaids on, aren't they.
~ Learn more about blister treatment here: https://www.blister-prevention.com/foot-blister-treatment/
0:00 - Start
0:41 - What is an island dressing?
1:20 - DIY island dressings
1:40 - Step 1: Make sure island is same width as toe
1:55 - Step 2: Snip the dressing at the top in 4 places
2:17 - Step 3: Lock all edges in with fixation tape
2:35 - Example on the big toe
3:09 - Bonus Tip: Use butterfly (finger) dressings
3:57 - Recap
4:25 - Where to learn more about blister treatment
4:31 - Blister Treatment Blueprint
One of two things usually happens:
✅ You end up with bulky bits that can irritate the next toe and even cause blisters
✅ Or your dressing comes off too easily
Either way, it’s a mess. So I want to show you 3 steps for applying island dressings to the tip of your toe so that you can:
✅ Make a neat job of it
✅ And ensure your dressing will stay in place all day
But first...
🏝️ What is an island dressing? 🏝️
An island dressing is simply a dressing that has an island of absorbent, non-stick material in the middle, surrounded by an ocean of adhesive. They’re great because they protect your blister roof from sand and grit, they keep germs out and they maintain a moist wound environment which is what you need for fast blister healing.
So here are my three steps to making a neat job of applying these dressings the tip of your toe when you have a blister there.
✅ Step 1️: Is to make sure the island is the same width as your toe.
Any bigger and you’ll end up creases and dog ears up here that might irritate the toe or the toe next to it. So match that up before you start.
If I had a blister on the tip of this toe, this dressing looks the right size. Let’s give it a go.
✅ Step 2: Is to make a couple of these clever little snips in the tape at the top on each side so you can lay these bits down nice and neatly. So that’s two snips on this side, one at the top and one at the bottom. And the same on this side. See how neatly it all lays down. No creases, no dog ears and no bulky bits.
✅ Step 3: Is to put some tape around the toe to lock in these edges. Otherwise, it will come off way before you want it to and end up at the end of your shoe. I like to make the ends meet at the top. That way, they’re less likely to catch if your toe does a lot of gripping – we don’t want an edge to come loose.
Let me show you that all over again, this time with the big toe:
👉 Number 1: The width of the island matches the width of the toe.
👉 Number 2: I’ll make two little snips in the tape on each side, right up here at the tip of the toe. That let’s me stick it down without lots of creases and dog ears.
👉 Number 3: I’d usually put some tape right round the toe to lock all these edges in so it stays on all day. But this was a big dressing and you can see there’s plenty of tape holding this on all around the toe. So he’s done!
⭐ Bonus tip ⭐
I use island dressings that are shaped like this for toe blisters. They look like little bow ties and they’re great for the tip of the toe and just about any blister on your smaller toes. Sometimes I put a single snip on each side, right in the middle at the top, but I often don’t have to. This little toe needs me to so I can do it nice and neat. I’ve got 12 of these little bow tie dressings in the Ultra Blister Kit – they’re actually called finger dressings. I use them every day in my clinic because they make toe dressings so much easier. I like these ones in particular because the tape is like Fixomull – it’s thin and stretchy. Others I’ve seen aren’t stretchy or don’t stick very well, so you might need to experiment a little. You don’t need them – I’ve just shown you that. But all the same, I like them a lot.
So that’s it. When you need an island dressing for a blister on your toe, especially the tip of the toe,
👍 No 1: Match up the width of the island with the width of your toe.
👍 No 2: Snip the dressing twice on each side to get it to lay down neatly at the tip of the toe
👍 No 3: Lock all the edges in to ensure it stays there all day long
👍 And a bonus tip, see if you can find some of those funny bow tie shaped dressings as they can make things even easier.
If you’d like to know more about how to treat blisters so they hurt less and heal faster, take a look at the blister treatment blueprint. It’s a free resource that shows you how to make the right decisions for your blister. I highly recommend printing the flowchart and putting a copy in your blister kit, so you can treat your next foot blister, right!
👉 https://lp.blister-prevention.com/blister-treatment-blueprint-2-0/
👉 https://www.blister-prevention.com/foot-blister-treatment/
Видео How To Apply An Island Dressing To The Tip Of Your Toe канала Blister Prevention
Показать
Комментарии отсутствуют
Информация о видео
Другие видео канала
 video 35 Toenail Dressing
 7 Hand Pain & Finger Pain Treatments - Ask Doctor Jo
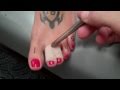 Buddy Taping: Treatment for Toe Injuries
 BlisterPod Hydrocolloid Blister Plasters: New & Improved
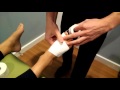 How to tape the big toe (MTP joint)
 How to Prepare, Apply & Remove a Total Contact Cast
 How to Fix Your Running Blisters for Good
 How to Use Nail Tips
 How To Use Triangular Bandage | First Aid
 How to Take a Blood Pressure Manually
 AVOID BLISTERS WHEN HIKING // Leukotape can prevent and treat hotspots and blisters on the trail
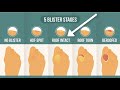 How To Treat A Blister Correctly (First, Look At Your Blister Roof)
 3 Ways To Tape The Ball Of Your Foot | Blister Prevention
 Toe Blisters - what to do
 Foot Blister Treatment - Top 3 Mistakes to Avoid Using Compeed
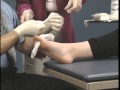 Foot Dressing (Toes Covered)
 How To Treat Foot Blisters (Like A Pro)!
 Correct way to apply toe and multi-layer bandaging to Lymphoedema patients
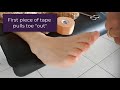 How To Hold A Curly Pinky Toe Straight With Tape
 How To Apply ENGO Blister Patches To Your Shoes, Insoles & Orthotics