Signal selector with a built-in Raspberry Pi, a DIY guide (Part 2 of 2)
This is a DIY guide of an audio accessory, which has a 4-to-1 signal selector and a Raspberry Pi 4b built in. As Pi could be configured in an infinite ways, as a media player, an Airplay or bluetooth receiver, or a media vault, the setup becomes a versatile and very high-quality audio source device on a budget. Audio quality is ensured by the I2S DAC integrated in the setup. This will make a nice addition to any home-made power amplifiers, which are often out of luck in terms of features. In this guide I made use of woodworking and connectors handling techniques. Also features information on various electric components.
This is the part 2 of 2, where I focused on the design and building process.
Contents are as follows:
0:00 Design walk-thru
4:56 Front panel building through a woodworking technique
16:12 Back and base panel processing
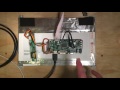
28:23 Wiring the components
38:00 Test and final thoughts
Here are links to the video related to this topic:
Part 1 of this series: concepts and components
https://youtu.be/2uPzUh1Y5vk
PCM 5102 I2S DAC guide for a Raspberry Pi
https://youtu.be/1T9PKLeBDFc
Making connectors with crimping tools
https://youtu.be/kzxBVLyWrfI
Building a signal selector module
https://youtu.be/FJYAjjtZnks
DIY Jigsaw table guide
https://youtu.be/WwiimDVNMYY
Видео Signal selector with a built-in Raspberry Pi, a DIY guide (Part 2 of 2) канала TinkerBox
This is the part 2 of 2, where I focused on the design and building process.
Contents are as follows:
0:00 Design walk-thru
4:56 Front panel building through a woodworking technique
16:12 Back and base panel processing
28:23 Wiring the components
38:00 Test and final thoughts
Here are links to the video related to this topic:
Part 1 of this series: concepts and components
https://youtu.be/2uPzUh1Y5vk
PCM 5102 I2S DAC guide for a Raspberry Pi
https://youtu.be/1T9PKLeBDFc
Making connectors with crimping tools
https://youtu.be/kzxBVLyWrfI
Building a signal selector module
https://youtu.be/FJYAjjtZnks
DIY Jigsaw table guide
https://youtu.be/WwiimDVNMYY
Видео Signal selector with a built-in Raspberry Pi, a DIY guide (Part 2 of 2) канала TinkerBox
Показать
Комментарии отсутствуют
Информация о видео
Другие видео канала
 Maker Project Reusing Laptop Screen with Raspberry Pi
 TOP 10 Raspberry Pi projects
 Create Your Own Raspberry Pi Home Network Music System
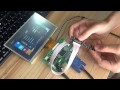 Raspberry Pi 7'' LCD Installation
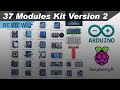 37 Sensors and Modules Kit (Version 2) for Raspberry Pi and Arduino
 Fluidd installation on Raspberry Pi Zero 2
 PiDesk - Futuristic desk with embedded controls, using Raspberry Pi
 How To Build A Bartop Arcade Machine With A Raspberry Pi
 5 Amazing Gadgets Built On Raspberry Pi
 Servo control using Raspberry Pi.
 DIY 자작 오디오 앰프 회로 : AB급 전력 증폭 회로를 적용한 인티 앰프
 Top 10 IoT(Internet Of Things) Projects Of All Time | 2021
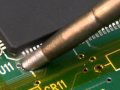 Professional SMT Soldering: Hand Soldering Techniques - Surface Mount
 Building a 4-node Raspberry Pi Cluster
 BEAUTIFUL! Micro Laser Soldering System - AWESOME! Cool Japan Technology
 3D printer power control on Klipper: Simple!
 Raspberry Pi: Using GPIO Inputs
 How to Make a Raspberry Pi Smart Mirror
 Using an M600 macro in Klipper to print in multiple colors of filaments.
 Raspberry Pi Laptop with Atrix 4G Dock