DIY Macrame Tutorial - Starting Your Work! Overlapping Square Knot Pattern
Macrame Tutorial - Starting Your Work! Overlapping Square Knot Pattern! Please see below for materials and written instructions.
Materials:
- 6mm 3 Ply Cotton Rope in Natural (Beige)
2mm-6mm Natural and Coloured Cotton String and 3 Ply Rope are available for purchase in my Etsy Shop: https://www.etsy.com/ca/shop/LotsofKnotsCa
Hey guys! Today I will show you another way to start your work. This is an overlapping square knot pattern. I also have a tutorial to make a full wall hanging with this pattern, please see below for links.
DIY Macrame Wall Hanging Part 1: https://youtu.be/FFMwbmVUwrU
DIY Macrame Wall Hanging Part 2: https://youtu.be/6uxbXSlJQrQ
Set-up: Cut 14 pieces of 6mm 3 ply Cotton Rope, each piece is 2 meters long. Attach in groups of 2 to your dowel, leaving 2 inches of space in between each group.
Tie a square knot with the 4 middle cords. Tie another square knot with the second group on the left. Tie another square knot with the second group from the right.
Using the two right strands from the square knot on the left and the two left strands from the square knot in the middle tie another square knot. This square knot should sit approx. 2.5 inches down from the first row of square knots.
Repeat that process on the right side of your work. The two square knots should be in line with each other.
Tie one more square knot in the middle of your work. I’ll show you next week how to attach cords to this section.
Bring the third group from the left and the third group from the right in front of your work. We will now make the same pattern with the 4 remaining groups.
Tie one square knot at the top of each group. Here is what it should look like when you are finished tying the 4 square knots.
Tie 3 more alternating square knots - they should sit approx. 2.5 inches down from the first square knots and in line with the second row of square knots in the back. They should also sit right underneath the first row of square knots in the back.
Here is what it should look like when you are finished tying those 3 square knots.
Tie another row of 2 more square knots using the same process.
Finish it off with one more square knot in the middle of your work.
Thanks so much for watching!
Видео DIY Macrame Tutorial - Starting Your Work! Overlapping Square Knot Pattern канала Lots of Knots Canada
Показать
Комментарии отсутствуют
Информация о видео
Другие видео канала
 DIY Macrame Tutorial - Intermediate Wall Hanging Part 1
 6 nuevos NUDOS en MACRAMÉ (paso a paso) | 6 New Macrame Knots
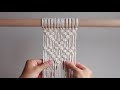 MACRAME SHAPES SERIES - Triangle Pattern #2 Using Square Knots!
 TUTORIAL Macramé : Nudos Básicos Paso a Paso | Belén Senra | Domestika
 5 Nudos Básicos para hacer Macramé!
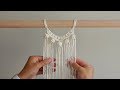 DIY Macrame Tutorial Using Double Half Hitch Knots & Berry Knots! Semi-Circle Pattern
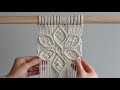 DIY Macrame Tutorial: Large 6 Petal Flower Using Double Half Hitch and Square Knots!
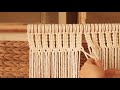 How to make a Macrame Curtain.
 DIY como hacer un BÚHO en MACRAME | DIY Macrame Owl Wall Hanging Tutorial
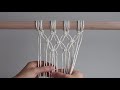 DIY Macrame Wall Hanging - 3 Ways to Start Your Work
 INSPIRATIE | DIY Macramé hanger maken
 DIY Macrame Curtain -Super easy, fast /Hướng dẫn thắt rèm macrame cực xinh, siêu nhanh
 8 NUDOS BÁSICOS en MACRAMÉ (paso a paso) | 8 Basic Macrame Knots
 CARA MEMBUAT MACRAME WALL HANGING
 DIY Atrapasueños en MACRAME ( paso a paso) | DIY Macrame Dreamcatcher Tutorial
 DIY Macrame Wall hanging #9 / 마크라메 월행잉 #9
 DIY | macrame layered wall hanging | 마크라메 레이어드 월 행잉
 DIY Tutorial l How to make a Moon Dreamcatcher ? | Macrame Decor
 5 nuevos NUDOS en MACRAMÉ (paso a paso) | 5 New Knots in Macrame
 DIY Macrame Tutorial - Intermediate Pattern Using Double Half Hitch Knots!