DIY Macrame Tutorial - Intermediate Wall Hanging Part 1
Macrame Wall Hanging - Part 1! Please see below for materials and written instructions.
Shop my book, Mixed Fiber Macrame, and Fiber Art Supplies (string, rope roving, ribbons, velvet and more) on my website or in my Etsy Shop:
Website: https://www.lotsofknots.ca
Etsy Shop: https://www.etsy.com/ca/shop/LotsofKnotsCanada
Support me directly: https://ko-fi.com/lotsofknotscanada
Materials:
- 3mm Single Strand Twisted Cotton String in Natural (Beige)
- Driftwood or dowel (28 inches long)
Hey guys! Today I will take you through Part 1 of 2 to create this wall hanging. Part 1 consists of the back 2 sections of this wall hanging. For a link to Part 2, please see below:
Part 2: https://youtu.be/6uxbXSlJQrQ
This is an intermediate pattern that uses Lark’s Head Knots, Cow Hitch Knots, Square Knots and Double Half Hitch Knots (DHHK). If you are unfamiliar with these knots please see links to more in-depth tutorials on how to tie each of these knots/patterns below.
Lark’s Head Knot, Cow Hitch Knot, Square Knot and DHHK: https://youtu.be/HPMe3nggRIk
Diamond Pattern with Square Knot (used to create outer layer): https://youtu.be/QnPt7nWi_gc
Small Diamond Pattern (used to create the second layer): https://youtu.be/RE23MpvIvy0
Hang your rope on a piece of driftwood, wooden dowel or copper rod that is approx. 28 inches long.
In total, you will need approx. 710 ft of 3mm single strand twisted string. This rope is available on my Etsy Shop if you are interested: https://www.etsy.com/ca/shop/LotsofKnotsCanada
Cut 14 pieces of rope, each piece is 6 ft long.
Fold each strand in half and attach to your work using Lark’s head knots. Attach 2 strands in the middle of your work, and 2 strands about 4 inches out from the middle on each side.
Tie 1 square knot at the top of each group (3 square knots total).
Using 2 strands from the left group and 2 strands from the middle group tie another square knot about 4 inches down from your first square knot. Repeat that process on the right side of your work.
Repeat that process one more time in the middle of your work.
Attach 2 more groups of 2 strands - they should sit approx. 2 inches out from the middle group on each side.
Tie 1 square knot at the top of each group (2 square knots total).
Tie one square knot in the middle of your work - about 4 inches down from the first row of square knots.
We will add 2 more groups of rope on the sides but before we do that we will add rope to the back section of our work.
Cut 26 pieces of rope, each piece is 5.5 ft long.
Attach 7 pieces to the top left section and 6 pieces to the bottom left section using Cow Hitch Knots (reverse of a Lark’s Head knot). Repeat on the right side of your work.
Using the left most cord as your filler cord tie a row of DHHKs underneath your Cow Hitch Knots. Repeat on the right side of your work.
Attach 2 more groups of 2 strands, one group will sit approx. 2 inches to the left of your work, and the other approx. 2 inches to the right of your work.
Tie 1 square knot at the top of each group (2 square knots total).
Using 2 cords from the left section and 2 cords from the 3rd section from the right tie another square knot approx. 4 inches down from the 1st row of square knots. This square knot should sit in line with the 2 square knots from the back section.
Repeat that process on the right side of your work.
Using 2 cords from the left section and 2 cords from the middle section tie another square knot approx. 4 inches down from the 2nd row of square knots.
Repeat on the right side of your work.
Tie one more square knot in the middle of your work.
Cut 36 pieces of rope, each piece is 5 feet long.
Attach 6 pieces per section (there are 3 sections total on the left and 3 sections in total on the right). Fold each piece in half and attach using Cow Hitch knots. Attach the remaining rope to the 3 sections on the right.
Using the left most cord as your filler cord tie a row of DHHKs underneath your Cow Hitch Knots. Repeat on the right side of your work.
Thanks so much for watching! Stay tuned for Part 2 next week!
Видео DIY Macrame Tutorial - Intermediate Wall Hanging Part 1 канала Lots of Knots Canada
Показать
Комментарии отсутствуют
Информация о видео
Другие видео канала
 DIY Macrame Tutorial - Intermediate Wall Hanging Part 2
 20 most usefull KNOTS in life
 Making a Net - Modified Snake Knot / Bull Hitch Paracord Net Tutorial – CBYS
 BASIC MACRAME KNOTS BEGINNER TUTORIAL
 DIY Macrame Tutorial: How to Start Your Work - Lark’s Head Knot with Multiple Cords!
 10 Easy MACRAME KNOTS and PATTERNS | Tutorial
 In-line Auto Truckers Hitch. Better Explanation
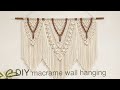 DIY | macrame layered wall hanging | 마크라메 레이어드 월 행잉
 PARTE 1 | DIY | Como fazer Painel de Macramê grande | 3 pontos fáceis |#DIY
 DIY | macrame leaves ribbons wall hanging | 마크라메 나뭇잎 리본 월 행잉
 MACRAME AESTHETIC UNTUK PEMULA
 Creative DIY Ideas That Will Take Your Home To The Next Level ▶9
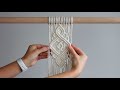 DIY Macrame Tutorial - Intermediate Pattern #2 Using Double Half Hitch Knots!
 DIY | macrame curtain back drop | 마크라메 커튼 백 드롭
 Macrame curtain #3 / How to make a Macrame curtain / step by step / easy even if you are a beginner
 The Easiest Macrame Wall Hanging | Mini Macrame Tutorial for Total Beginners
 DIY | macrame wall hanging | 마크라메 월 행잉
 20 Pattern Elements for your macrame projects (PART 2) / How to weave it
![[Eng sub] DIY Macrame wall hanging #5 / 마크라메 월행잉 #5](https://i.ytimg.com/vi/5MqWaOCmwqo/default.jpg) [Eng sub] DIY Macrame wall hanging #5 / 마크라메 월행잉 #5
[Eng sub] DIY Macrame wall hanging #5 / 마크라메 월행잉 #5