Curbless Shower Installation Wood Subfloor | Part 1
Installing a curbless shower over a wood substrate is a lot easier now than in years past. Topical waterproofing and foam pans make the installation a lot faster and there’s practically no notching of the floor joists involved. In fact there are many sizes of foam pans available that require zero notching if you use a 1/4” underlayment outside the shower. This particular job did require notching the joists down about 3/8” which isn’t enough to worry about added deflection.
The first thing you’ll want to do is cut out the subfloor where your barrier free shower is to be installed. Once that is out of the way the next step is to install 2x4 along each side of the floor joists. You will need to add up the heights of your shower pan and subfloor thickness then deduct the thickness of the underlayment outside the shower to know how far down to install the 2x4. It’s better to error slightly deep than too high on the pan.
Once your 2x4 has been installed, cut strips of plywood to go between each run of floor joists. The plywood does have to be fully supported, so you may have to add additional floor joists or blocking as necessary. Our job was very accessible, so we added two more floor joists on each side of the pan. The new joists do have to be installed so that each end is resting on a beam or support.
Our next video will show you how to install the underlayment outside the shower and get the shower pan ready to install. Be sure to watch for Part 2 coming up.
https://www.ejflooring.com
https://www.facebook.com/ejflooring
https://www.instagram.com/ejflooring
Видео Curbless Shower Installation Wood Subfloor | Part 1 канала EJ Flooring & Custom Tile Installation
Показать
Комментарии отсутствуют
Информация о видео
14 апреля 2019 г. 23:18:02
00:12:53
Другие видео канала
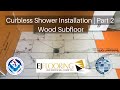 Curbless Shower Installation Wood Subfloor | Part 2
 Curbless Shower Installation Wood Subfloor | Part 3
 How to Recess a Floor for a Curbless Shower with the Schluter®-Shower System
 How to waterproof your shower installation with the Schluter®-KERDI-SHOWER-KIT Complete Kit
 Curbless Showers LEVEL ENTRY SHOWER SYSTEM Installation Video
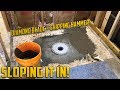 Installing a Curbless Shower on a Concrete Slab
 Schluter Curbless Shower Installation Tips (Full Length Linear Drain!)
 VIM Products, Inc Level Entry Shower System™ Installation
 Universal Infinity Drain Linear Drain Installation Video - Traditional Waterproofing
 Schluter®-KERDI-DRAIN Installation with No Access to Plumbing
 How to install Schluter®-KERDI-SHOWER Trays
 How to Mortar Shower Pan. HardieBacker on plywood floor. Bathroom Remodeling. Part 16.
 How to Tile a Bathroom Floor...Next to Curbless Showers -- by Home Repair Tutor
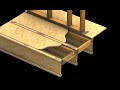 HOW TO LOWER A SUBFLOOR: EBBE SUBFLOOR RECESS KIT *$79.99* INSTALLATION BARRIER FREE SHOWER
 Curbless Shower Pan Planning: Schluter Curbless Shower (Part 1)
 WHAT is this, and WHY do you want it under your floors?
 Curbless shower entry
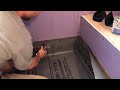 Easy Shower Pan Liner: Tile Coach Episode 9
 Building a Curbless Shower - Framing and Plumbing ---Grandpa Bath Episode 3
 KERDI-BOARD Installation: Schluter Curbless Shower (Part 2)