Creative effects with real iron and copper
Creative effects with real iron and copper
TIME STAMPS (Skip through sections or watch again)
PRINTS (now available)
https://www.dantirels.co.uk/shop/vg4x25a7r84tgiipter8jo7g9p2l8v
0:00 Canvas panels. I'm working on these small ready primed panels 5" x 7"
0:22 Masking tape. This is to form a structure for the iron layer, protecting areas of the canvas that you want to keep free. A tip is to keep this simple, tear or cut the tape, use a mix of thin pieces and larger sections.
2:12 PVA glue. This is to enable the iron powder to stick to the canvas, don't use too much or you will overload the iron. I have found this to be the best kind of glue to work with although you could experiment. Use a brush to achieve a flat finish.
2:51 Iron powder. This is 100% genuine iron powder, used by for casting by model makers and sculptors. You will find this for sale online (try Ebay ) Spread over the wet glue so everything is covered, tap off the excess and repeat until all the glued sections are covered with a fine layer of iron. Take care with this, read the label carefully DO NOT BREATH IN. (always wear a mask if you can)
3:52 Remove the masking tape. Do this before the glue has dried or you will remove some of the iron layer. Repeat this process for all the panels.
4:27 Stencils. Try experimenting with a pattern, you could just paint this on by hand or use a cut stencil like the one used here.
9:00 The finished iron layer. This is the first stage completed. Although I am using the small panels here for this demo, this will work very well on a larger scale. I would always recommend to practice on these small panels to begin with.
9:38 Wax crayon. To add some interest draw over the canvas with a white wax crayon or you could try using a candle.
10:16 Hydrogen Peroxide. This is used to begin the oxidation process of the iron. I use a 12% strength here and this was bought on ebay. Take care and always use in a well ventilated room or outside if possible. I transfer this into a spray bottle so you can produce a fine mist. Get the bottles on ebay or Amazon, they are very useful for this and other projects. Lightly spray over the surface of each panel.
10:59 Salt water. Mix table or sea salt with warm water to form a strong salt solution. Spray this over the panels and you will now begin to see the oxidation process begin to take place, this does not take very long.
11:55 White vinegar. A spray of this will really speed up the process, don't use too much.
15:45 The oxidation of the iron. The six panels have begun the dramatic transformation, the rusting will continue until all the liquid has dried
16:00 Liver of Sulphur. Use this to change the colour of the iron, you can paint it on with a brush or draw direct from the tube to make these blackish lines which will gradually change. This chemical can be diluted with water to vary the colour produced. Add it to the plastic spray bottle for more coverage when working on a larger scale.
17:18 Cutting the templates. Using a thick piece of card, begin to make a mask that will protect the areas from the application of copper. Keep the design simple and work with the previous iron layer as a guide.
19:32 The finished templates. The designs reveal the areas that will be coated with the copper.
20:42 Copper powder. Always use 100% copper powder, this can be expensive but you will not use large quantities for this process. You can use the same method as the iron layer and apply a coat of PVA glue first or try this method combining the powder with an acrylic base (from culturehustle.com ) or medium and mixing into a thin paste. Add a little water if it needs to be thinner. Apply with a brush making sure to cover those areas not protected with the mask. Allow to dry then paint another layer if needed.
23:43 The finished copper application.
24:20 Copper patination.
You will find this here on EBAY https://www.ebay.co.uk/itm/133412988503
or from AMAZON https://amzn.to/3vzgZMg
This fluid can be applied with a brush and diluted to vary the strength of colour. The changes will happen immediately and continue for the next few hours, add more for a stronger colour.
27:34 THE FINISHED PANELS
All materials used for this demo can easily be found on Ebay.
100% Iron powder
100% Copper powder
Always take care when using these and take precautions with ventilation.
Hydrogen Peroxide
White Vinegar
Salt (mix with water)
Copper patination fluid (dilute with water)
Liver of sulphur (this adds patination to iron)
Acrylic base (from culturehustle.com) or use acrylic medium.
PVA glue
Canvas panels 5" × 7"
Small brush, masking tape
Wax crayon (white) or use candle
Small spray bottles for liquid
Paper and scissors for the masks
MUSIC from YouTube audio library
Mono printing booklet now available from the website. A FREE mono print will be included with each order while stocks are available.
https://www.dantirels.co.uk/shop
Видео Creative effects with real iron and copper канала Dan Tirels
Показать
Комментарии отсутствуют
Информация о видео
Другие видео канала
 Easy Monoprinting techniques with oil paint and simple abstracts
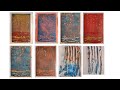 Printmaking demo/Monotype-Creating multiple art works at once using foam board and block print inks.
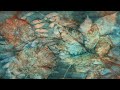 Sprayed leaf Prints Stack Hack - Inspired by Susan T. Brown And Jibid Neary - THT
 Creative effects with real iron powder on a large canvas
 Mono-printing inspired by Paul Klee with Glue gun, Tin Foil and oil stick
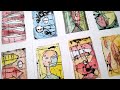 How to create Paul Klee inspired mono-prints from recycled materials
 Multi Colour monoprints with templates
 Monoprinting with multiple layers
 Monoprinting with stencils : Abstract figures
 Framing artwork on a budget
 Mono-printing techniques with fast drying alkyd oil paint
 Photo Transfers Monoprinting with Your Gel Plate
 Acrylic and charcoal sketch on canvas panel
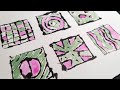 Inspired by.......Andy Warhol Blotted line technique
 Dan Tirels Monoprinting with 3 types of recycled plastic
 Monoprinting on stretched canvas primed with radiator paint ? (improvised art materials)
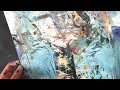 Monoprinting : Creative layers and textures with fast drying oil paint
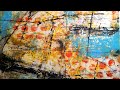 Mono-prints from my dogs old pool ? Recycling art projects
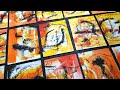 Making expressive marks with wax, dye, oil stick and paint.