Quilt As You Go: Borders
Click "Join" to get access to memberships and special perks:
https://www.youtube.com/channel/UCL-l...
Find Nancy's books, patterns and notions at www.OnPoint-TV.com or Fireside Quilts.com
Nancy is completing the Quilt As You Go series, Block by Block with this tutorial. Her Learning To Quilt book (available at https://www.onpoint-tv.com/shop/) takes you through all the techniques used for the blocks. She also used Beth Donaldson's Block by Block book (out of print but available on Ebay or online bookstores).
In this tutorial, Nancy is using a book by Marti Michell called, Machine Quilting in Sections, to help with adding the borders to the quilt. The book is available at a quilt shops and online.
Nancy first shares some different quilted tile blocks she has done. You can find a free download of one of the quilted tiles designs in the https://www.onpoint-tv.com/shop/. Hopefully this tile will help you design your own additional blocks.
Nancy has four QAYG blocks sewn together, appliquilted and quilted. She is ready to add the borders. Complete the quilting on all the sashings and cornerstones before adding borders.
Make your large borders ahead of time by cutting or tearing your backing fabric the length of grain. Then cut batting the same size as the border but a half of an inch smaller on one of the long sides. Attach the batting to the backing using fusible tape (Heat Press Batting Together or Marti's Choice Fusible Tape by Marti Michell). Place this border with the batting side down on your work surface and the backing fabric up. Now take the quilt top and lay it on top so both backing fabrics are together. Add an inner border on top (optional). Pin everything together adding a pin about every two inches. Sew a quarter of an inch seam allowance (not a scant quarter of an inch due to all the bulk that needs to be sewn and it is a little too narrow when sewing everything together). Using a walking foot, sew one back stitch to secure and continue sewing over the needles. Go slowly. Use an 80 or 90 needle to handle the thickness. Hold the back and the front of the quilt while it goes through the machine. Have enough space behind your sewing machine for the quilt to rest as you sew. Finish with a back stitch to lock the end of sewing in place.
Nancy takes the quilt back to her cutting table and shows how the large border with the fusible tape is sewn to the small inner border. As she lays it out flat, the smaller inner border has the quilt batting from the large border behind it with less bulk. She flips out the inner border and presses it with her iron. She has an outer border to add. Again pin the same way with a pin in about every two inches. Sew, flip over and press in place. Add your large borders all the way around the quilt. Quilt the borders. Finish with a binding (https://tinyurl.com/y2rrcg3u).
Thank you for watching! Share with your friends. Subscribe if you have't already-thank you! if you have. Click on the bell to receive a notification when a new video is posted. We appreciate all the support! Leave questions and comments below. Email Nancy at quiltingwithnancy@gmail.com if you would like her to come and teach at your quilt guild or with your questions.
New to quilt making? Start from the beginning with Nancy's "Learning to Quilt" series right here on Youtube. Visit our website to purchase patterns, companion lessons, ebook or a hardcopy print of Nancy's book! Find them all at www.onpoint-tv.com/shop
Visit our website: http://www.onpoint-tv.com
Like us on Facebook https://www.facebook.com/OnPointCrafts/
Follow us on Instagram: onpoint_tv
Thank you for watching!
Видео Quilt As You Go: Borders канала OnPoint-TV and Quilting with Nancy
Показать
Комментарии отсутствуют
Информация о видео
26 октября 2019 г. 18:13:29
00:20:37
Другие видео канала
 How to Quilt As You Go: Easy Borders by Monica Poole
 Quilt As You Go: Review & Basting
 OnPoint Tutorials, Tips and Tours Ep. 203: Borders, Borders, Borders
 Great Basics 5: Borders
 QUILT AS YOU GO: QUILTING AND ATTACHING BORDERS WITH SASHING
 Adding Borders Quilt As You Go - Part #5 - Ep #7
 HELP!! Borders??? EASIEST FANCY BORDERS FOR ANY QUILT!!!
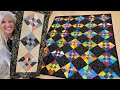 Donna's New "Mix & Match" Quilt! *************FREE PATTERN*************
 Q&A - All Things Quilting
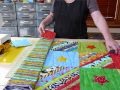 How to prepare Borders for a Quilt as you Go quilt - Quilting Tips & Techniques 073
 Quilt As You Go: Assembling the Blocks
 FINISH YOUR QUILTS! How to - BORDERS, BACKING, BINDING, QUILTING - For ANY Quilt Top!!
 Quilt as You Go-Stitch & Flip Log Cabin
 My Mother's Flower Garden Quilt
 Free Motion Machine Quilting Borders
 Half Square Triangle Techniques - Tranquil Stars Part 1
 OnPoint Tutorials, Tips, and Tours Ep. 204: Borders, Borders, Borders II
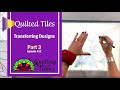 Quilted Tiles Transferring Design - OnPoint TV Ep. 412:
 How to Quilt As You Go: Machine Sewn Binding and Scallop Edging by Monica Poole