Comic Book Text Effect - Photoshop Tutorial
This is a beginner-level tutorial for creating a comic book text effect in Photoshop. The first part of the video will concentrate on creating a fun background for the text to sit on, while the second half will focus on creating the text effect itself. Once created, the text will remain fully editable, meaning you can change the text at any time without having to recreate the entire effect.
Also, since the effect is created using ONLY layer styles, you can save the layer style for use elsewhere.
If you found this tutorial helpful, please subscribe and share.
►RESOURCE LINKS◄
Font used - Obelix Pro (http://www.dafont.com/obelixpro.font)
►FULL INSTRUCTIONS◄
Create a new document 3840 x 2160 @ 150DPI
***Creating the Background Elements***
Fill the background with a light blue color (3c93dd), unlock the layer and rename the layer “Background”.
Now, create a halftone pattern.
1. Set your colors to default B&W (D) and then switch the colors (X) so that white is your foreground color and black is the background color.
2. Create a new layer (Ctrl + Alt + Shift +N) and name it “Halftone”
3. Select your Gradient tool (G), set the gradient to foreground/background (the first gradient choice), Gradient Type=Radial, and draw a gradient from the center of the image to the outermost edge
4. Go to Filter - Pixelate - Color Halftone
a. Max Radius 30, everything else 0
b. Change layer blend mode to “Overlay” and Opacity to 50%
Now for the Burst.
1. Create a new layer and name it “Burst”
2. Select the Polygon tool (U).
3. Click once anywhere in the image to bring up the Create Polygon dialogue box and fill it out as follows
a. Width=3000, Height=1500, # sides=20, Smooth corners=UNCHECKED, Star=CHECKED, Indent sides=90%, Smooth Indents=CHECKED
4. Center the burst and resize it to fill most of the screen
5. Apply an Inner Glow to the burst layer
a. Blend Mode=Normal, Opacity=100%, Noise=0, Color=Black (000000)
b. Technique=Softer, Edge=CHECKED, Choke=100%, Size=28
c. Contour=Smooth, Anti-Aliased=Unchecked, Range=100, Jitter=0
d. Set the layer’s FILL OPACITY to 75%
Select all three layers and group them together (Ctrl + G). Name this group “Background Elements”
***Creating the Text***
I’m using ObelixPro Regular, but any comic-ish font will do.
Create a new layer outside your Background Elements group (Ctrl + Alt + Shift +N).
Select your text tool (T) and type in your text, making the font large enough to fill most of the burst. Now is the time to alter any spacing issues you may have between the letters by placing your text tool in between the letters and using (Alt + Left/Right Arrow)
Now apply the layer styles to the text layer:
1. Stroke, with special gradient
a. Size=4, Position=Center, Blend Mode=Normal, Opacity=90, Overprint=CHECKED.
b. Gradient, Black color (000000), Opacity=100% at the 25% marker, Opacity=0% at the 30% marker, Opacity=0% at the 70% marker, Opacity 100% at the 75% marker
c. Gradient Style=Linear, Align with Layer=CHECKED, Angle=94, Dither=UNCHECKED, Scale=100%
2. Inner Shadow 1 with “Ring” contour
a. Black color (000000)
b. Blend Mode=Normal, Opacity=100%, Angle=163, Global Light=UNCHECKED, Distance=3, Choke=100%, Size=3
c. Contour=Ring Double, Anti-aliased=UNCHECKED, Noise=100%
3. Inner Shadow 2 with “Ring” contour
a. Black color (000000)
b. Blend Mode=Normal, Opacity=100%, Angle=22, Global Light=UNCHECKED, Distance=2, Choke=100%, Size=1
c. Contour=Ring Double, Anti-aliased=UNCHECKED, Noise=100%
4. Gradient Overlay with custom color gradient
a. Blend Mode=Normal, Dither=UNCHECKED, Opacity=100%
b. Gradient = Gold (ffb20a) to Red (ff1e00), Reverse=UNCHECKED
c. Style=Linear, Align with Layer=CHECKED, Angle=90, Scale=100%
5. Drop Shadow 1 White
a. White color (FFFFFF)
b. Blend Mode=Normal, Opacity=100%, Angle=90, Global Light=UNCHECKED, Distance=10, Spread=100%, Size=16
c. Contour=Linear, Anti-aliased=UNCHECKED, Noise=0%
d. Layer Knocks out Drop Shadow=UNCHECKED
6. Drop Shadow 2 Black
a. Black color (000000)
b. Blend Mode=Normal, Opacity=100%, Angle=90, Global Light=UNCHECKED, Distance=46, Spread=100%, Size=59
c. Contour=Linear, Anti-aliased=UNCHECKED, Noise=0%
d. Layer Knocks out Drop Shadow=UNCHECKED
Finishing touch is a slight warp to the text using the “Warp Text” tool. Make a subtle arch of +15%.
Видео Comic Book Text Effect - Photoshop Tutorial канала Pixel Magic
Показать
Комментарии отсутствуют
Информация о видео
Другие видео канала
 Photoshop: Create Your Own Comic Book, Pop Art Text Bubble!
 How to make Broke 3D Text effect in Adobe Photoshop | TAGALOG TUTORIAL
 How to Make a Comic Book Cartoon Effect From a Photo — Photoshop Tutorial
 Retro Halftone Effects in Photoshop!
 Photoshop Tutorial: Supertext
 Illustrator Basics: Halftones - 3 ways to create halftones
![BOOM! 💥 Photoshop Cartoon Comic Book Style 🦸 Text Effect [16]](https://i.ytimg.com/vi/iKIQOM_UkP0/default.jpg) BOOM! 💥 Photoshop Cartoon Comic Book Style 🦸 Text Effect [16]
BOOM! 💥 Photoshop Cartoon Comic Book Style 🦸 Text Effect [16]![Photoshop Halftone Print Effect Tutorial [w/BLKMARKET Inklab]](https://i.ytimg.com/vi/GEqfgur2BOU/default.jpg) Photoshop Halftone Print Effect Tutorial [w/BLKMARKET Inklab]
Photoshop Halftone Print Effect Tutorial [w/BLKMARKET Inklab] Paint Hair like a Pro (Digital Painting)
 Chocolate Social Media Banner Design Tutorial | Web Banner Design In Photoshop Designhob
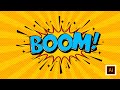 Comic Book Text Effect in Illustrator
 Glowing Neon Light Text Effect in Photoshop
 How to Create a Cartoon Gradient Text Effect in Photoshop
 Photoshop: How to Transform a Photo into a Pop Art, Cartoon Effect!
![Create a Photoreal Sink Hole [ AE + Cinema4D + Octane ]](https://i.ytimg.com/vi/QA_z3ZcDCvk/default.jpg) Create a Photoreal Sink Hole [ AE + Cinema4D + Octane ]
Create a Photoreal Sink Hole [ AE + Cinema4D + Octane ] 10 Photoshop Features Every Graphic Designer Should Know
 Photoshop || 3D Retro Text Effect
 Turn a photo into an illustration! The comic style halftone effect in Photoshop 2021
 Photoshop Tutorial: How to Put a Face and Name onto Paper MONEY
 Retro COMIC BOOK Effect From a Photo - Cartoon DRAWING Photoshop Tutorial