Rusted Old Pocket Knife Multi-Tools - Restoration | Workshop DC
#WorkshopDC #Restoration #PocketKnife #ASMR
Rusted Old Pocket Knife Multi-Tools - Restoration | Workshop DC
Hi! How are you doing?!
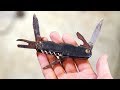
In this video you will see a Rusted Old Pocket Knife Multi-Tools being restored.
I found this pocket in a fair for 1$ and didnt have a brand mark. It's not a Swizz one.
I started this restoration showing you all the body and the surfaces, it was very rusted and oxidized, i barely can open some parts with my fingers to show up how they are looking.
There is only one part of the cover, and a plastic stick that i don't know for what it was made.
For disassemble I use my bench Vise and a minigrinder to grind the hold pins.
After that i took off all pieces with a help of my screwdriver, some parts are kinda stuck but it wasin't had to disassemble, i also show you how was all parts.
Now is time to restore this pretty, so i use a scotch brite disk that i make for this project, all parts were brushed, it works very well.
Some parts needed to be filed to rid off deep rust marks, again all parts were filed job.
I sand some parts with 280G to make a better and shiny finish after polished.
I polished all Iron parts.
The blade i sharpened with a oil stone.
Now All Stainless parts were done.
Time to make a body cover. I made a draw to copy the old one in a wood piece, yeah, the body cover will be made in wood. After that i cut with a handsaw the parts that left over and sand all to give a form to the wood.
I make the fit of the stainless body with a help of my minigrinder, that part took me 3 hour to be done and in some areas the wood burns. I test the body cover and it fits very good.
I stain the Cover body with red and varnish matte.
I replaced all the pins and polish the Plastic Stick.
And now i Started to Assemble!
I put piece by piece of stainless body parts together with the pins and hammered then to hold everything.
Now i glued the wood Cover with contact glue and press it for 10 hours, after that i put the Plastic Stick in his place.
And it Done! A perfect restoration!
0:00 Welcome!
0:10 Showing the Object
1:00 Disassemble
2:12 Rust Inside
4:58 All parts disassembled
5:45 Brushing time!
6:25 All clean
6:46 Smothing Rust marks
7:30 Sanding
7:44 Polishing
8:10 Shapening the Blade
8:56 Making a new Cover Body
11:15 Stains the Wood
11:35 Apling the varnish
12:36 New Pins!
12:38 All Ready to Assemble
13:09 Assemble!
15:40 Gluing the Wood Cover Body
16:40 Puting the Plastic Stick
16:51 Before and After!
17:50 Thanks for Watching!
Protection Equipments:
- Gloves;
- Goggles;
- Hearing Protection;
- Mask;
Products Used:
- Wood Stains;
- Wood varnish matte;
- Contact Glue;
Thanks for Watching!
And Please SUBSCRIBE! Don't forget to comment, share and leave a Like. It helps me a lot!
If you notice some english mistake please tell me in the comments, im trying to do my best to make a better content for you.
See you!
Follow me Below
My Instagram - https://www.instagram.com/workshopdcof/
My Facebook - https://www.facebook.com/workshopdcof
Видео Rusted Old Pocket Knife Multi-Tools - Restoration | Workshop DC канала Workshop DC
Rusted Old Pocket Knife Multi-Tools - Restoration | Workshop DC
Hi! How are you doing?!
In this video you will see a Rusted Old Pocket Knife Multi-Tools being restored.
I found this pocket in a fair for 1$ and didnt have a brand mark. It's not a Swizz one.
I started this restoration showing you all the body and the surfaces, it was very rusted and oxidized, i barely can open some parts with my fingers to show up how they are looking.
There is only one part of the cover, and a plastic stick that i don't know for what it was made.
For disassemble I use my bench Vise and a minigrinder to grind the hold pins.
After that i took off all pieces with a help of my screwdriver, some parts are kinda stuck but it wasin't had to disassemble, i also show you how was all parts.
Now is time to restore this pretty, so i use a scotch brite disk that i make for this project, all parts were brushed, it works very well.
Some parts needed to be filed to rid off deep rust marks, again all parts were filed job.
I sand some parts with 280G to make a better and shiny finish after polished.
I polished all Iron parts.
The blade i sharpened with a oil stone.
Now All Stainless parts were done.
Time to make a body cover. I made a draw to copy the old one in a wood piece, yeah, the body cover will be made in wood. After that i cut with a handsaw the parts that left over and sand all to give a form to the wood.
I make the fit of the stainless body with a help of my minigrinder, that part took me 3 hour to be done and in some areas the wood burns. I test the body cover and it fits very good.
I stain the Cover body with red and varnish matte.
I replaced all the pins and polish the Plastic Stick.
And now i Started to Assemble!
I put piece by piece of stainless body parts together with the pins and hammered then to hold everything.
Now i glued the wood Cover with contact glue and press it for 10 hours, after that i put the Plastic Stick in his place.
And it Done! A perfect restoration!
0:00 Welcome!
0:10 Showing the Object
1:00 Disassemble
2:12 Rust Inside
4:58 All parts disassembled
5:45 Brushing time!
6:25 All clean
6:46 Smothing Rust marks
7:30 Sanding
7:44 Polishing
8:10 Shapening the Blade
8:56 Making a new Cover Body
11:15 Stains the Wood
11:35 Apling the varnish
12:36 New Pins!
12:38 All Ready to Assemble
13:09 Assemble!
15:40 Gluing the Wood Cover Body
16:40 Puting the Plastic Stick
16:51 Before and After!
17:50 Thanks for Watching!
Protection Equipments:
- Gloves;
- Goggles;
- Hearing Protection;
- Mask;
Products Used:
- Wood Stains;
- Wood varnish matte;
- Contact Glue;
Thanks for Watching!
And Please SUBSCRIBE! Don't forget to comment, share and leave a Like. It helps me a lot!
If you notice some english mistake please tell me in the comments, im trying to do my best to make a better content for you.
See you!
Follow me Below
My Instagram - https://www.instagram.com/workshopdcof/
My Facebook - https://www.facebook.com/workshopdcof
Видео Rusted Old Pocket Knife Multi-Tools - Restoration | Workshop DC канала Workshop DC
Показать
Комментарии отсутствуют
Информация о видео
Другие видео канала
 Restoring old broken pocket knife - New handle from bottle caps
 Rusty Old Tin Snips - Restoration | Workshop DC
 Old Folding Pocket Knife RESTORATION - Complete Restoration
 Spinning Fishing Reel - Restoration | Workshop DC
 Vintage Rusted Pocket Knife - Restoration - WorkshopDC
 Old Adjustable Wrench - Restoration | Workshop DC
 Antique Rusted Farm Lamp - Restoration - Workshop DC
 ANTIQUE RUSTY RESTORATION - OLD AMAZING KNIFE
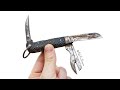 Old Rigging Pocket Knife Restoration - Sheffield England
 Extremely Rusty WW1 Pocket Knife Restoration (Haunted House Find)
 Pocket Knife Refurbishing from World War 2 | COOL RESTORATION
 Folding Knife Restoration | Pocket Knife Restoration | COMPLETE RESTORATION
 Antique Rusted Hammer - Restoration | Workshop DC
 Bowie Knife Restoration
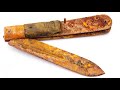 Pocket knife Restoration.
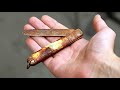 Restoring rusty old pocket knife found from fleamarket - Knife restoration
 Extreme Rusted Antique Brazilian Meat Grinder - Restoration | Workshop DC
 Stranger Antique Rusted Grinder - Do you know what kind is? Restoration | Workshop DC
 Personalized Vintage Knife Restoration
 Antique Cleaver Restoration